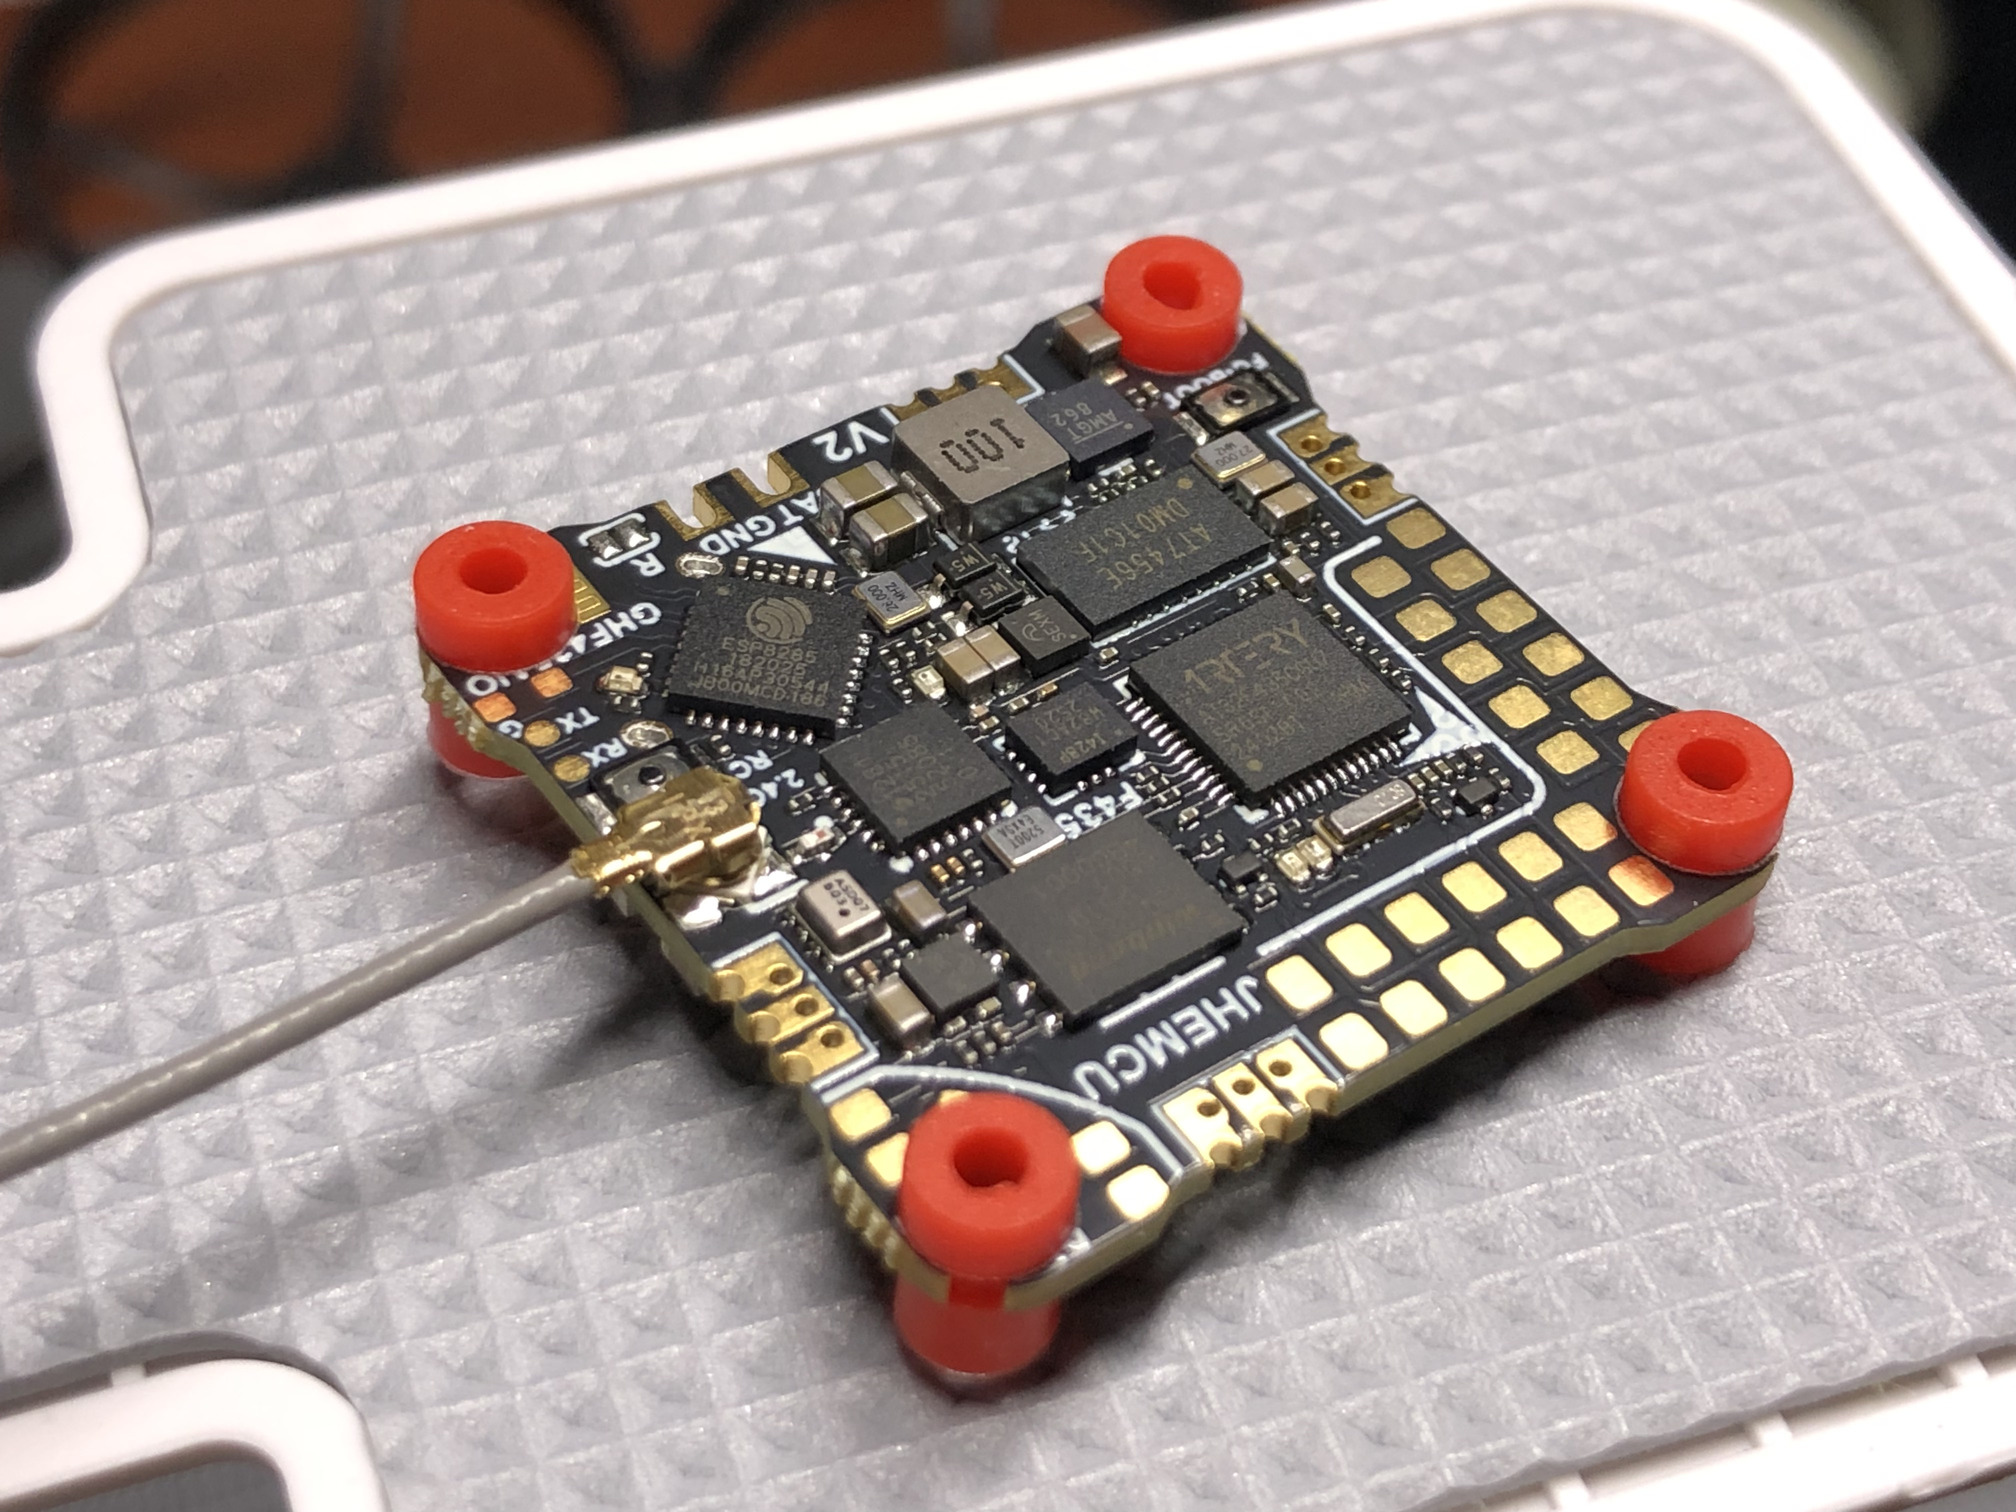
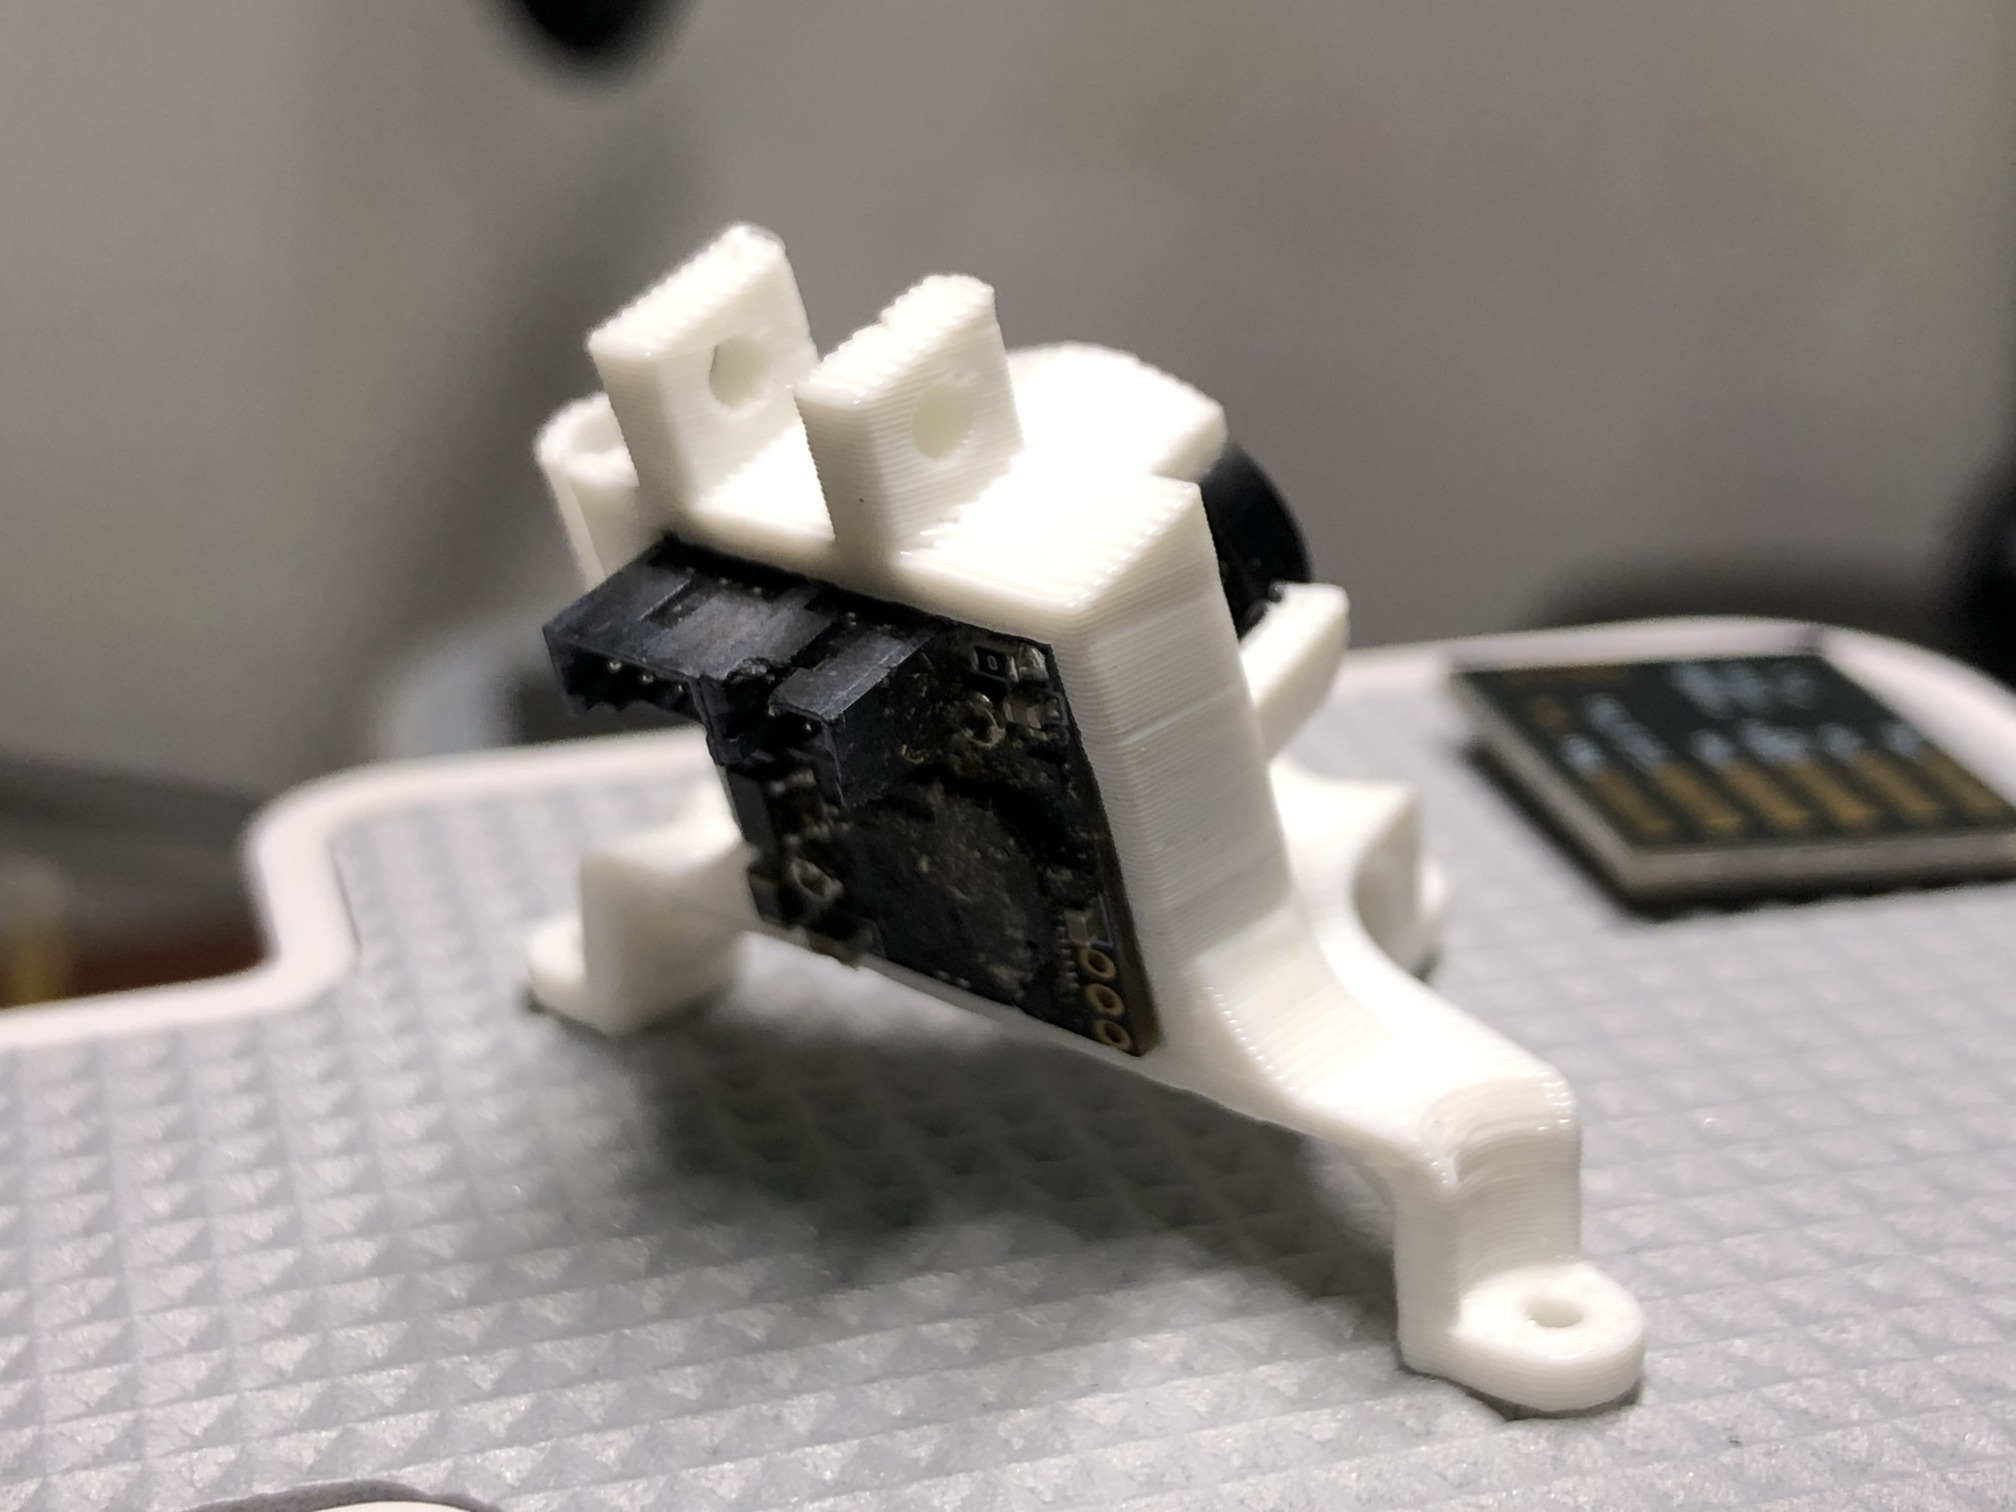
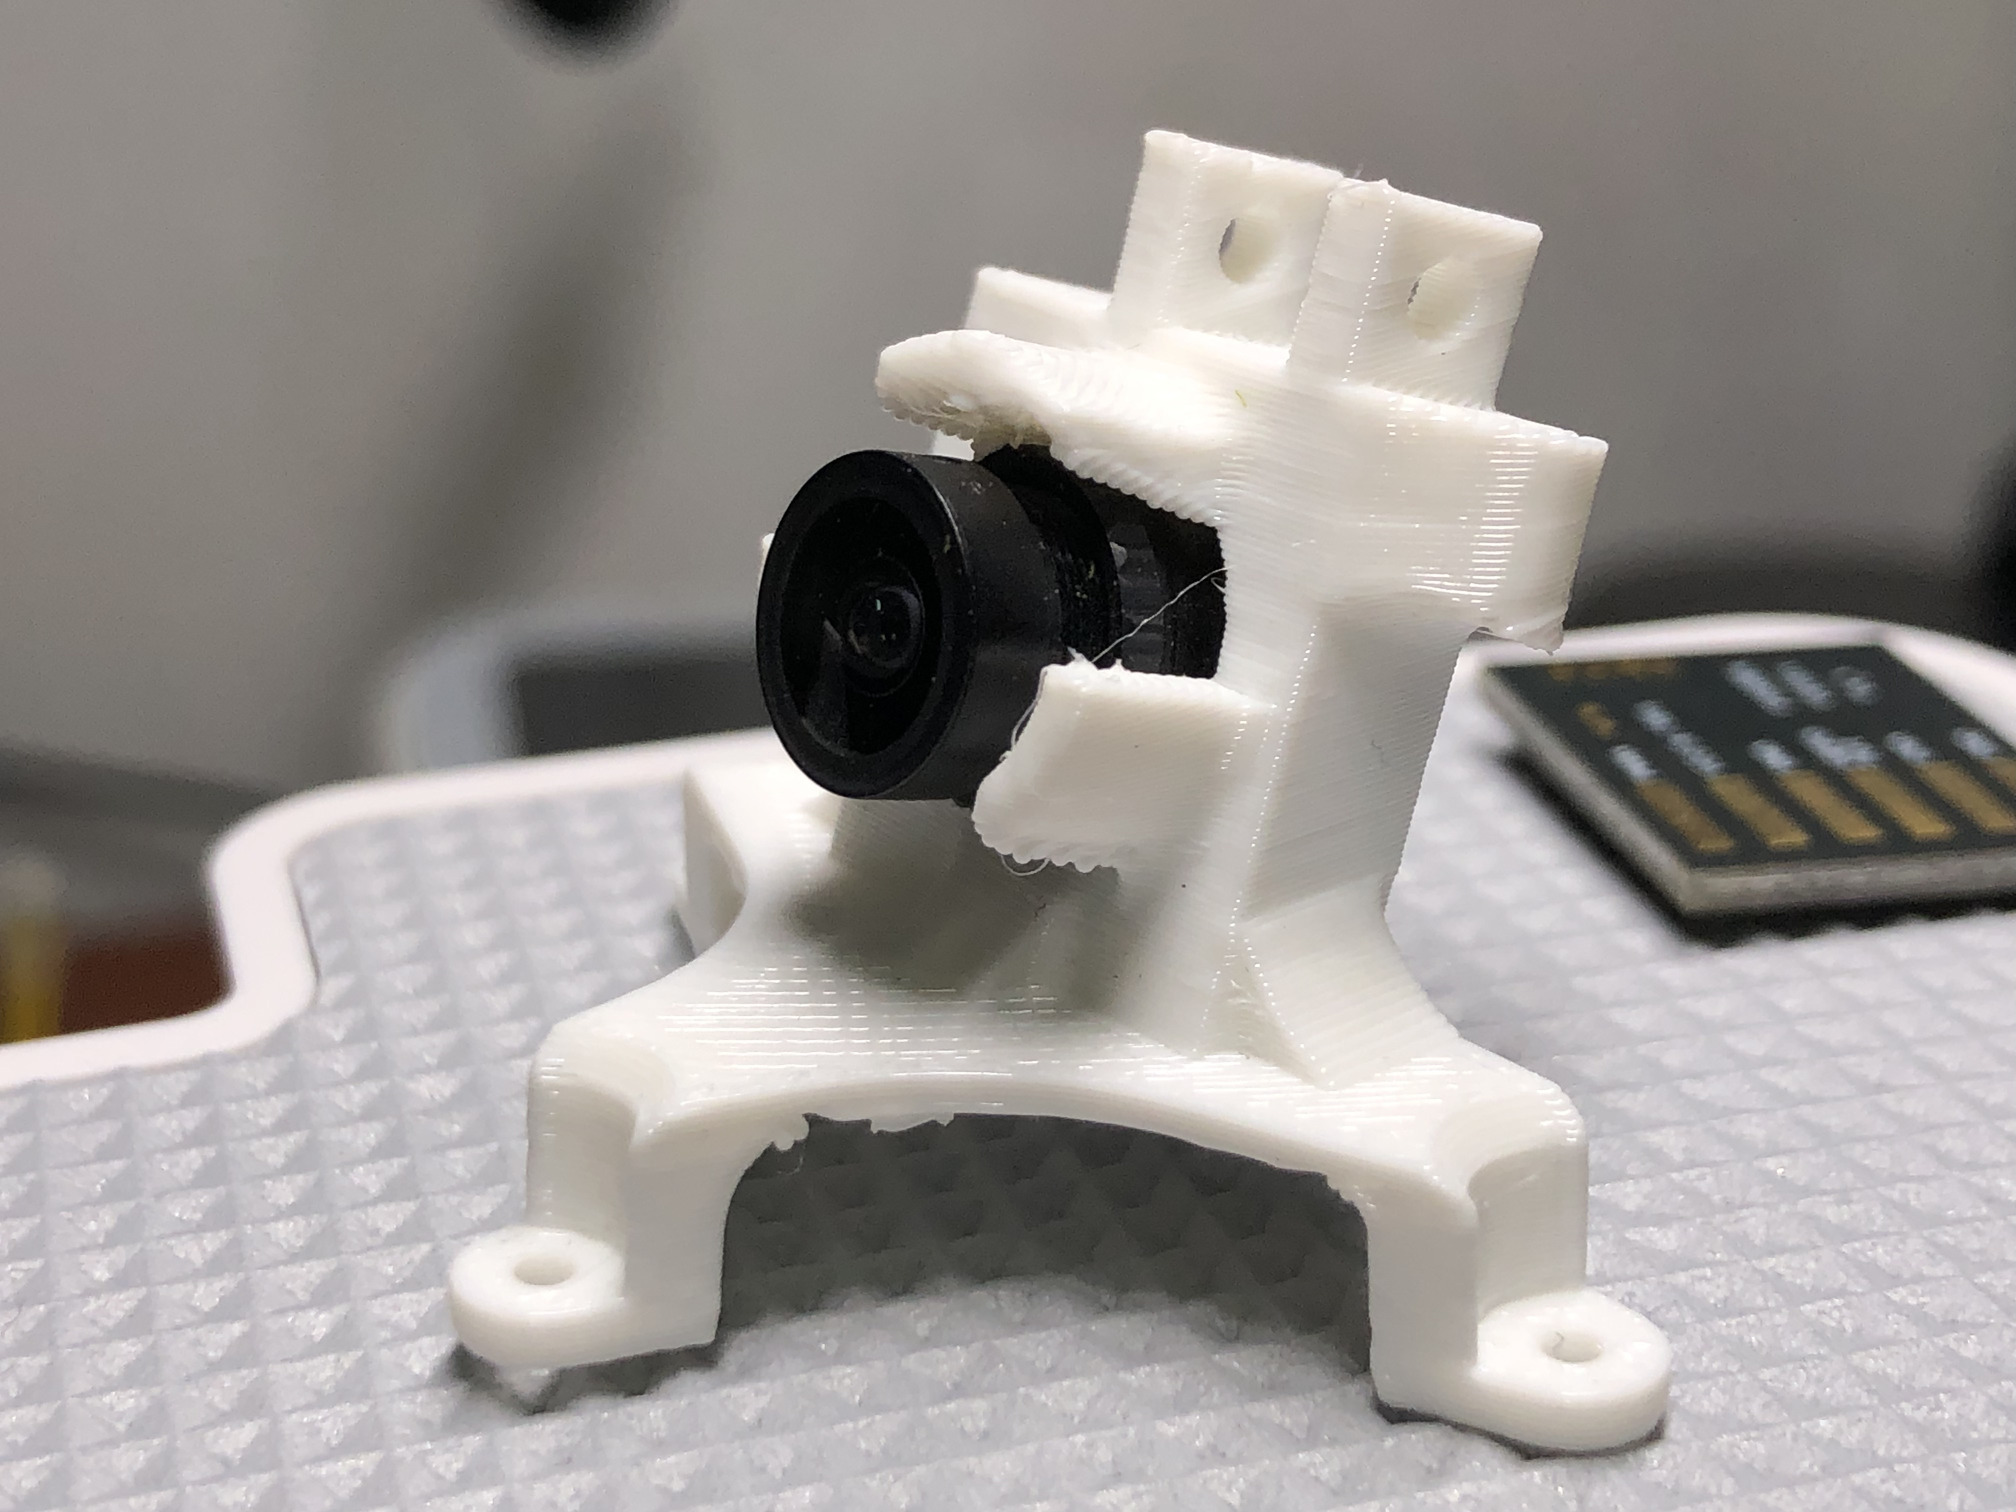
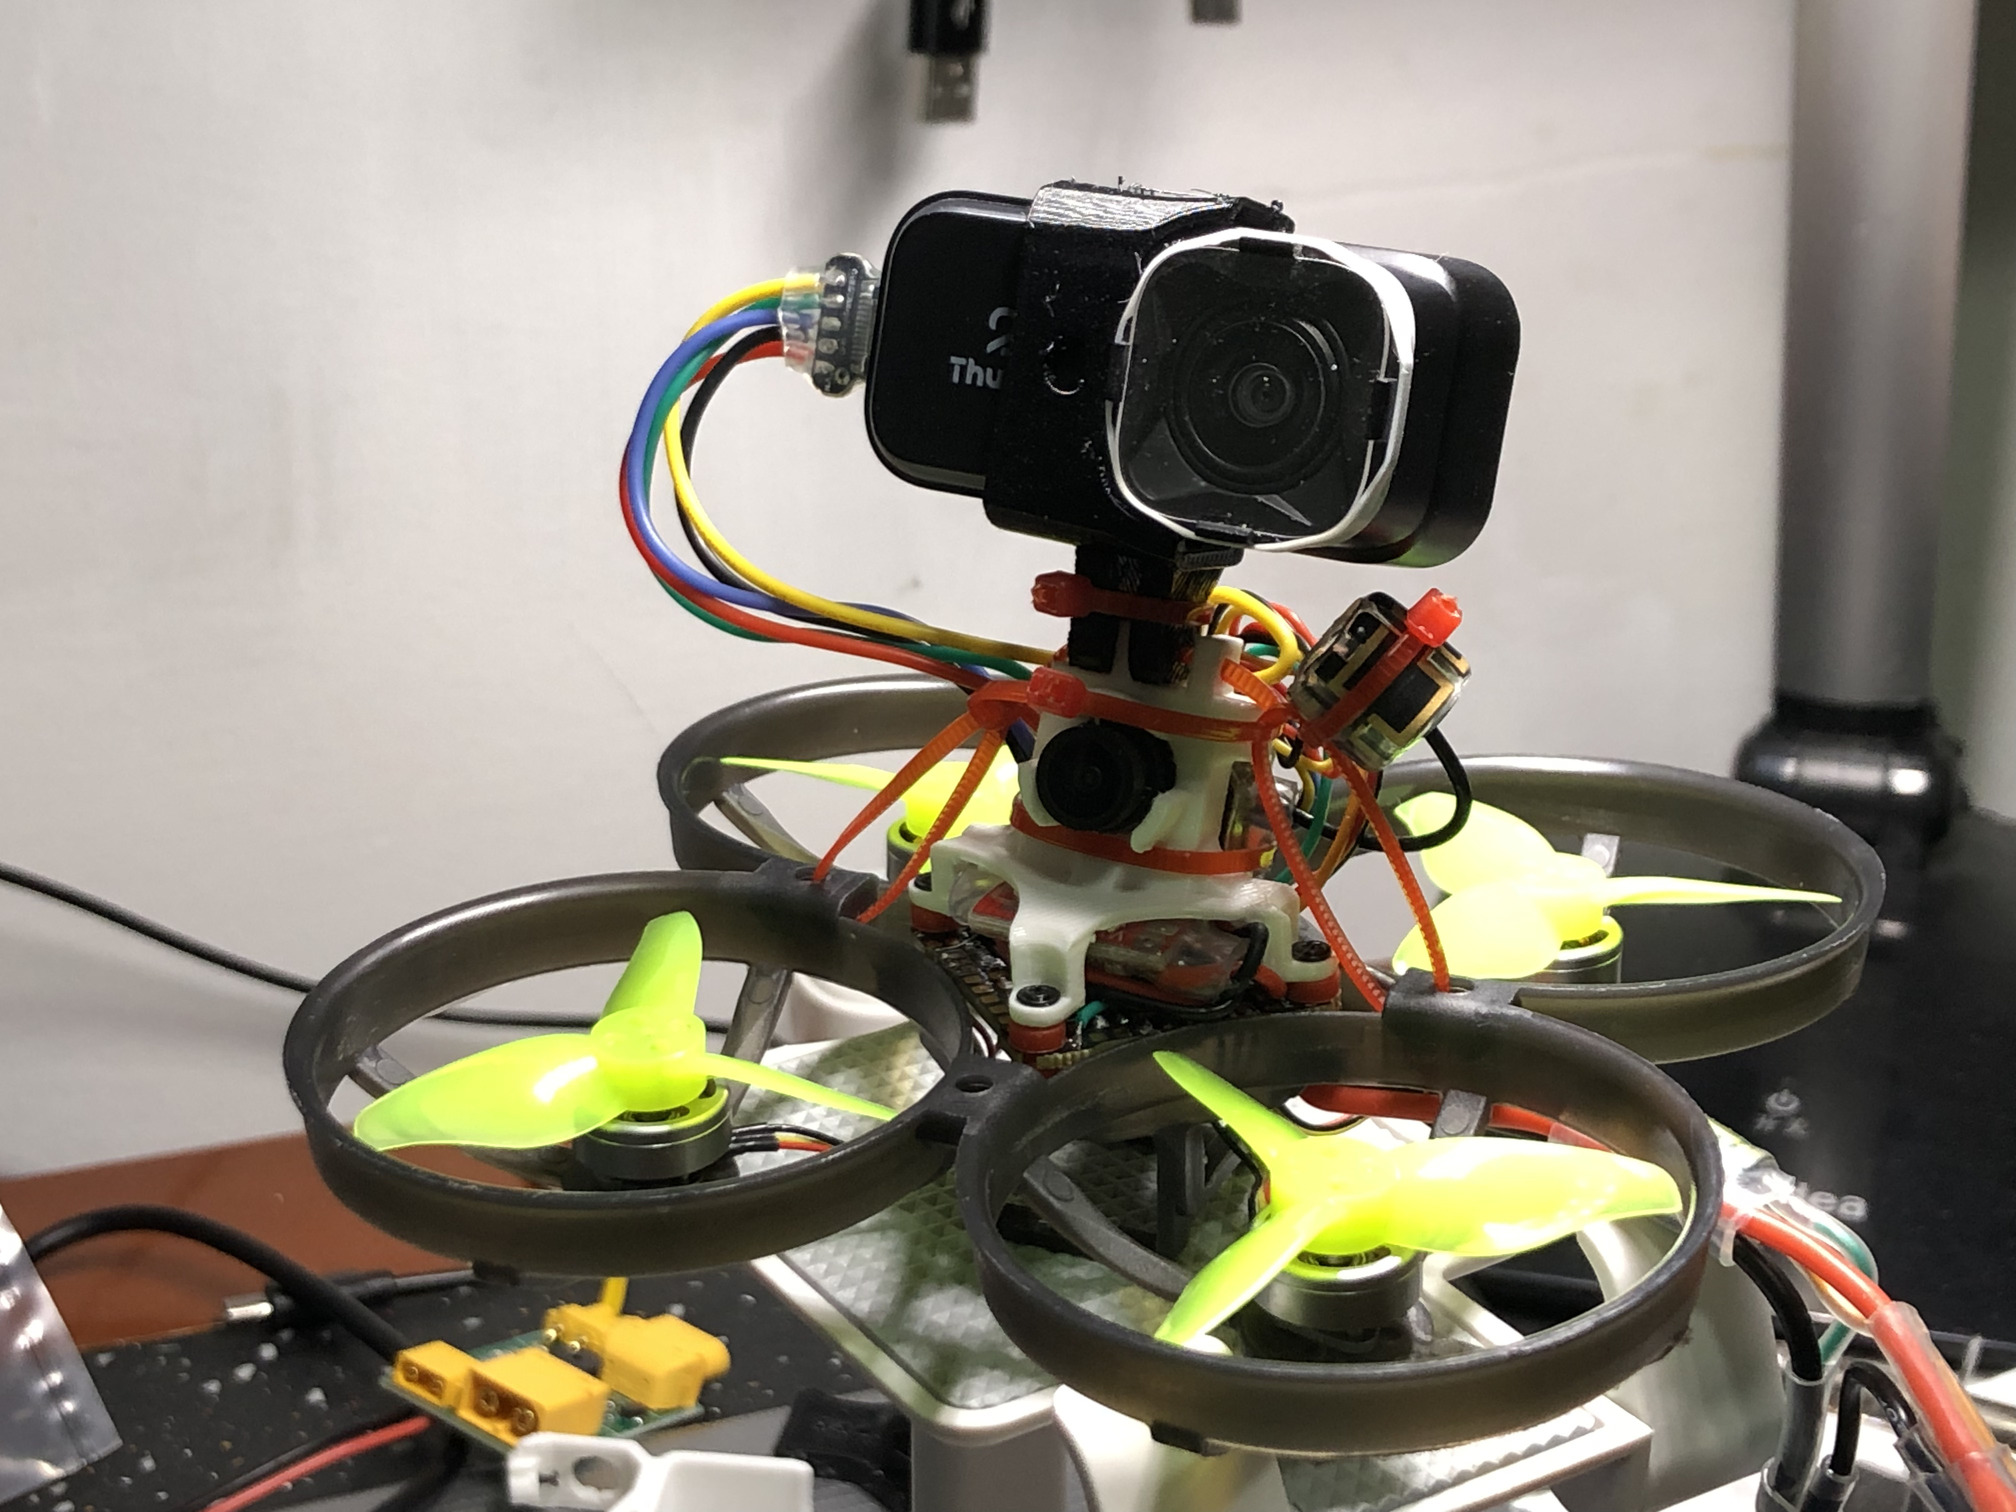
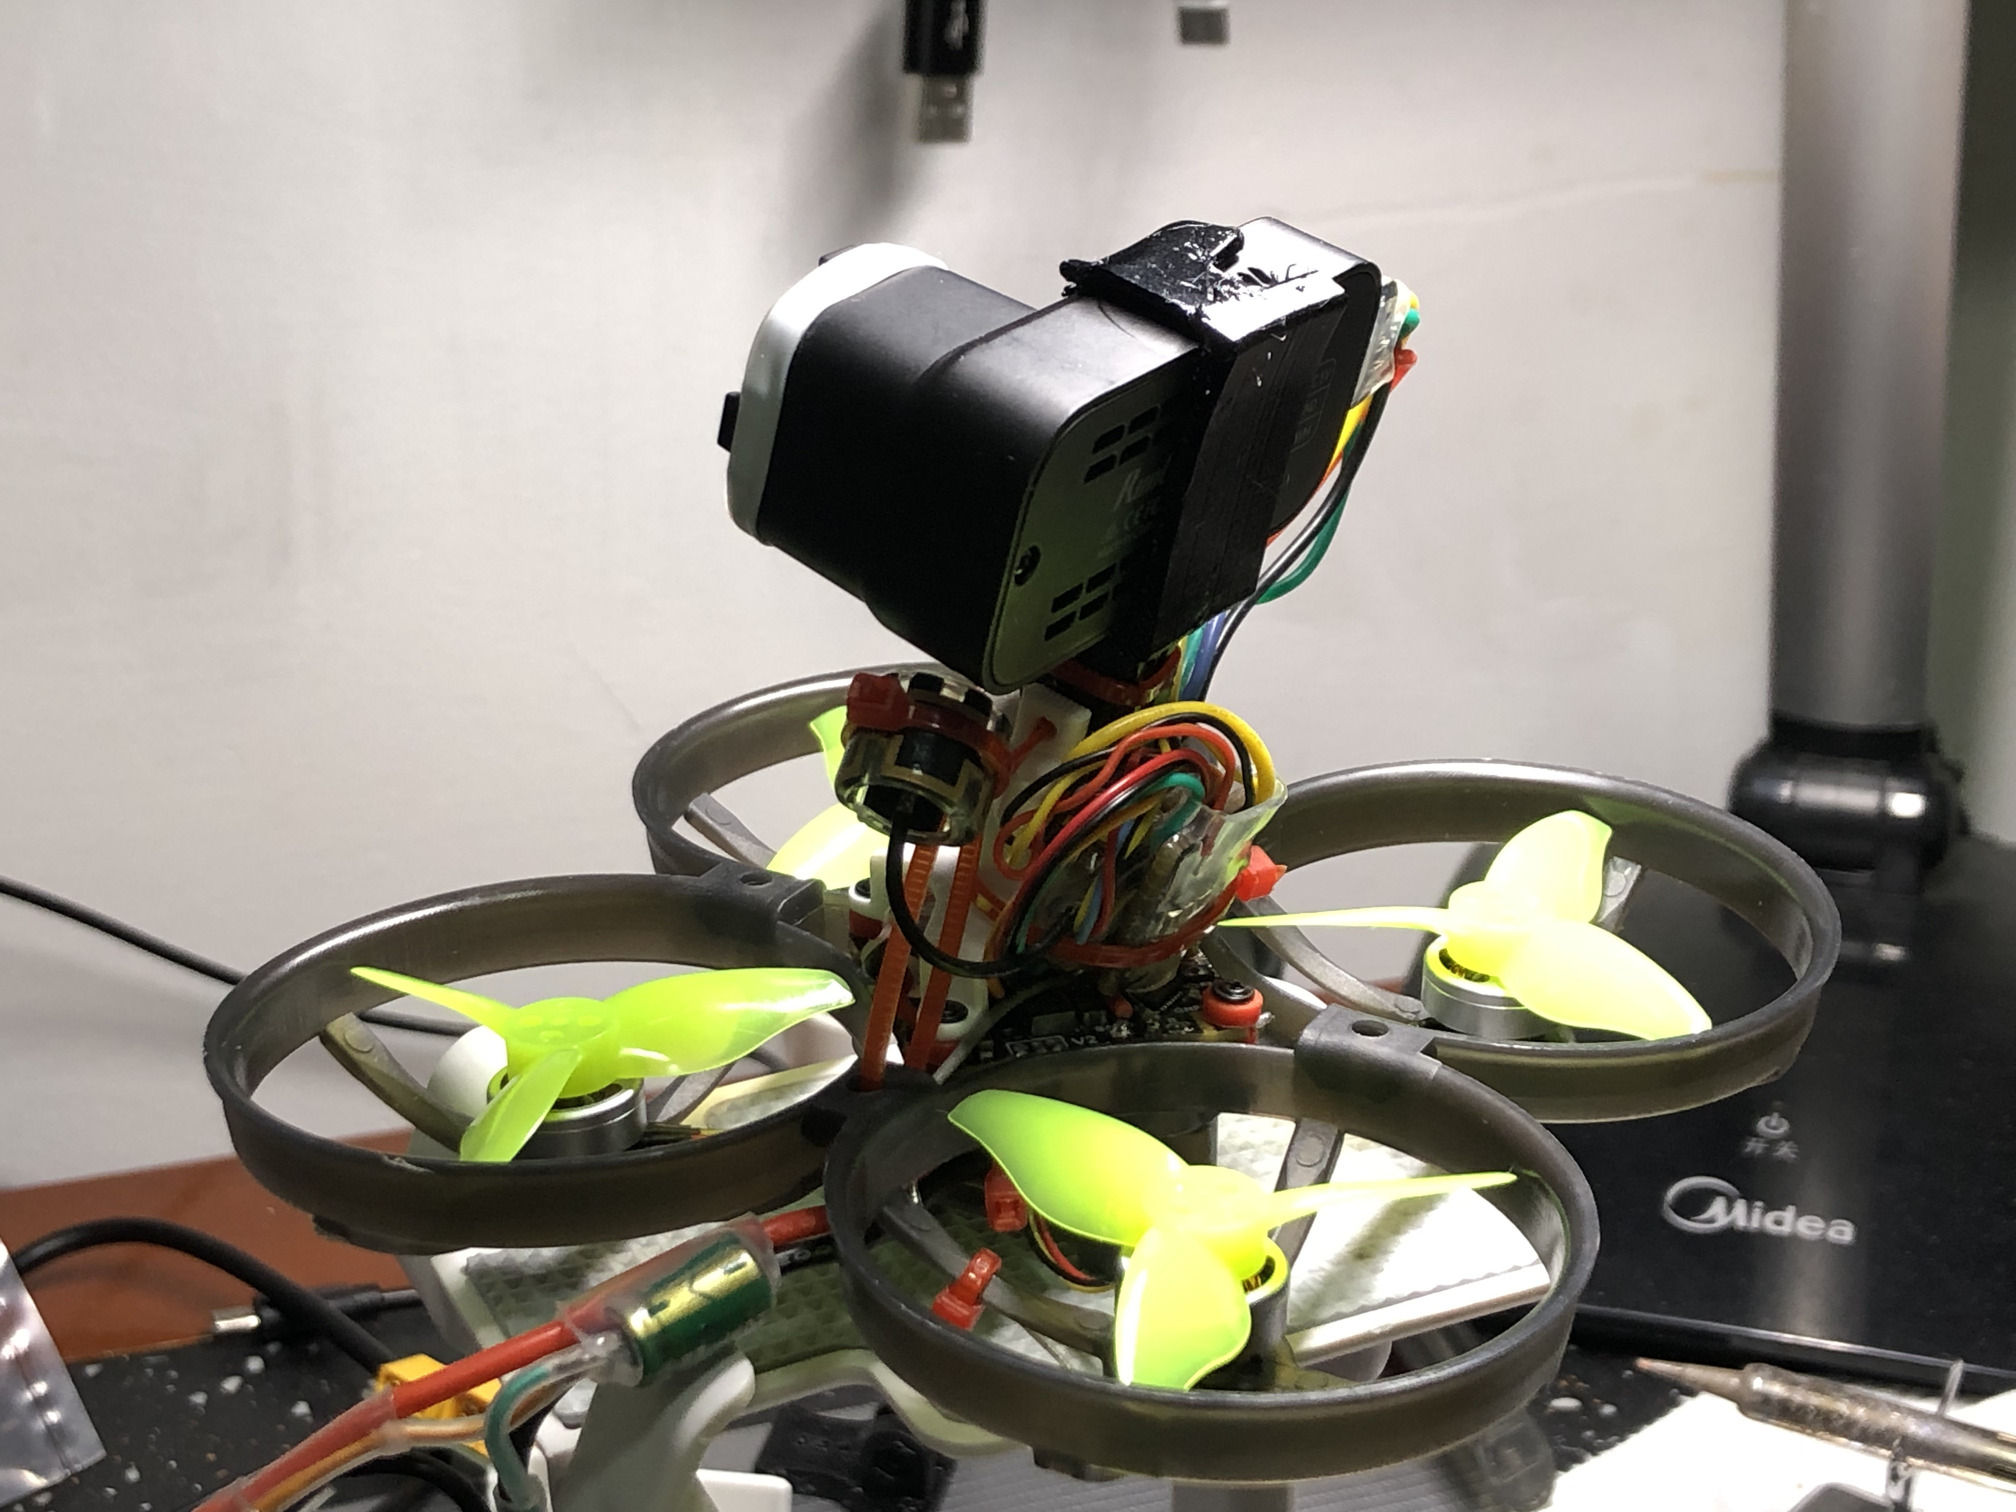
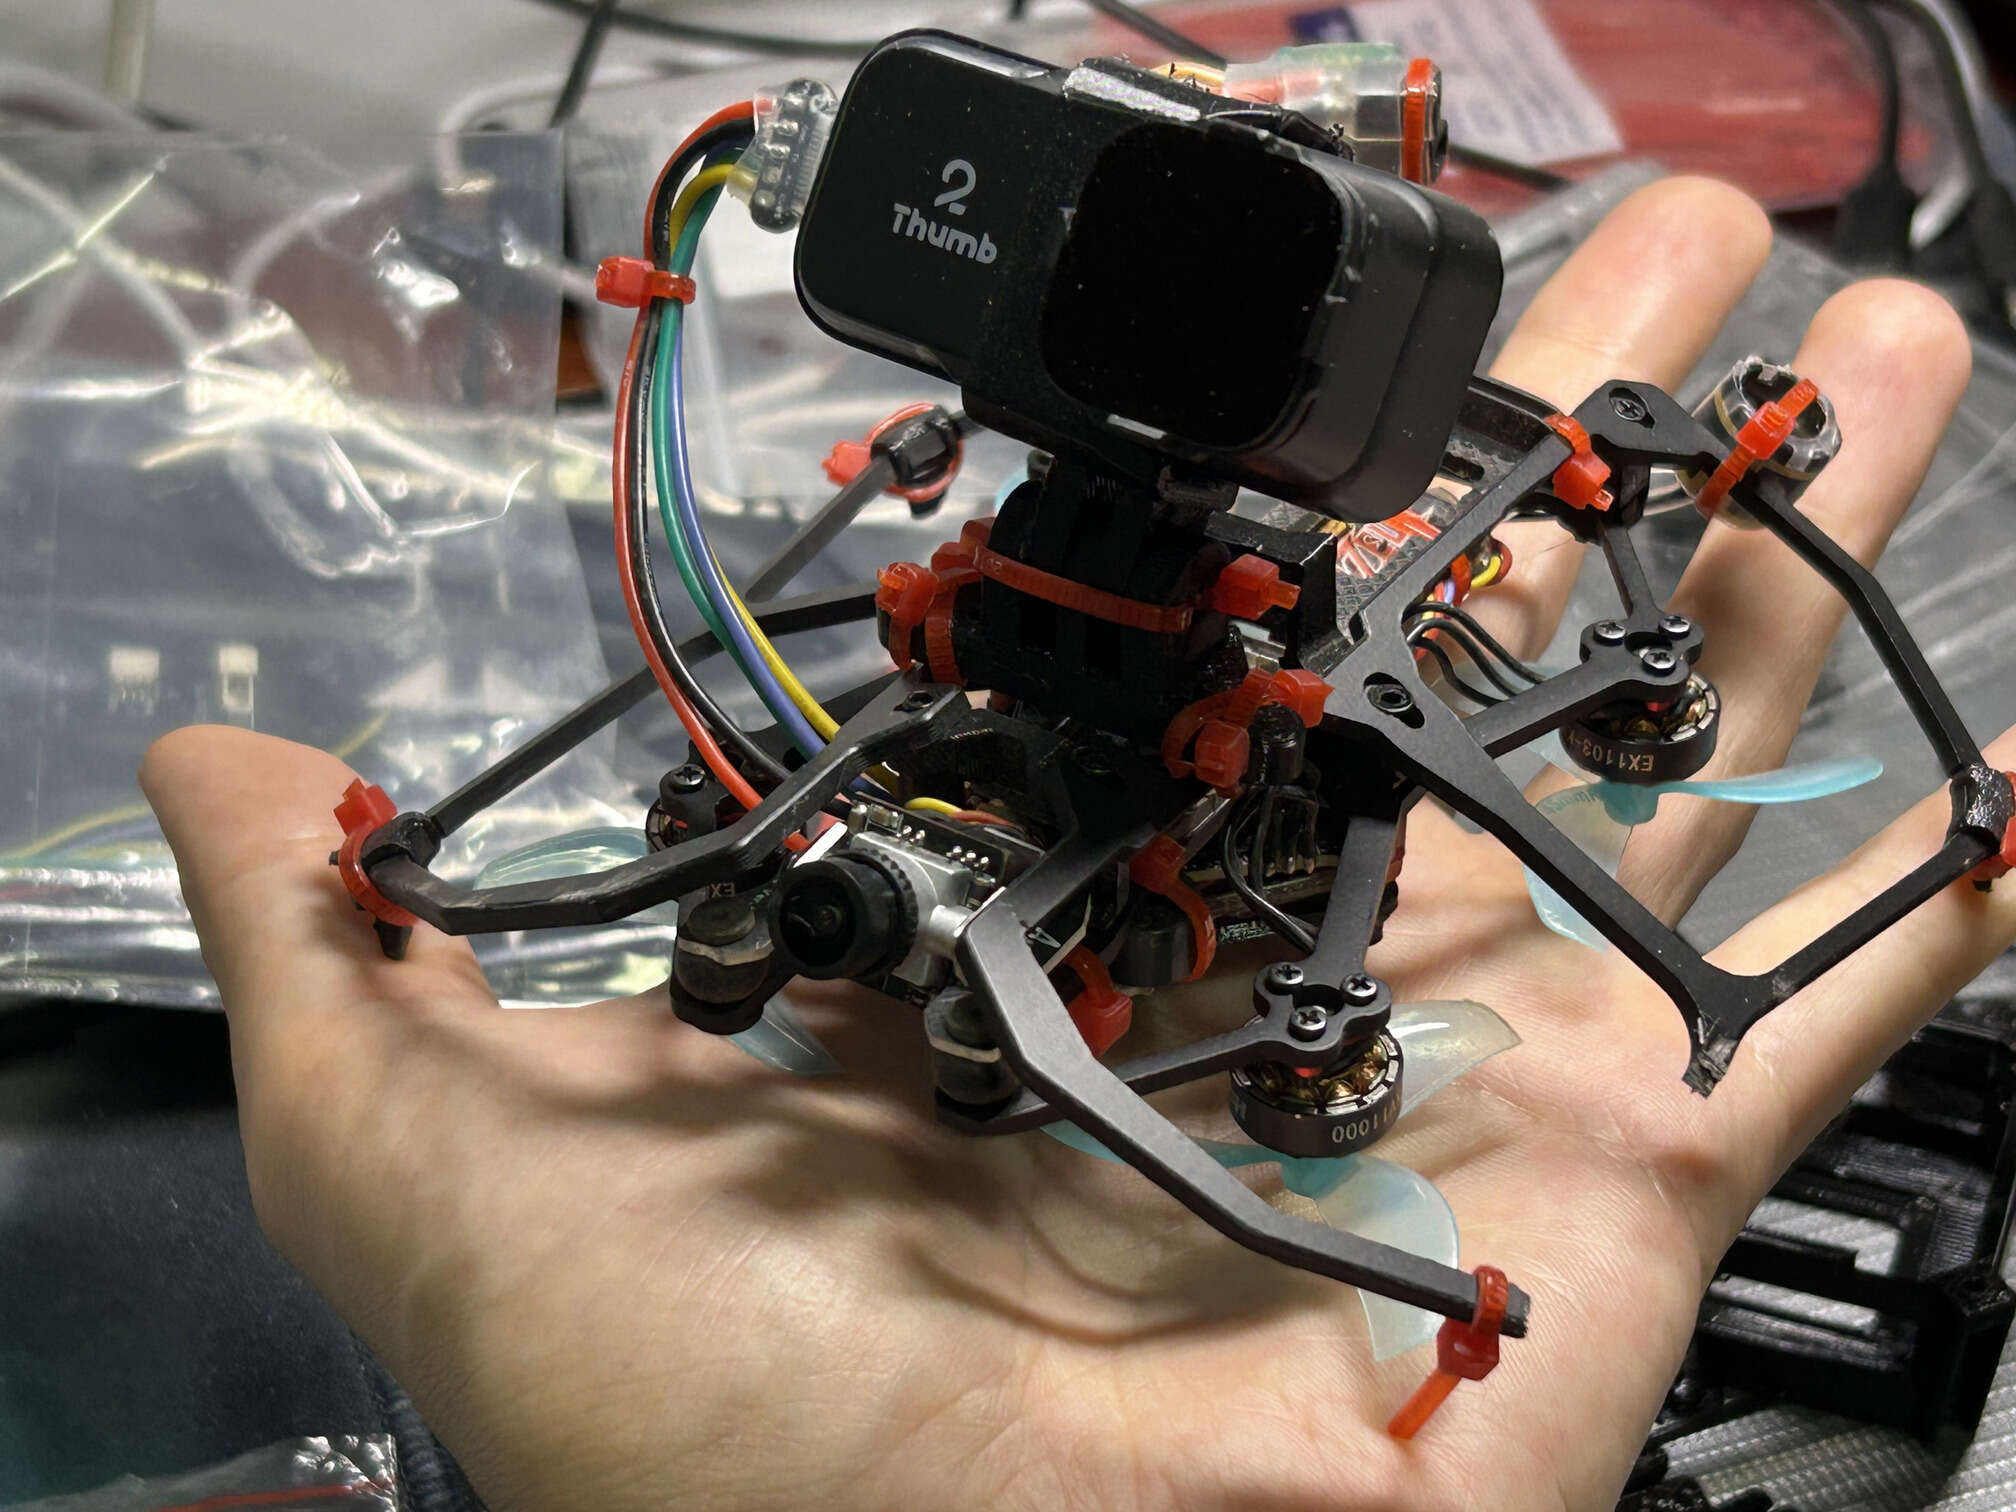
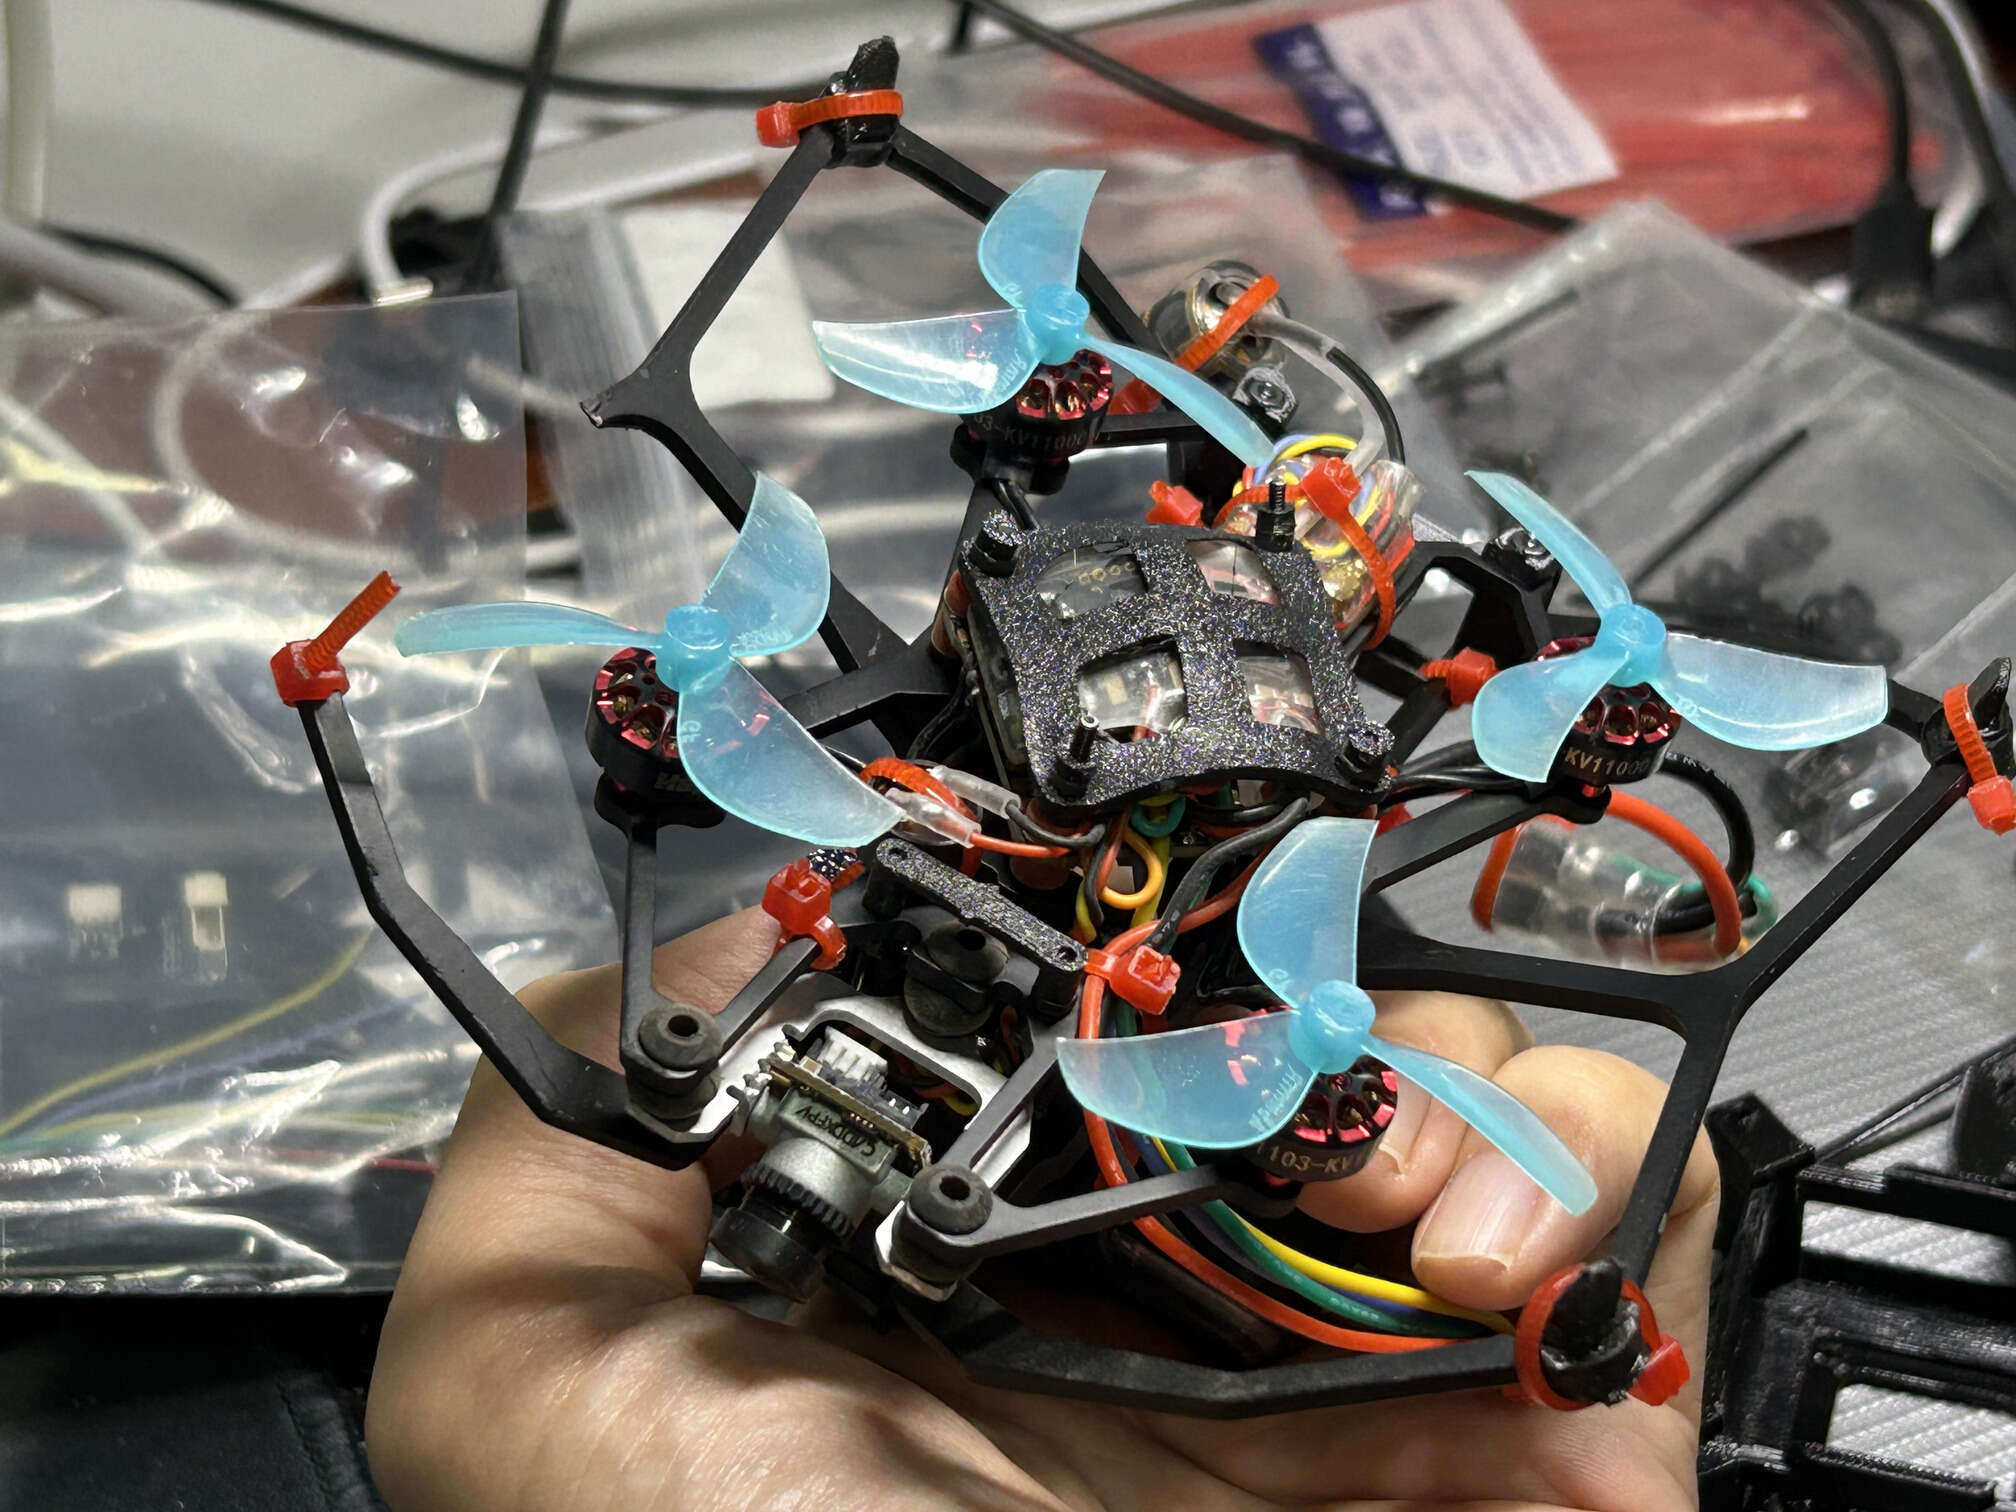
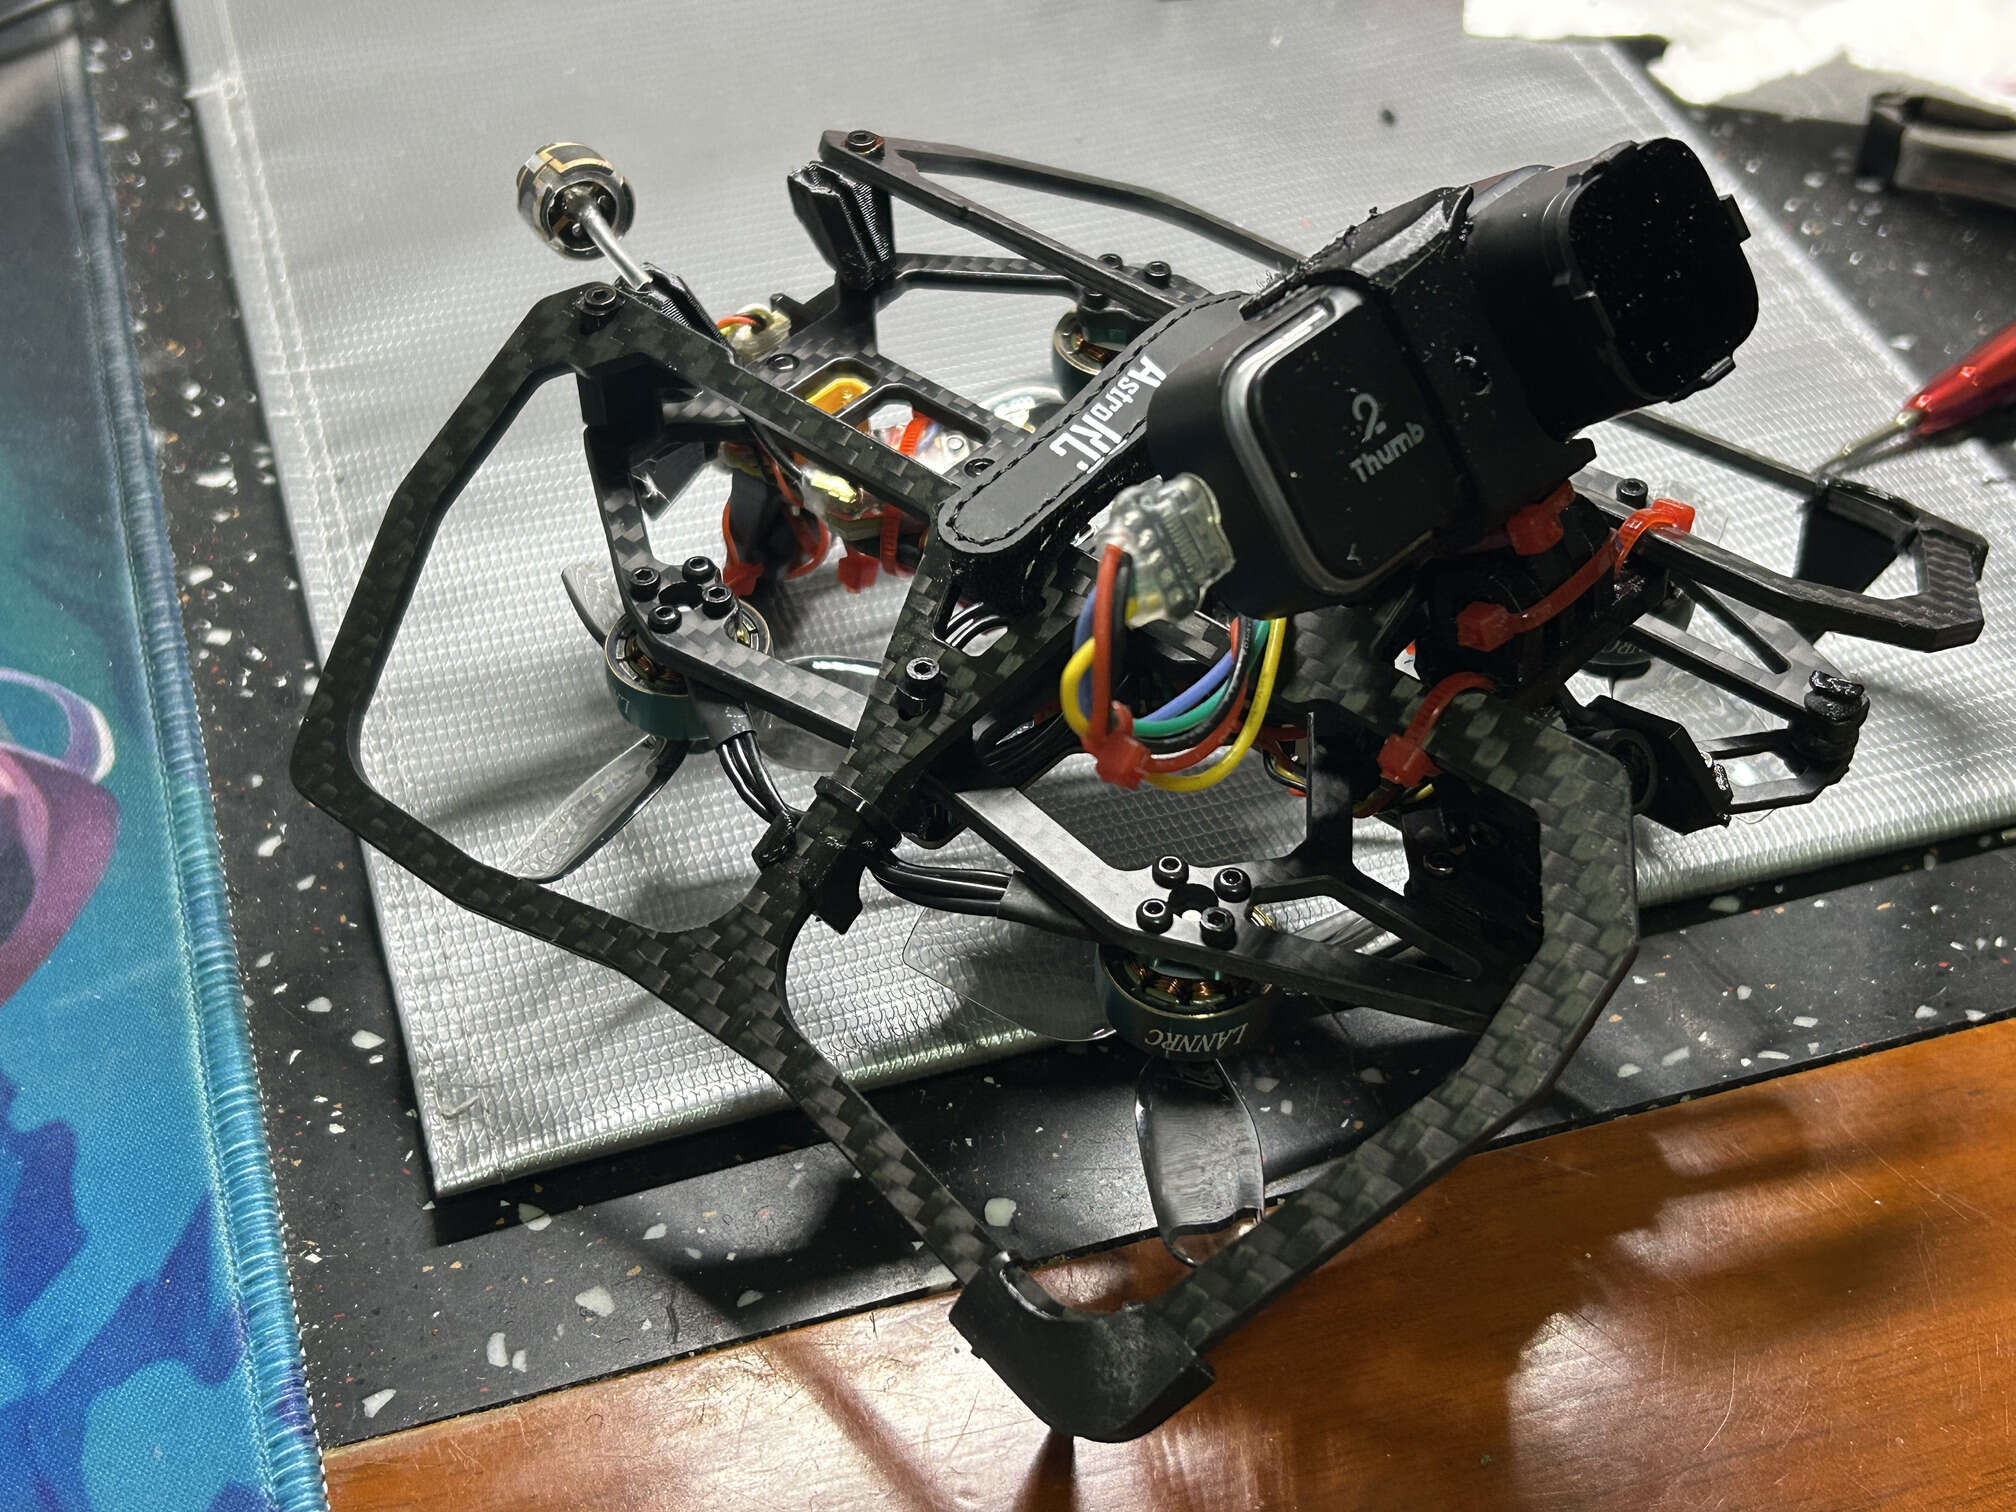
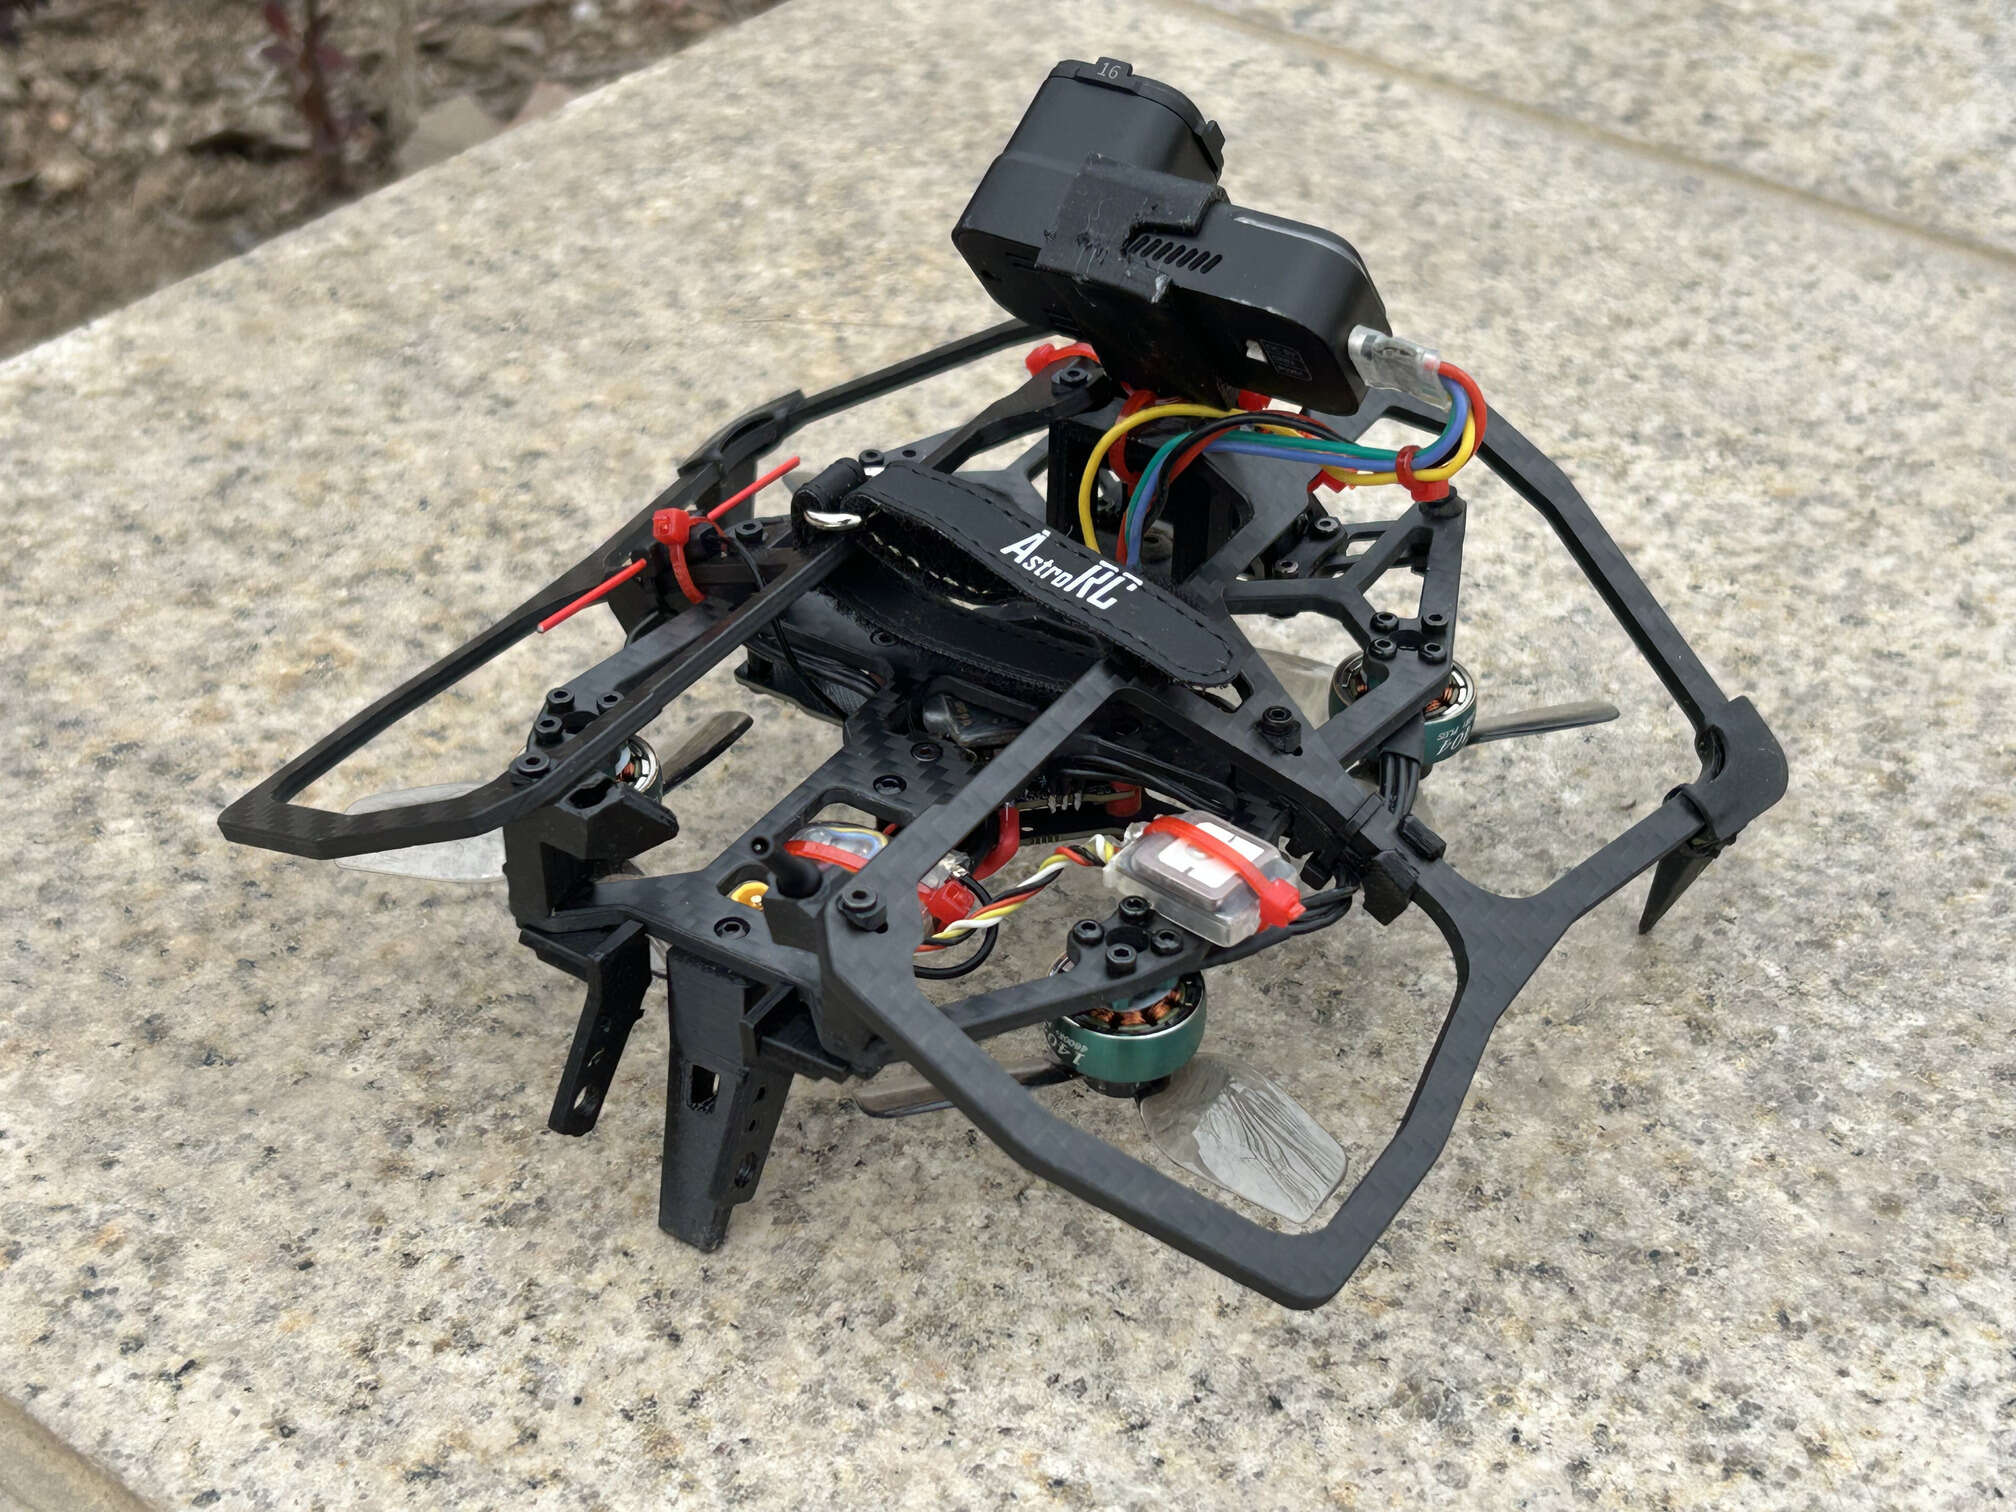
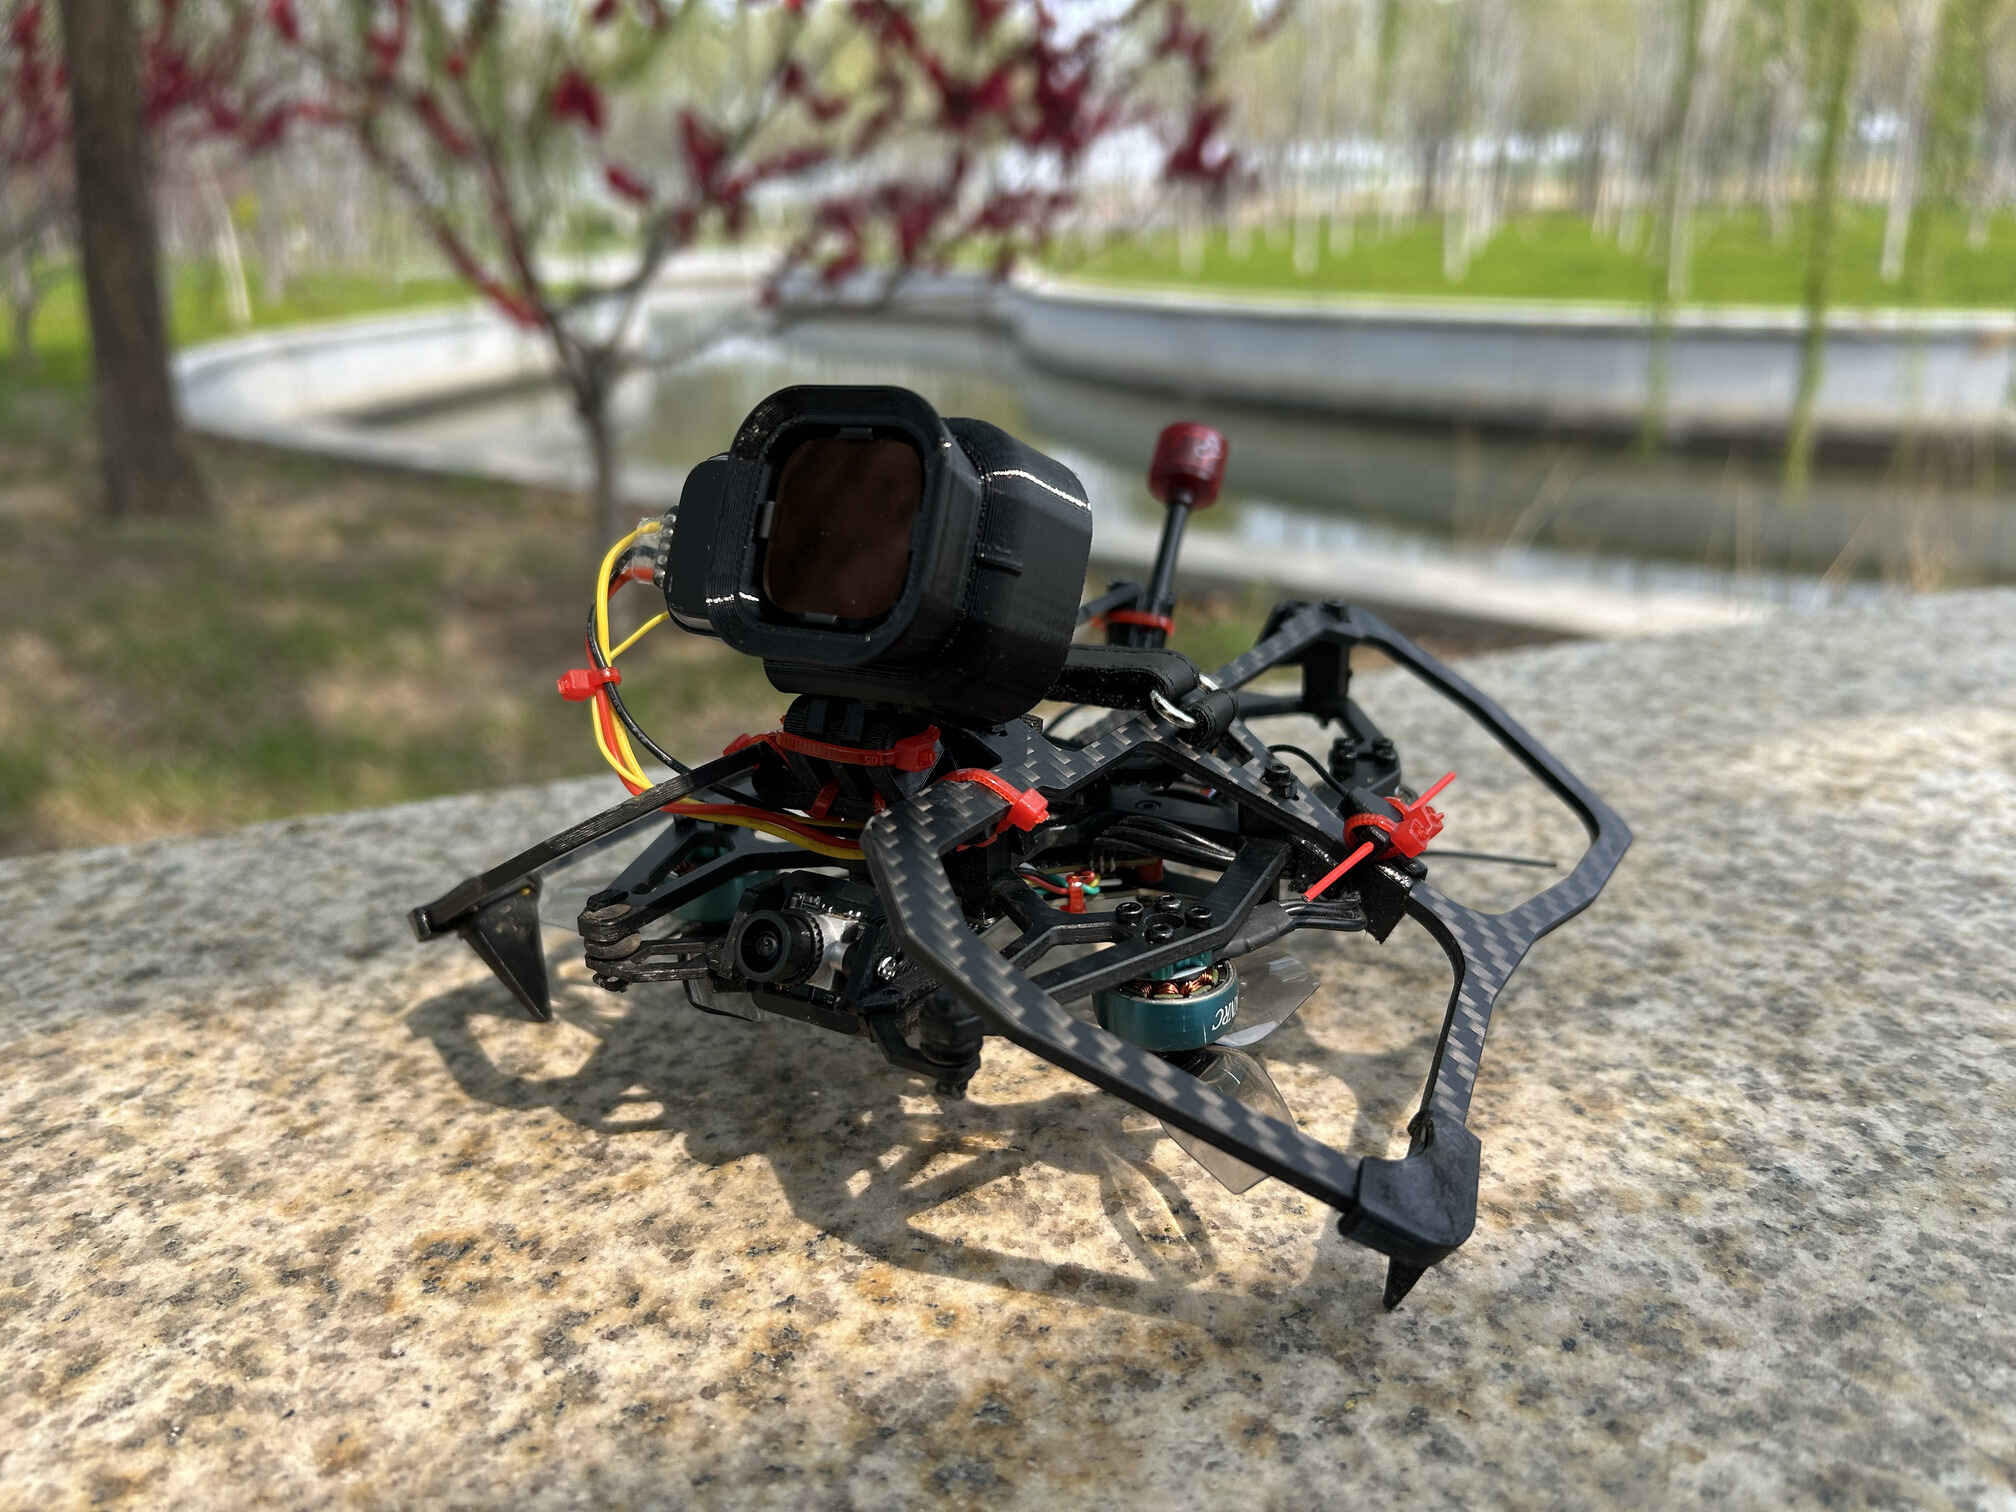
I want to build the smallest quad possible that can carry a 4K camera onboard, have prop guards and have enough thrust to be able to do light freestyle. Here’s how I built a cinewhoop using Mobula8 frame 2.5 inch frame and Runcam Thumb 2. I decided to build it on a FC with fast modern MCU from ArteryTek and new industry standard gyro ICM42688P. the Runcam camera will act as both the fpv camera and the 4K video camera. having a live preview in the goggles is super convenient for dialing in Runcam’s manual exposure settings. also useful for checking if I lost the action camera (or its ND filter) in a crash or not, by switching to the camera feed.
highlights of the final build: live switching between the cameras, Runcam camera recording start/stop from the radio, VTX power level adjustment on a pot, turtle mode without arming, RHCP antenna for VTX, whip-style antenna for RX, low esr capacitor, GPS rescue, position and altitude hold (without a magnetometer so it needs a calibration flight each time before use). VTX is set to whatever power setting S2 pot at the moment the RX connects to the radio, but VTX keeps low power before the first arm. Crash recovery enabled.Location-related information in the ELRS telemetry is disabled as an OPSEC measure. OSD profile switching using S1.
read the updates! the quad ended up being very different. the “smallest” part is not the case anymore since it means very poor (borderline unusable) flight performance.
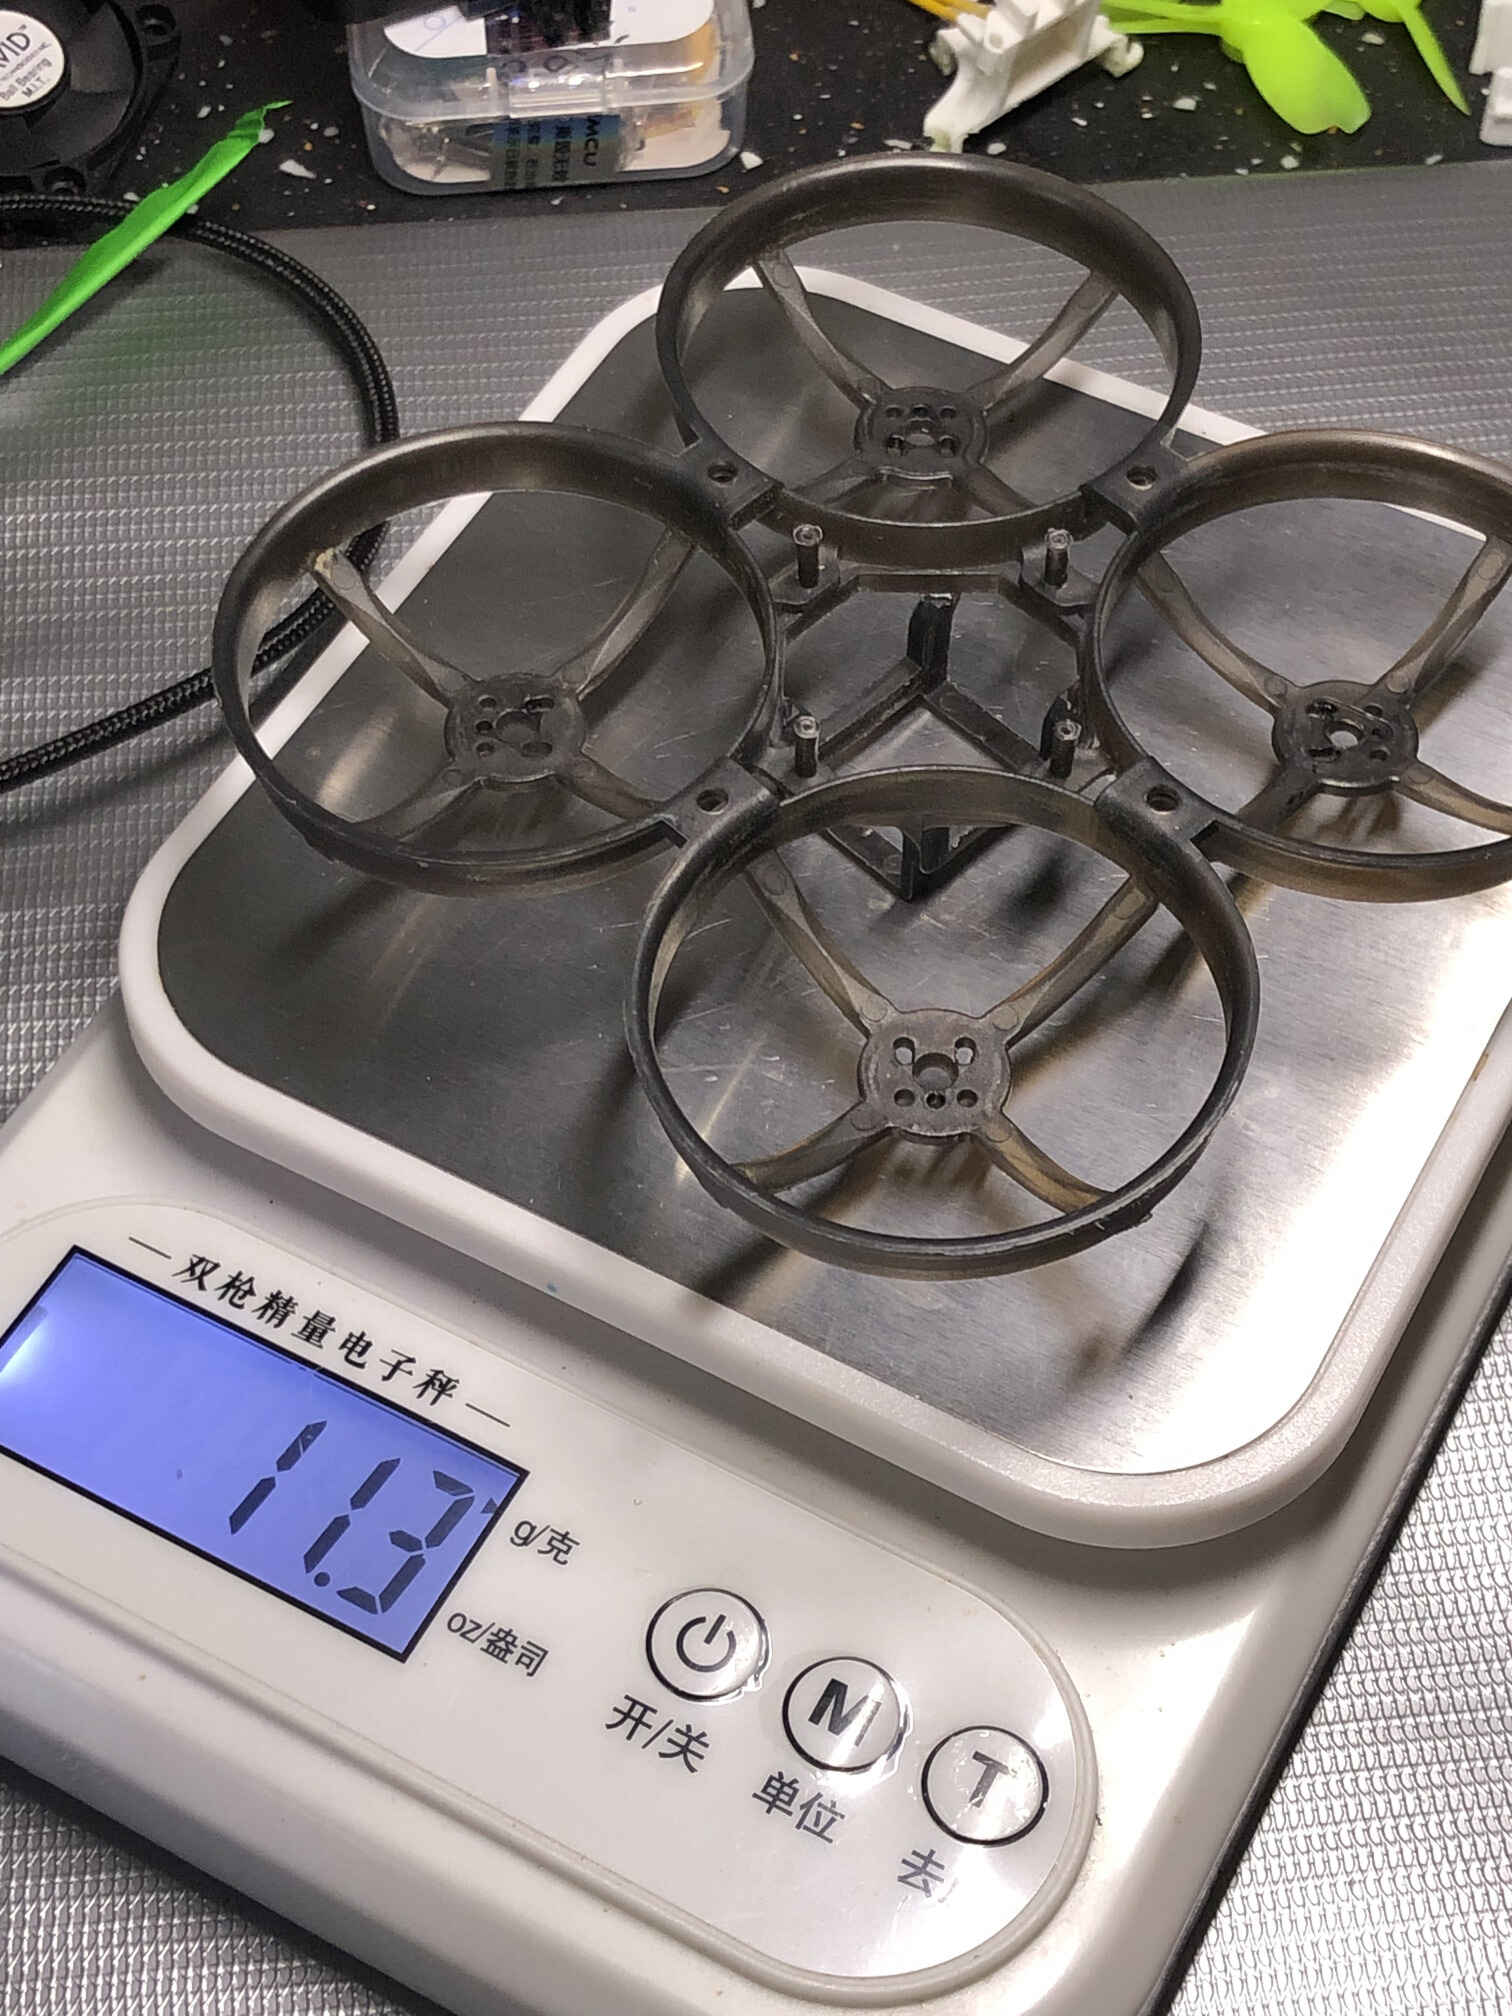
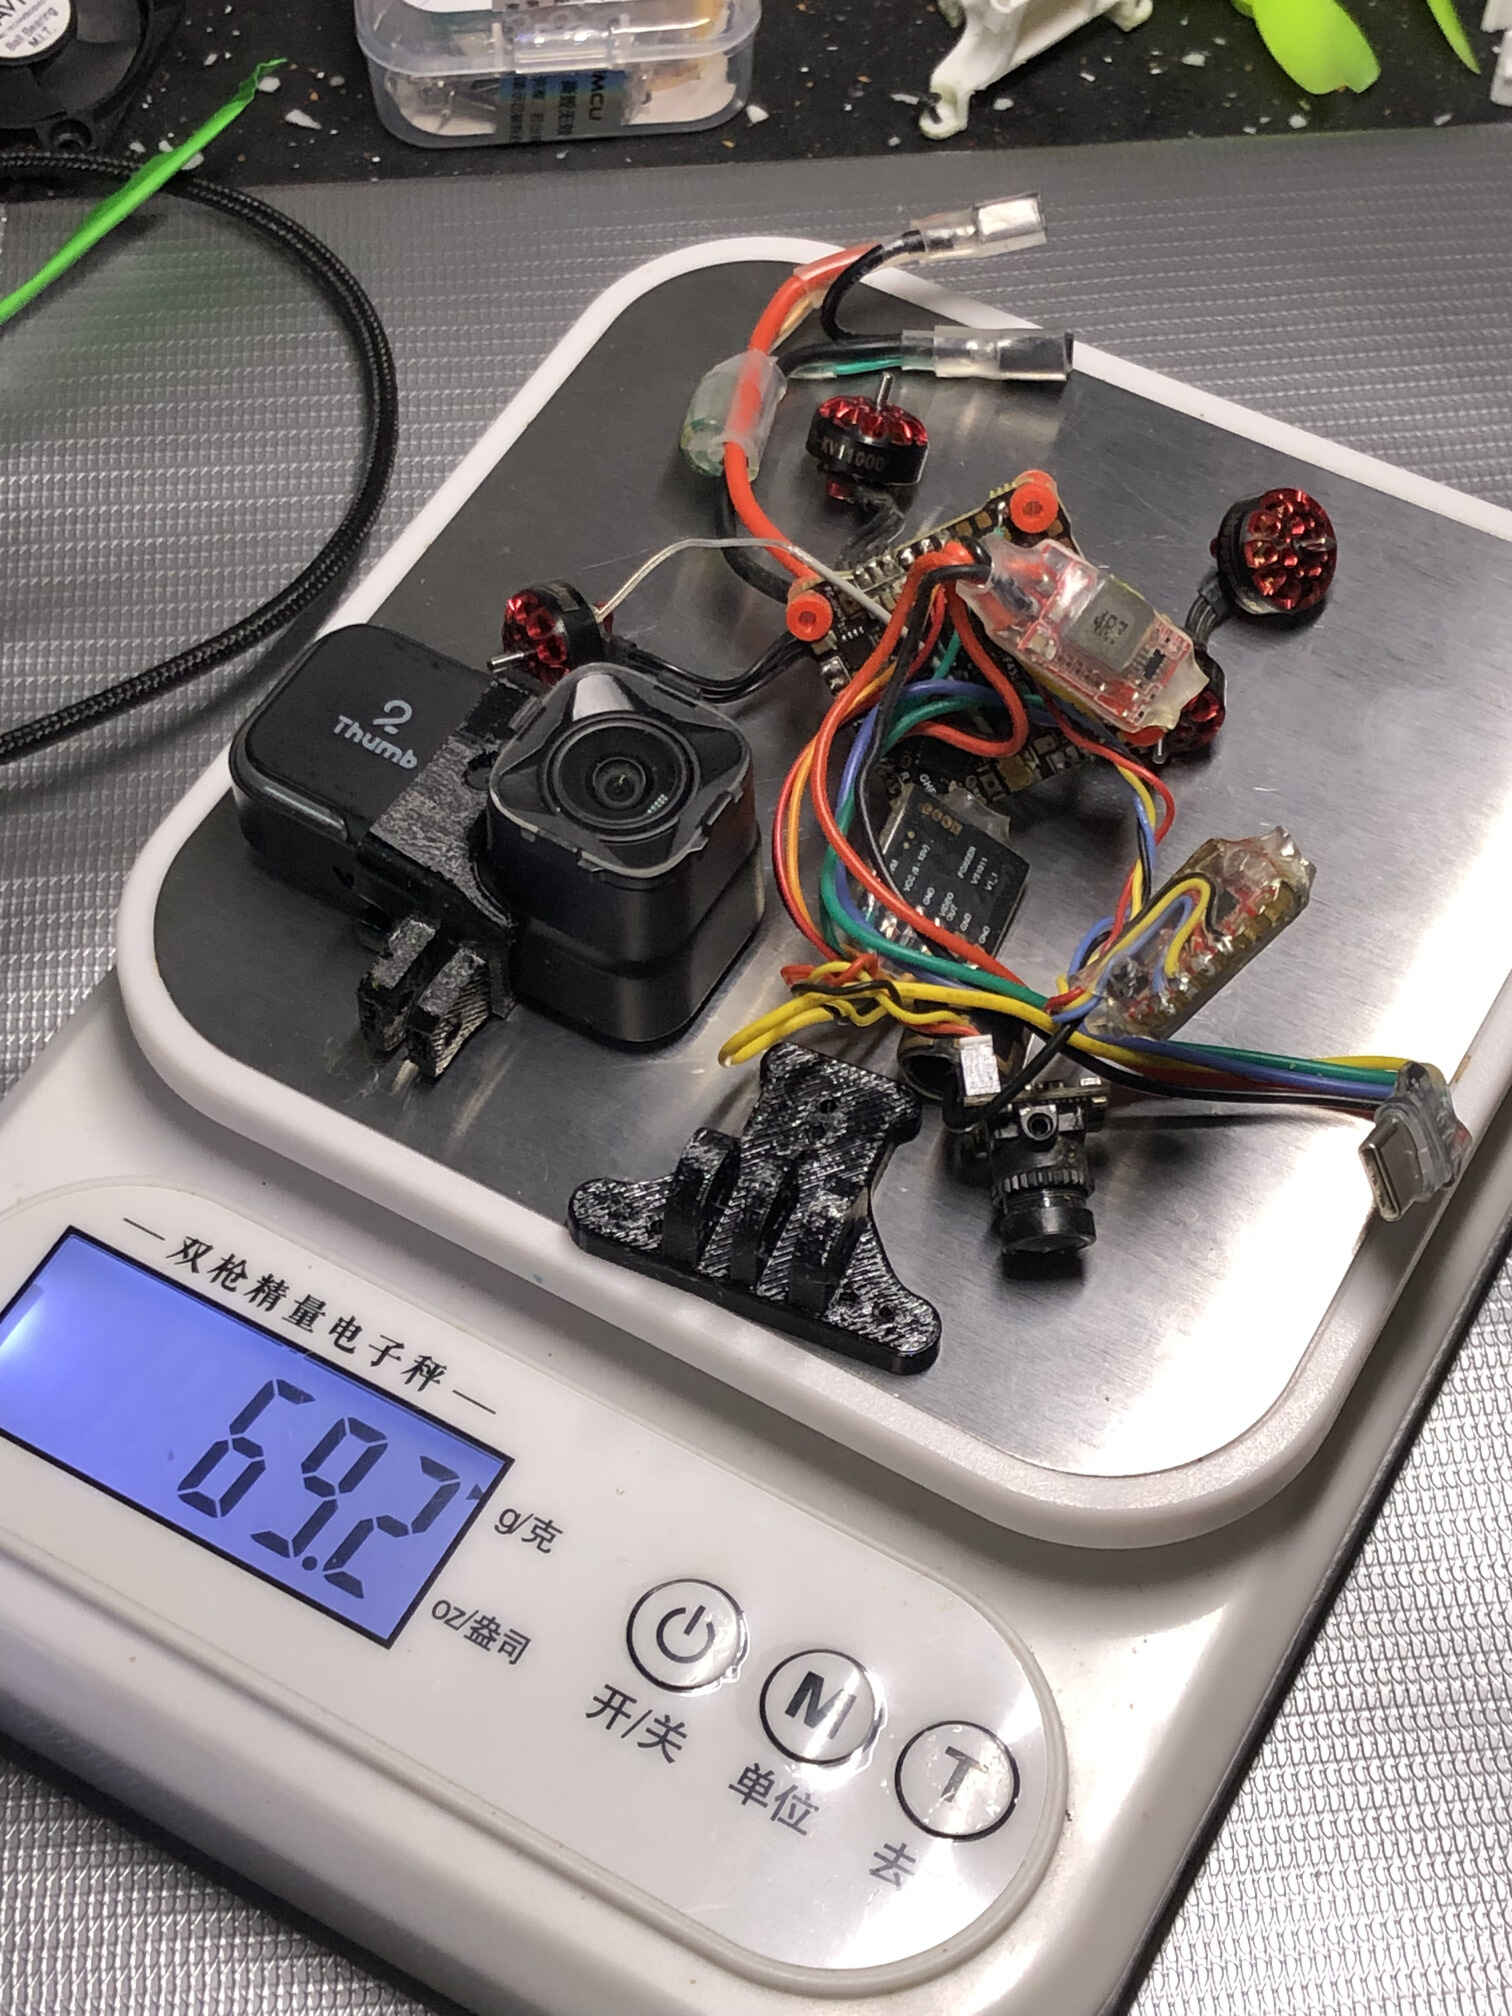
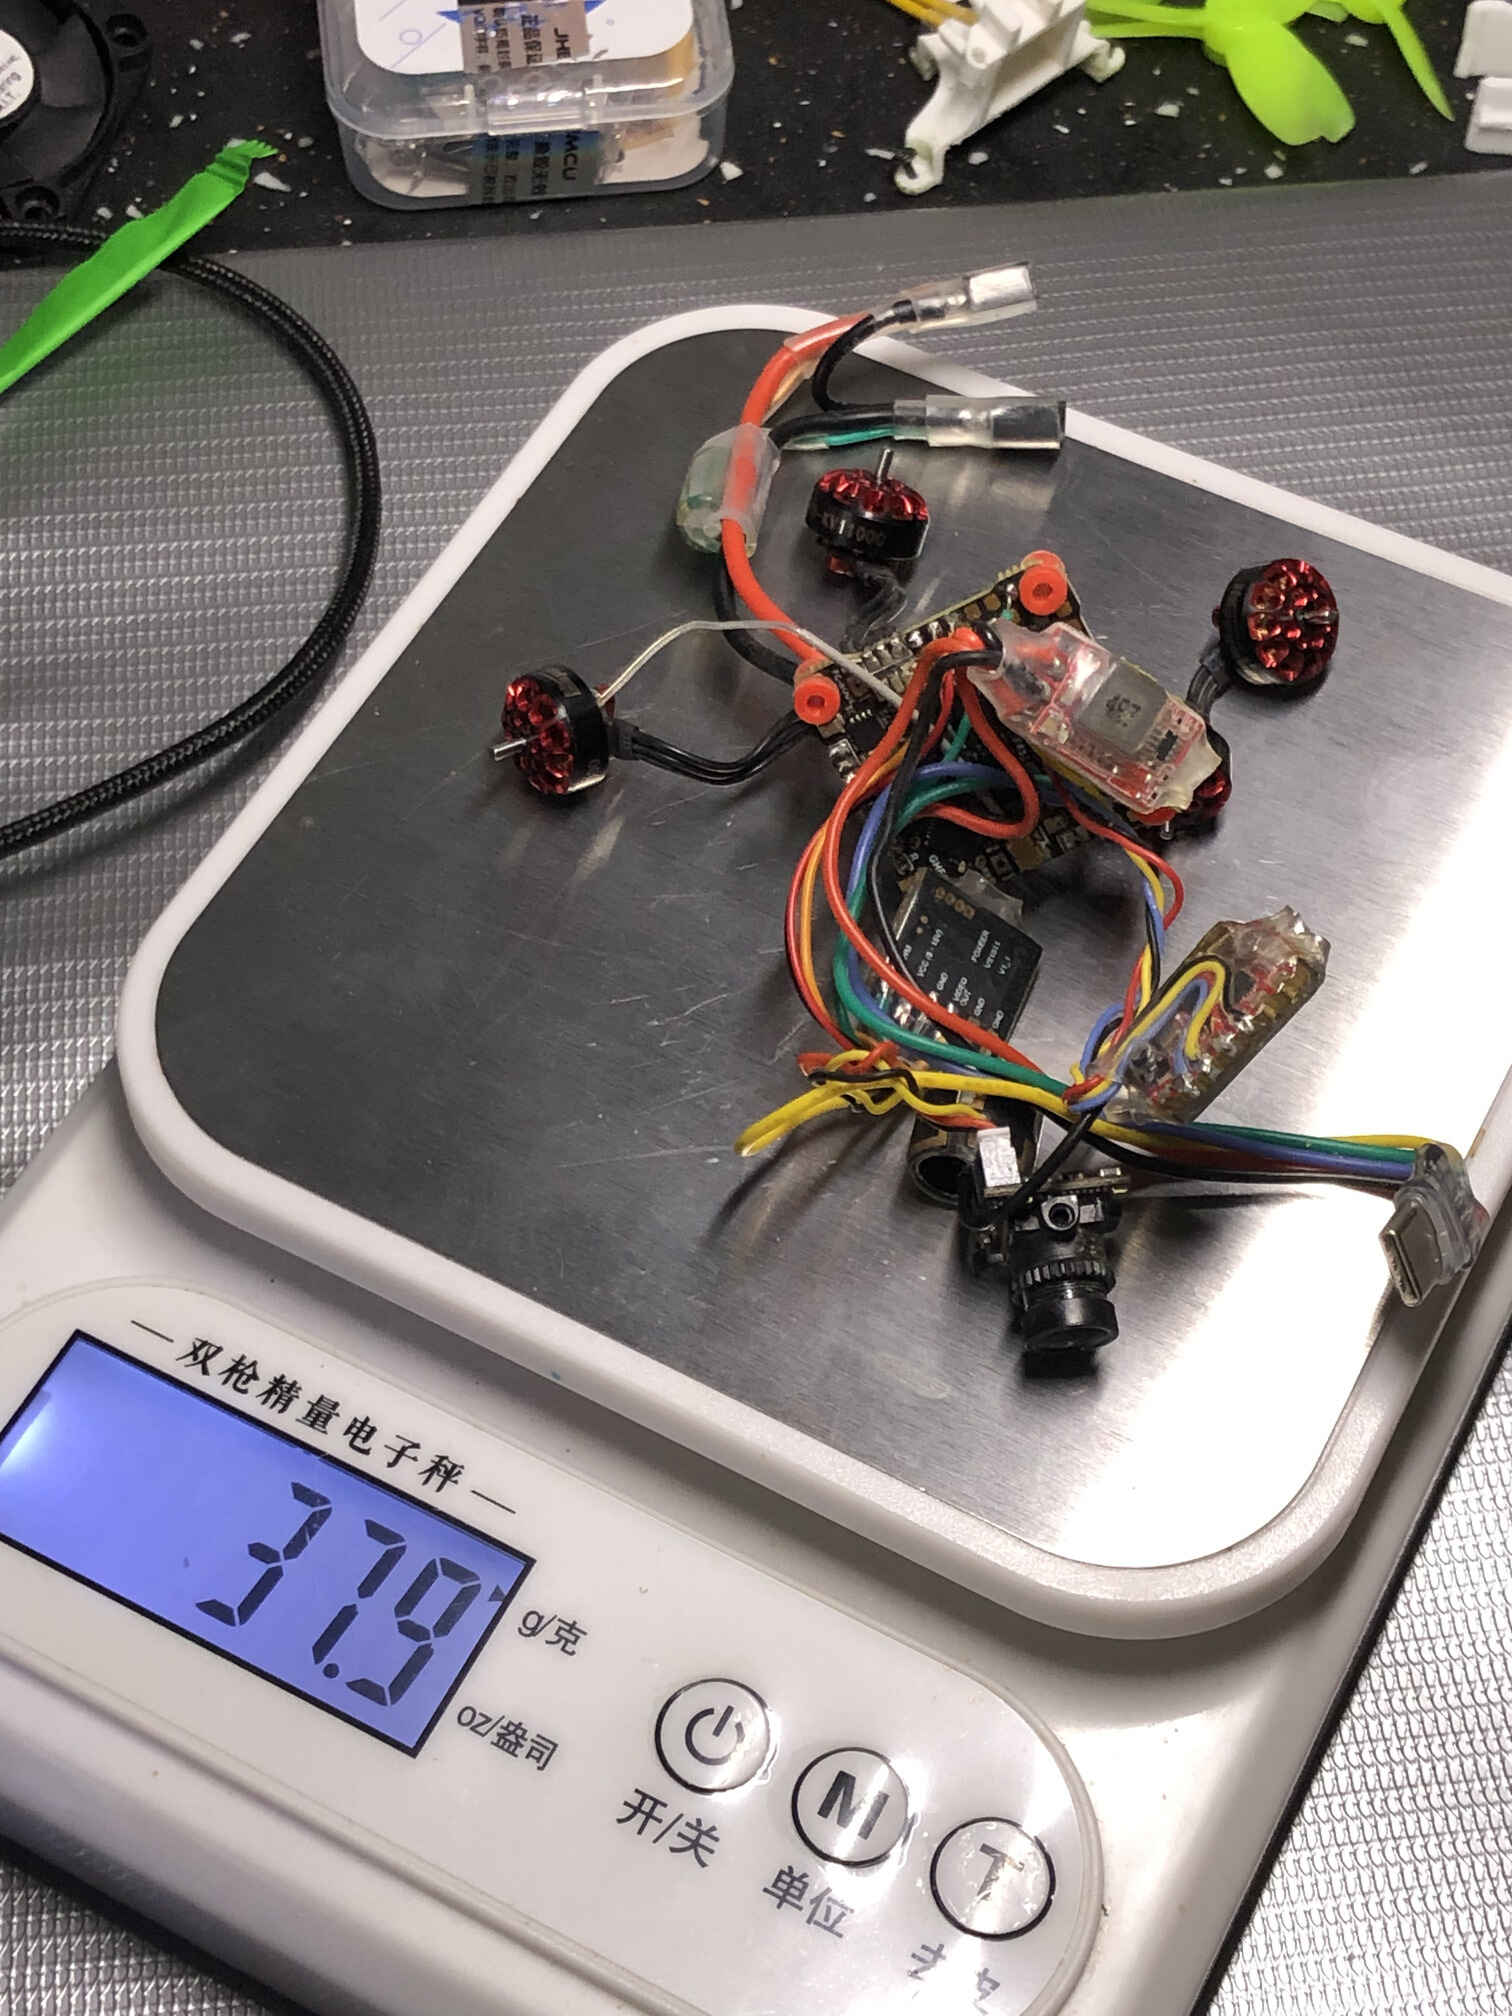
results and updates (mobula8 frame)
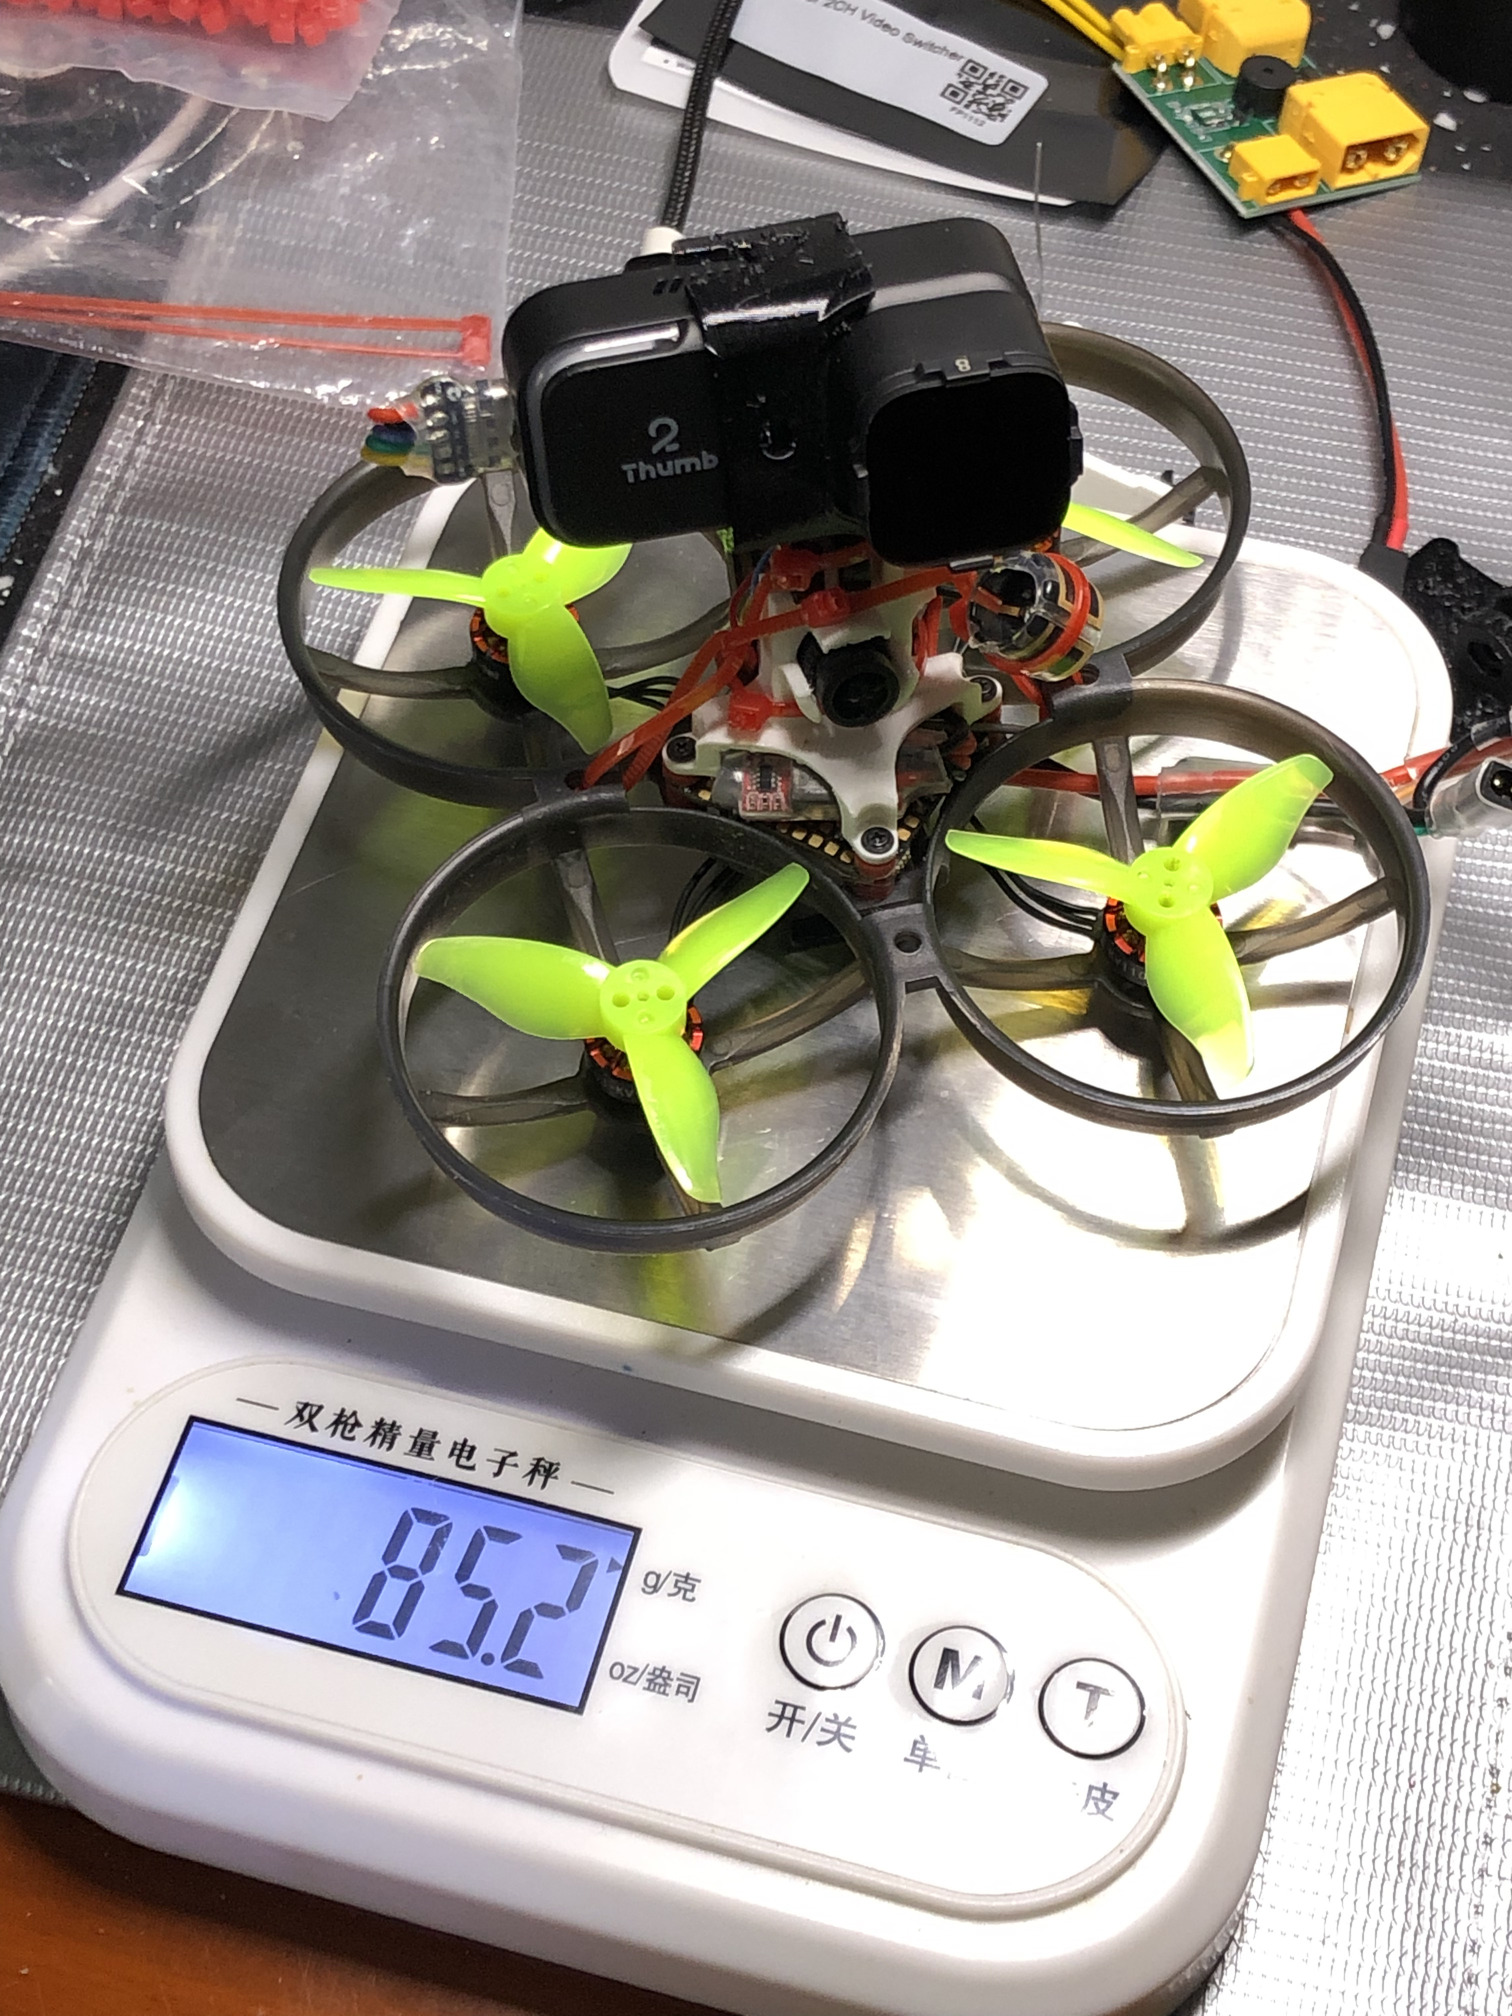
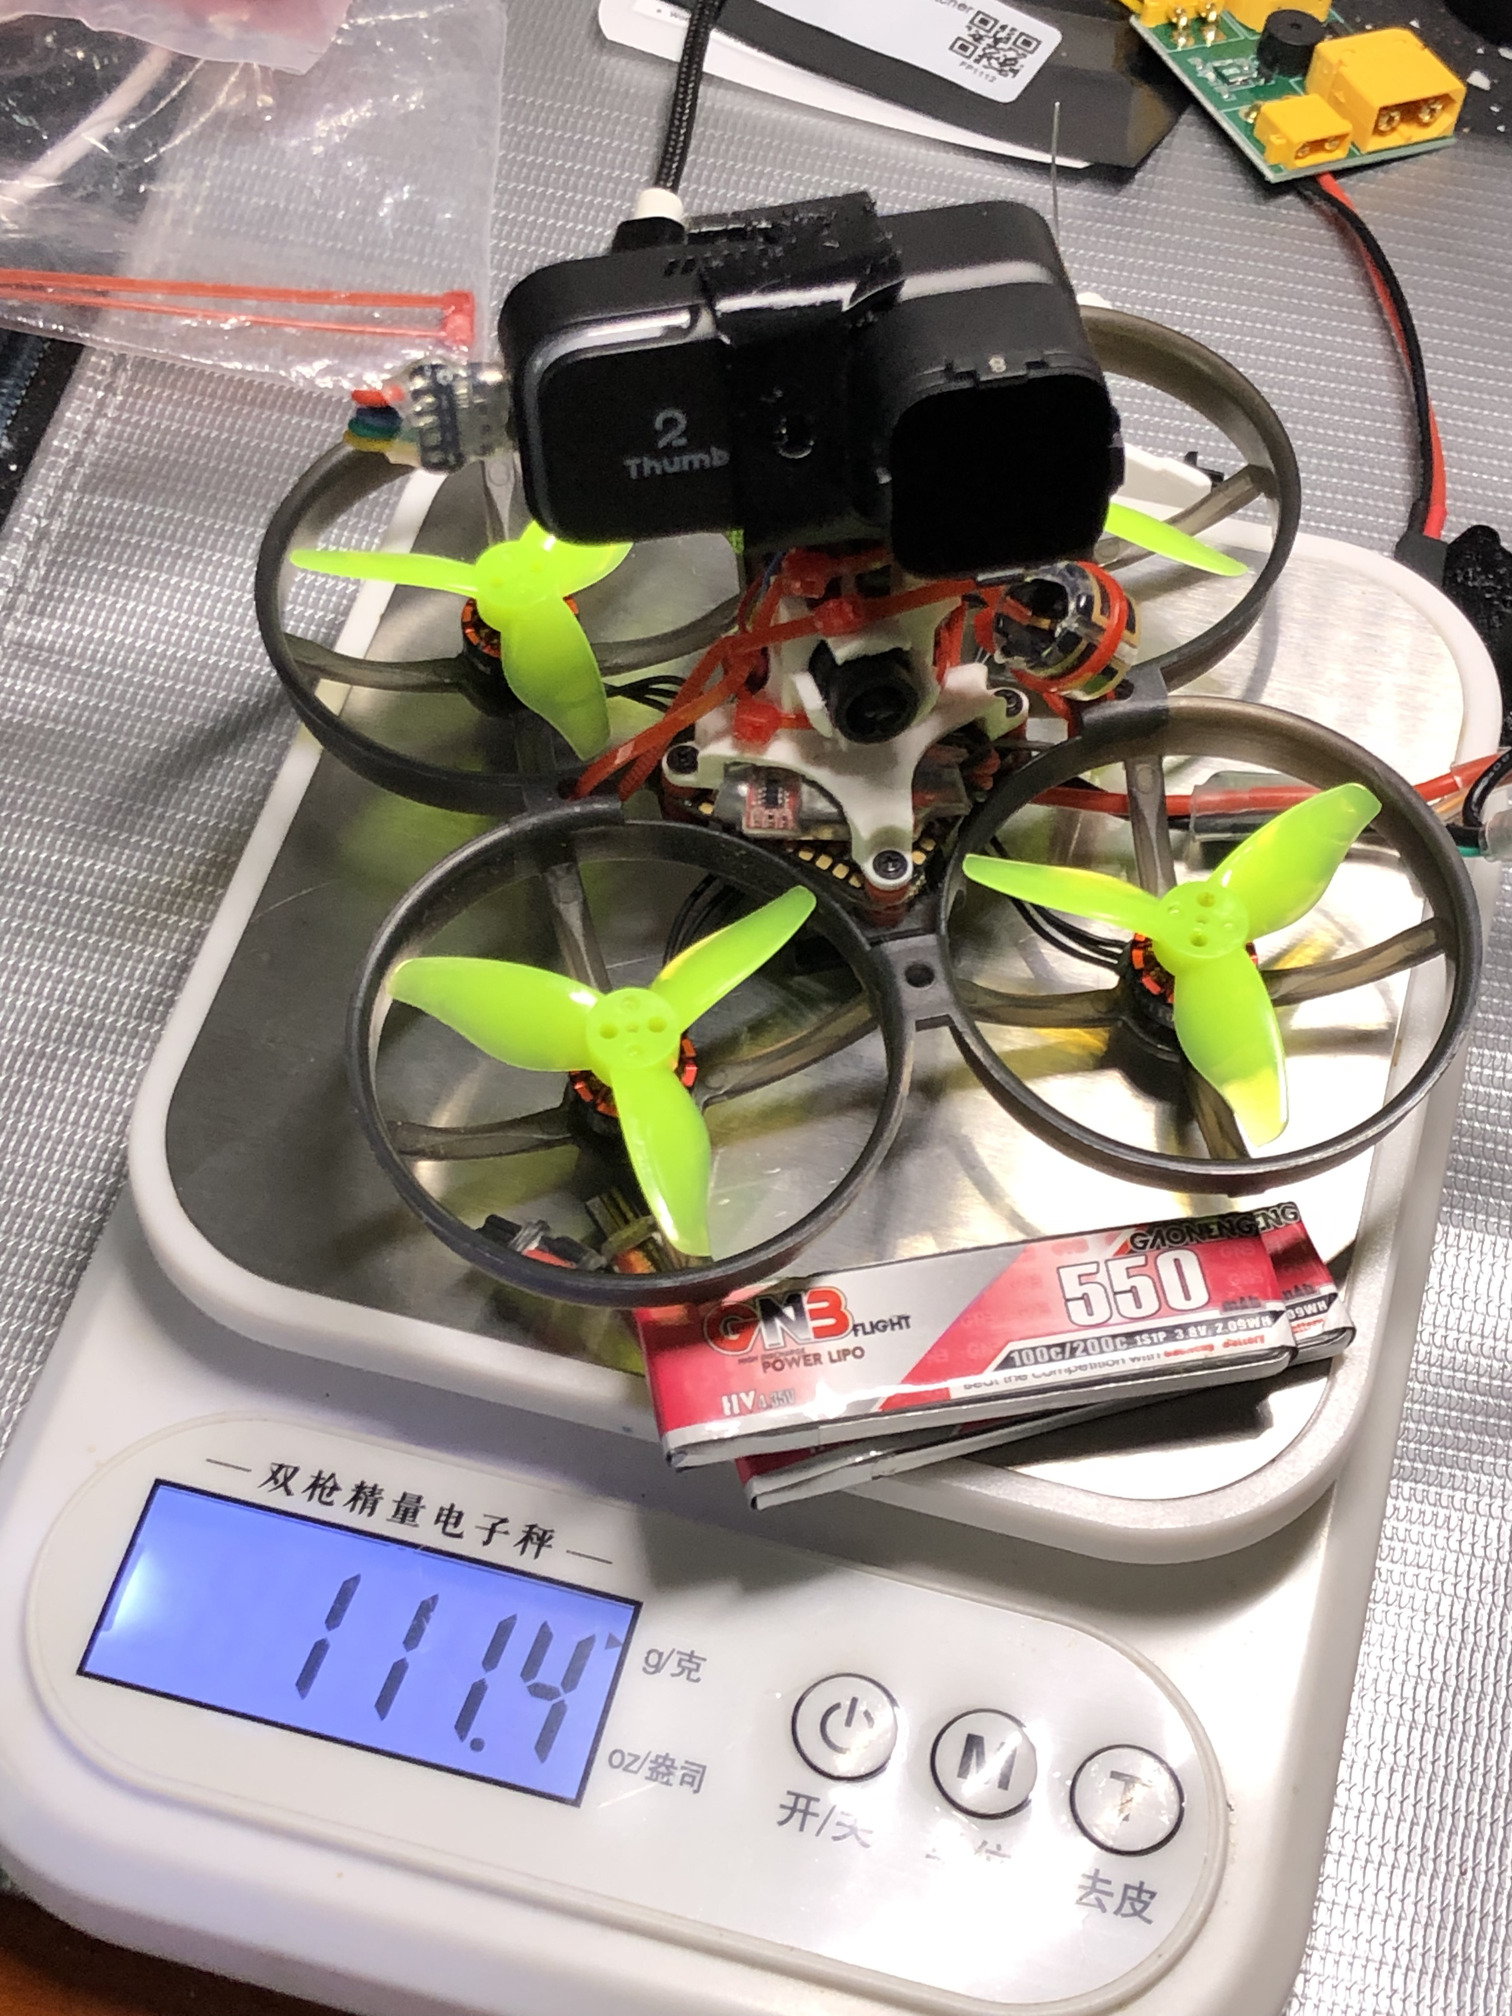
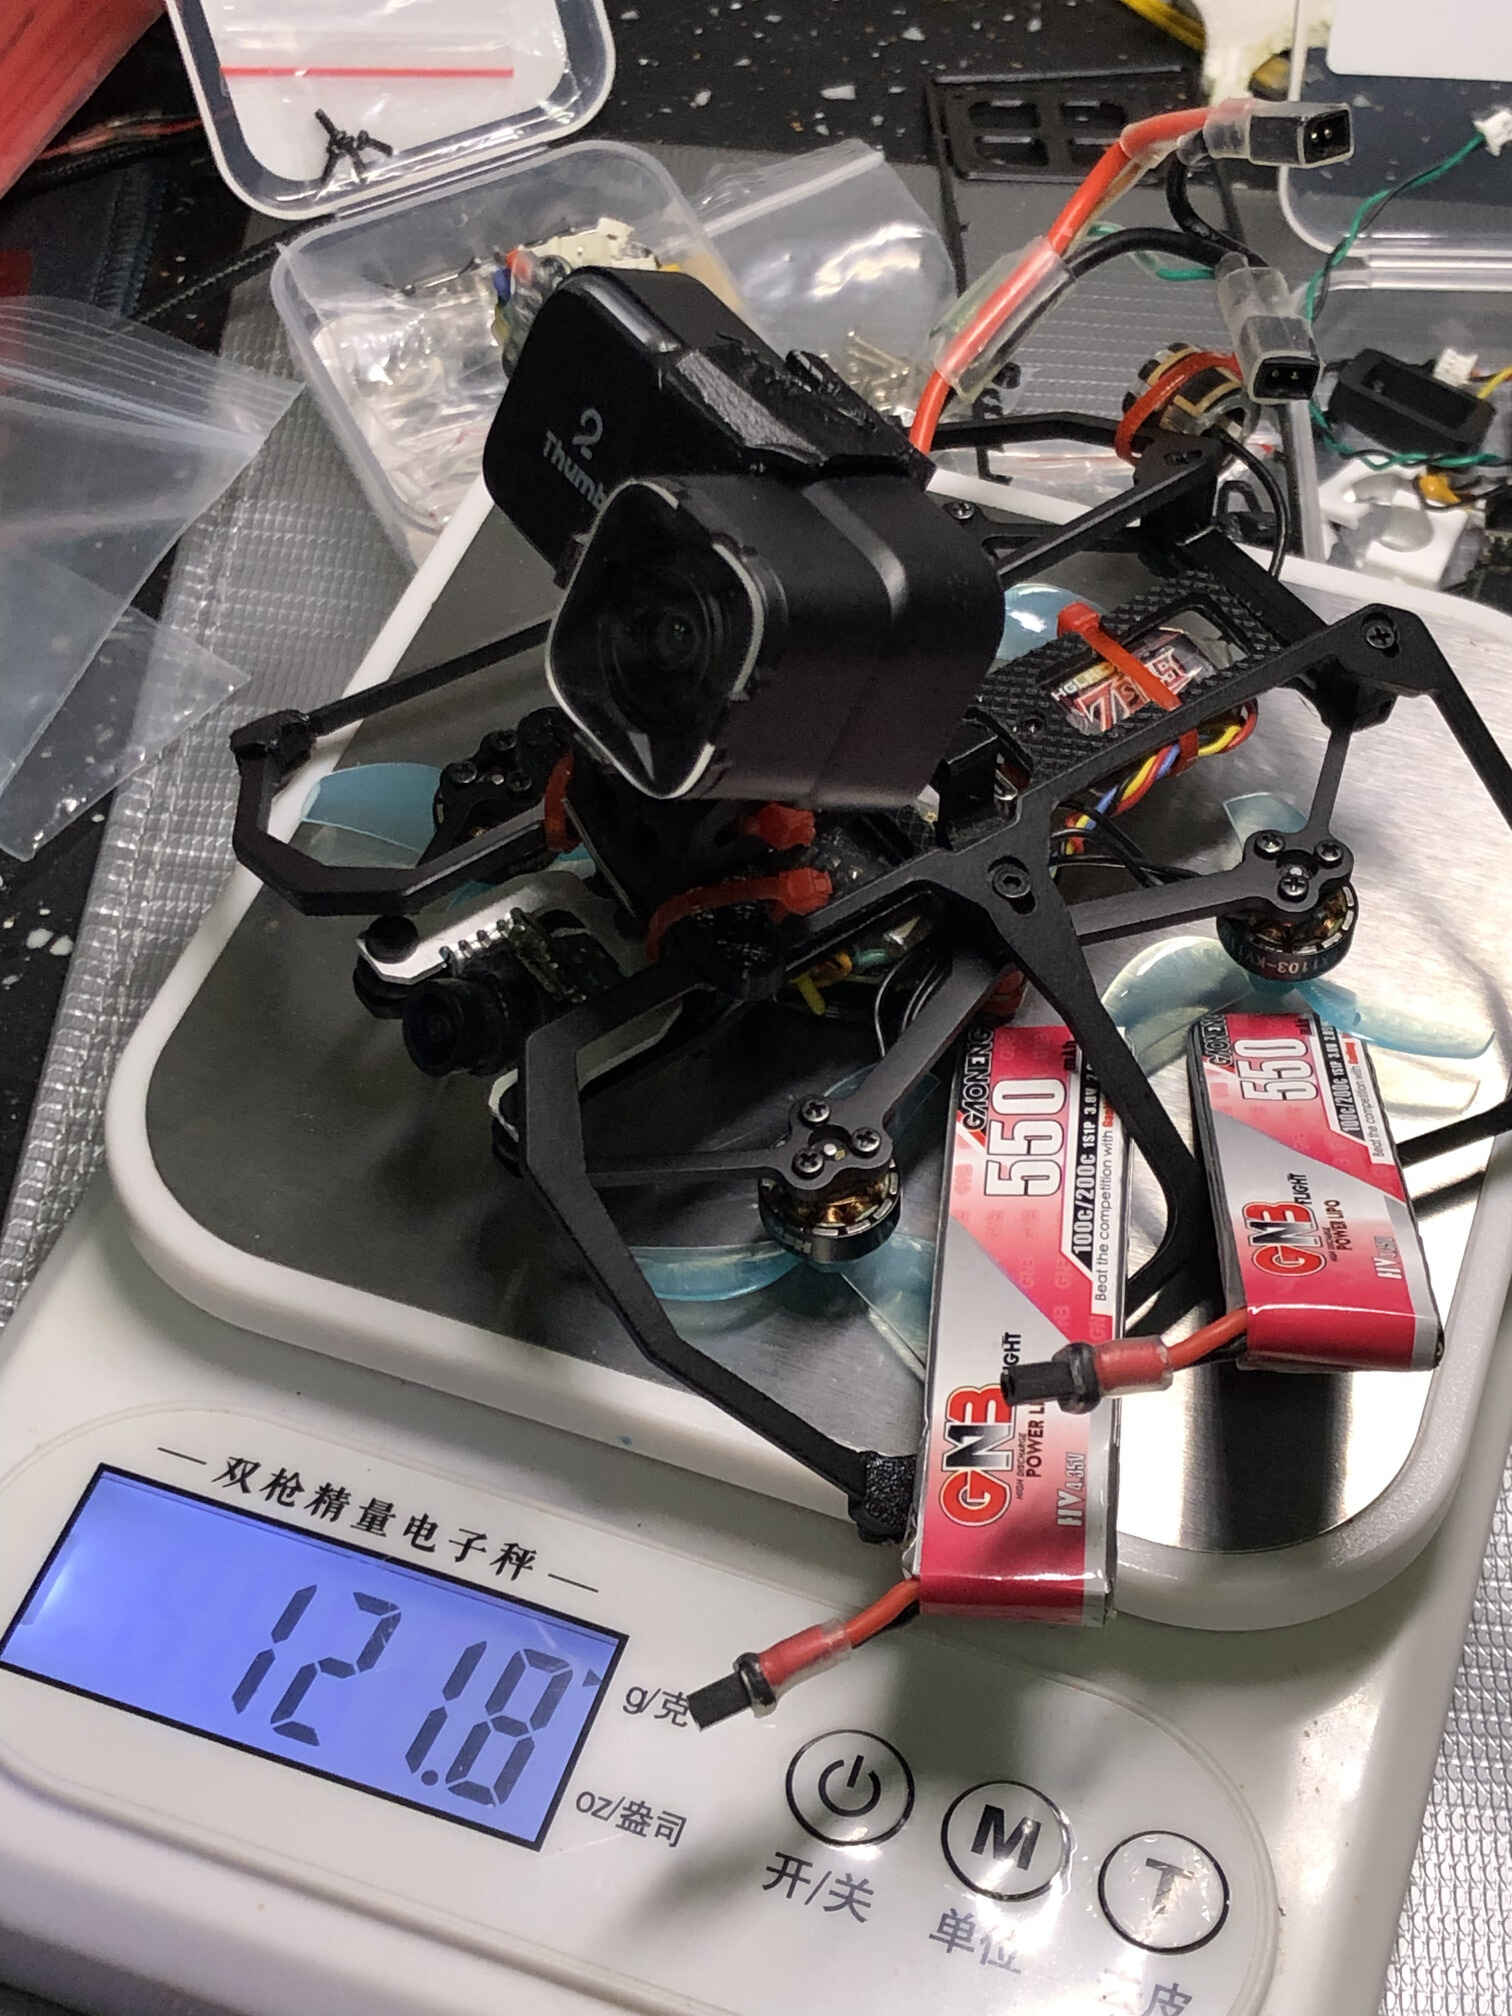
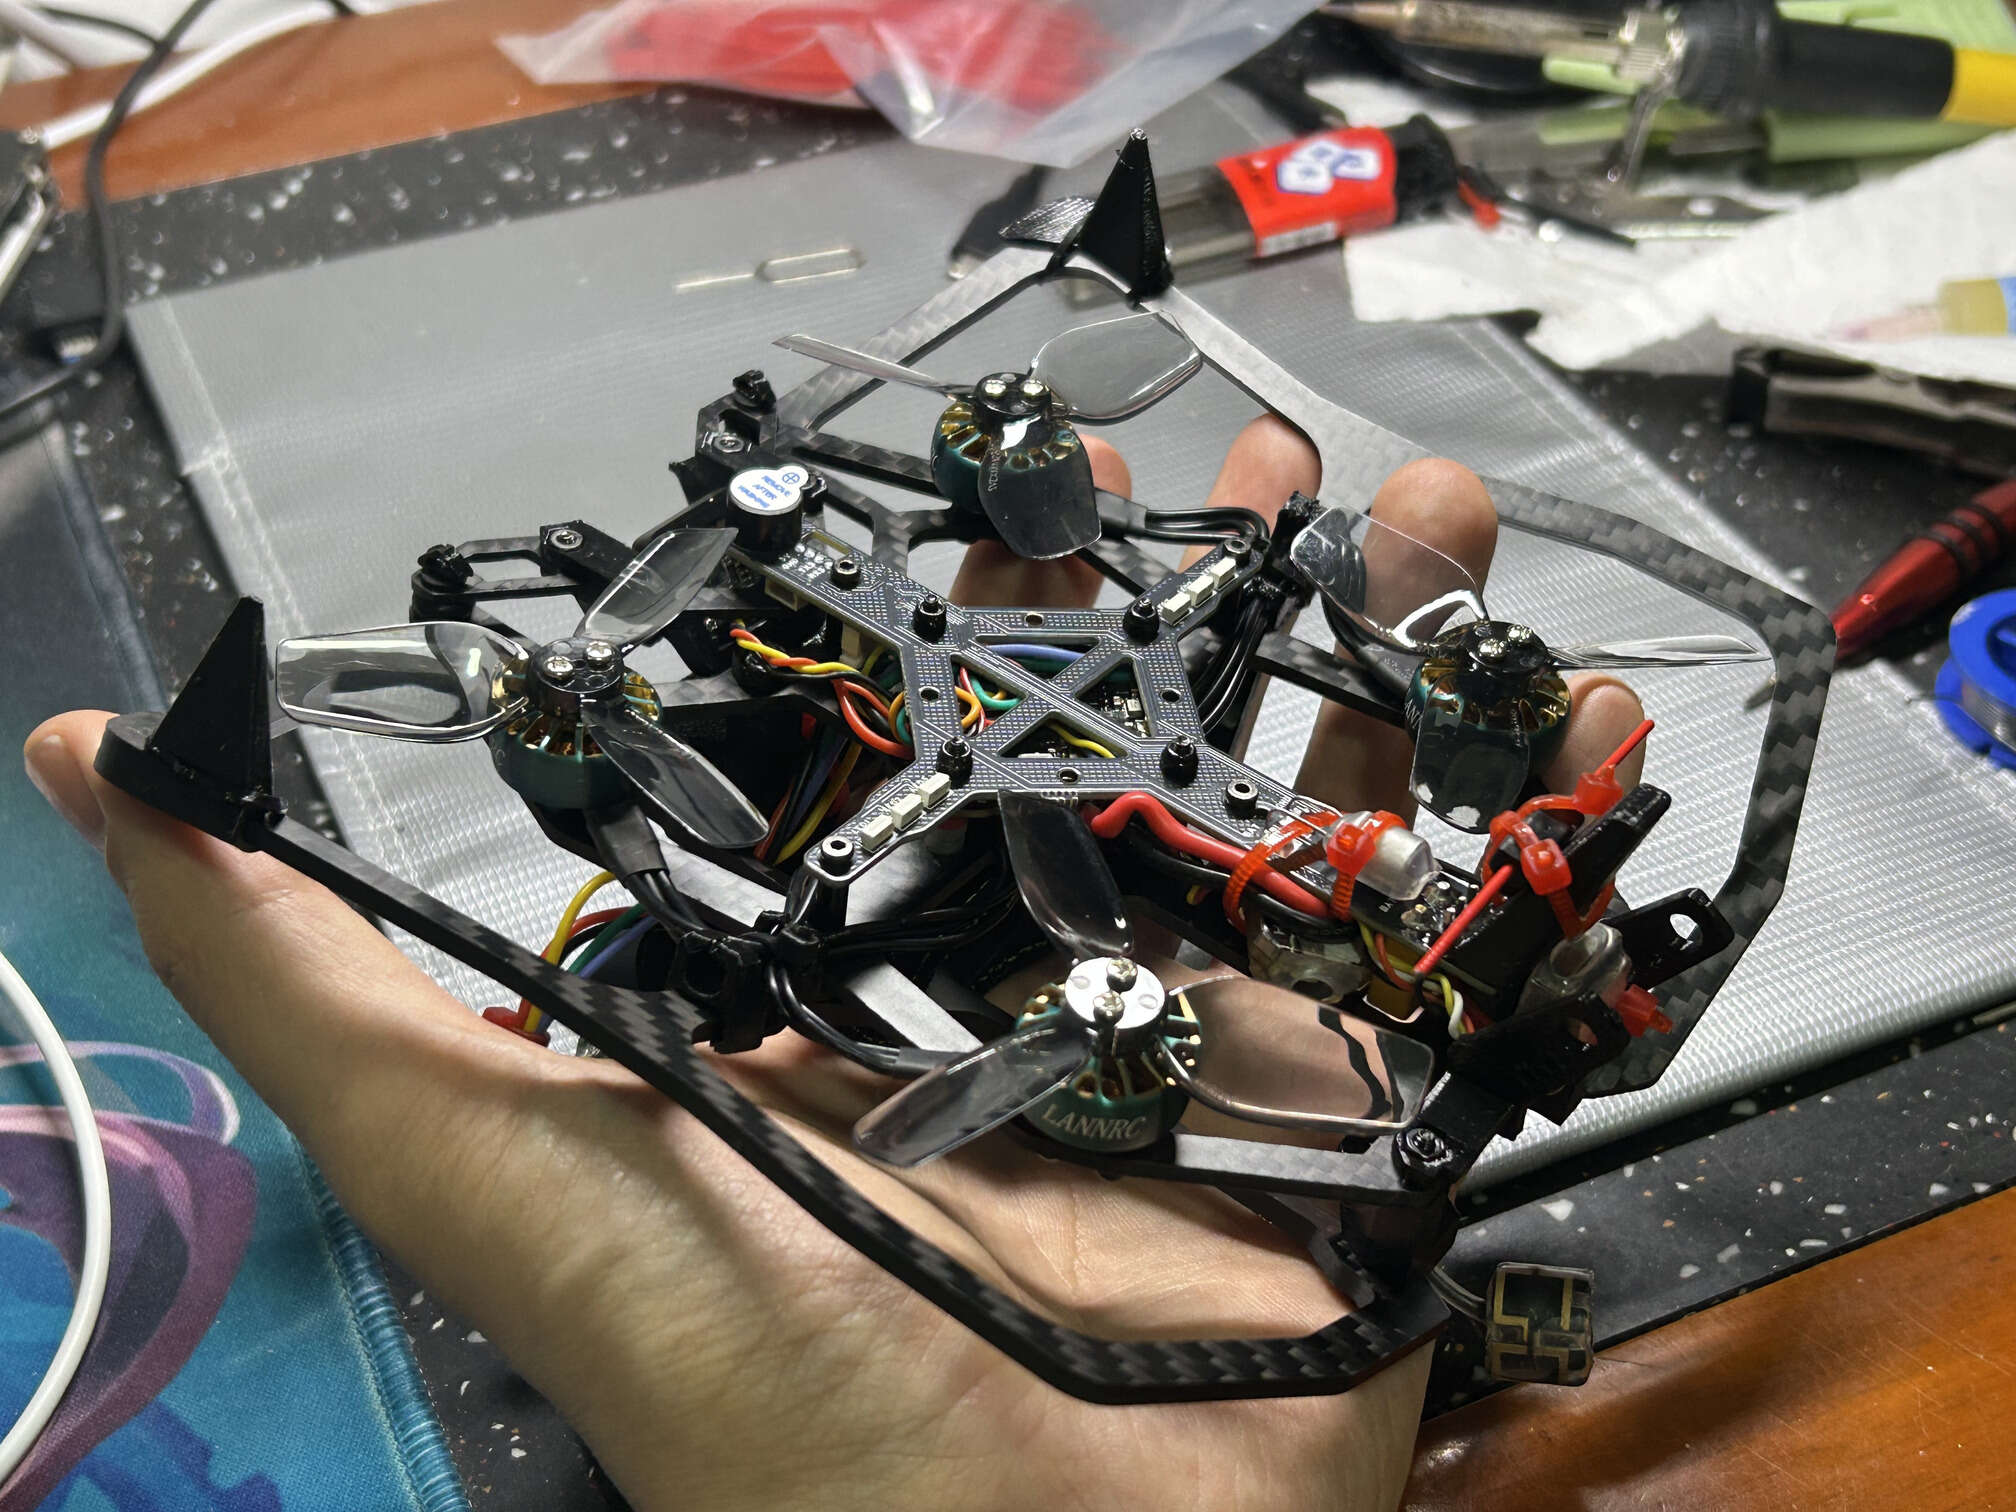
dry weight: 85.2g, with 550mah batteries: 111.4g. flight time 2 minutes (winter).
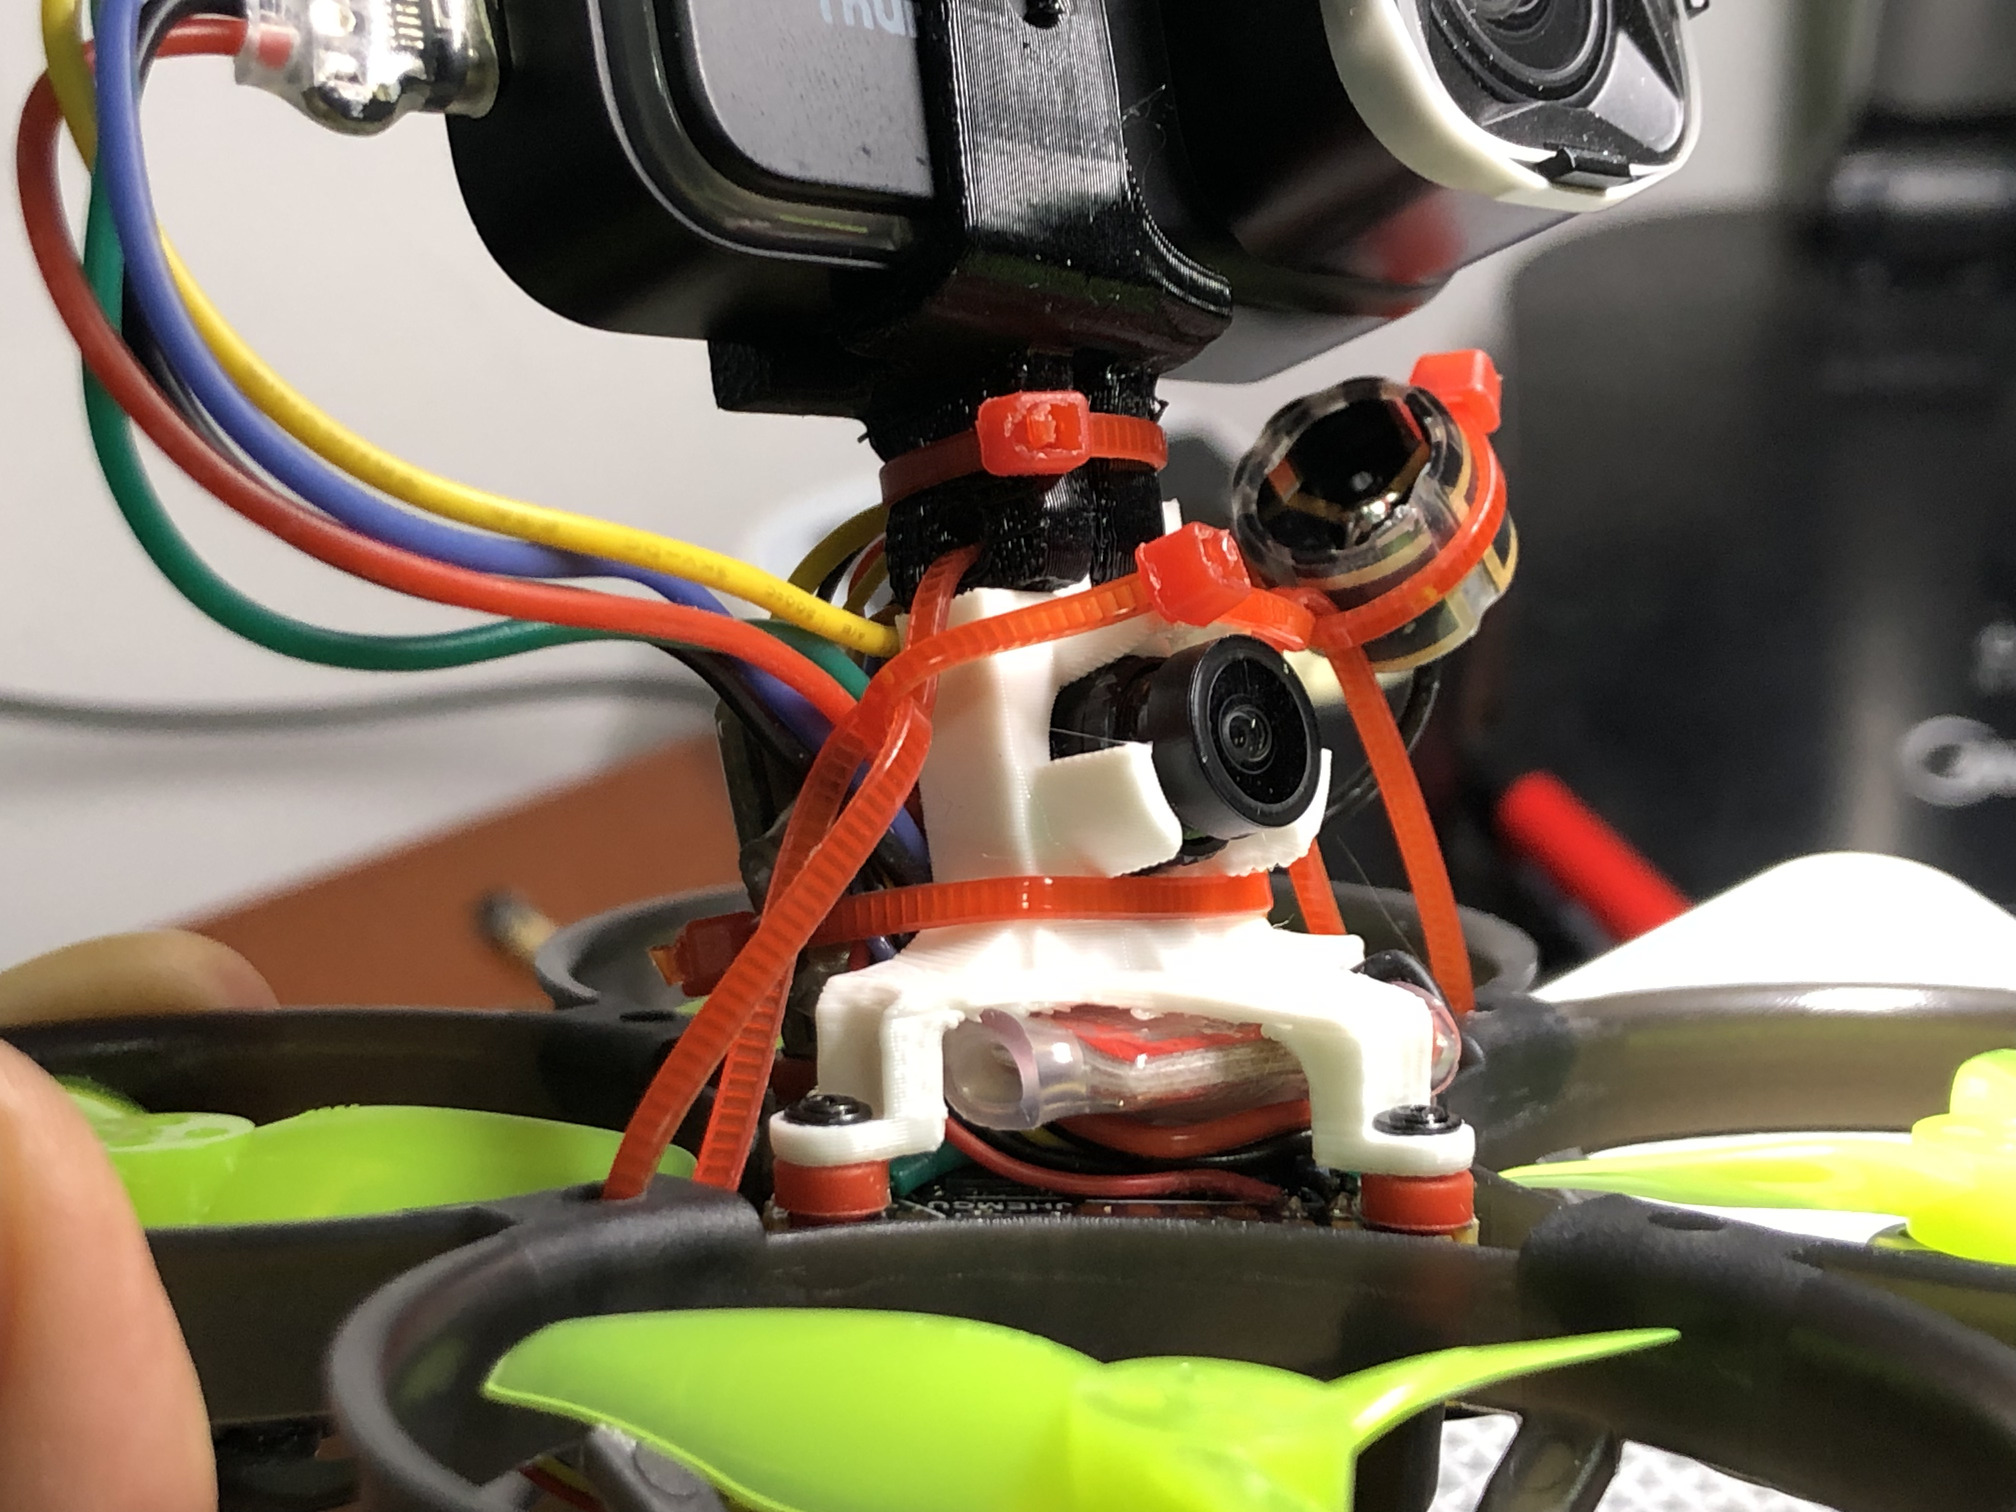
there is a significant delay in video from the Runcam camera, which makes it very difficult to fly, so I have to add an fpv camera and a video source switcher to still be able to view the preview of the runcam exposure in the goggles but fly with the regular fpv camera. the switcher is controlled with PWM by remapping LED_STRIP pad resource to a servo.
FC restarts because of a voltage sag caused by current spike caused by throttle bump or a crash (crash_recovery = ON). when FC restarts, camera comes back on but without video feed, last 10-20 seconds of video recording is lost, gyro data is lost completely. powering the camera not from the FCs onboard 5V but from the battery directly through a 5V BEC (to alleviate some load from the FC) did not solve the problem. set motor_output_limit = 80seemd to help. maybe just need to swap the two A30 for one XT30 and a proper 2S battery
the final part of the video and gyro data is lost if Runcam camera loses power before recording is stopped. if the camera is powered from the FC and the FC reboots, the camera loses power. powering the camera from the battery directly through the UBEC acts as a protection against that.
ND filters are easy to lose in a crash (lost one ND8, 30元)
it seems like the Runcam camera reads (sometimes?) date and time from the flight controller no, it takes the time from the QR code
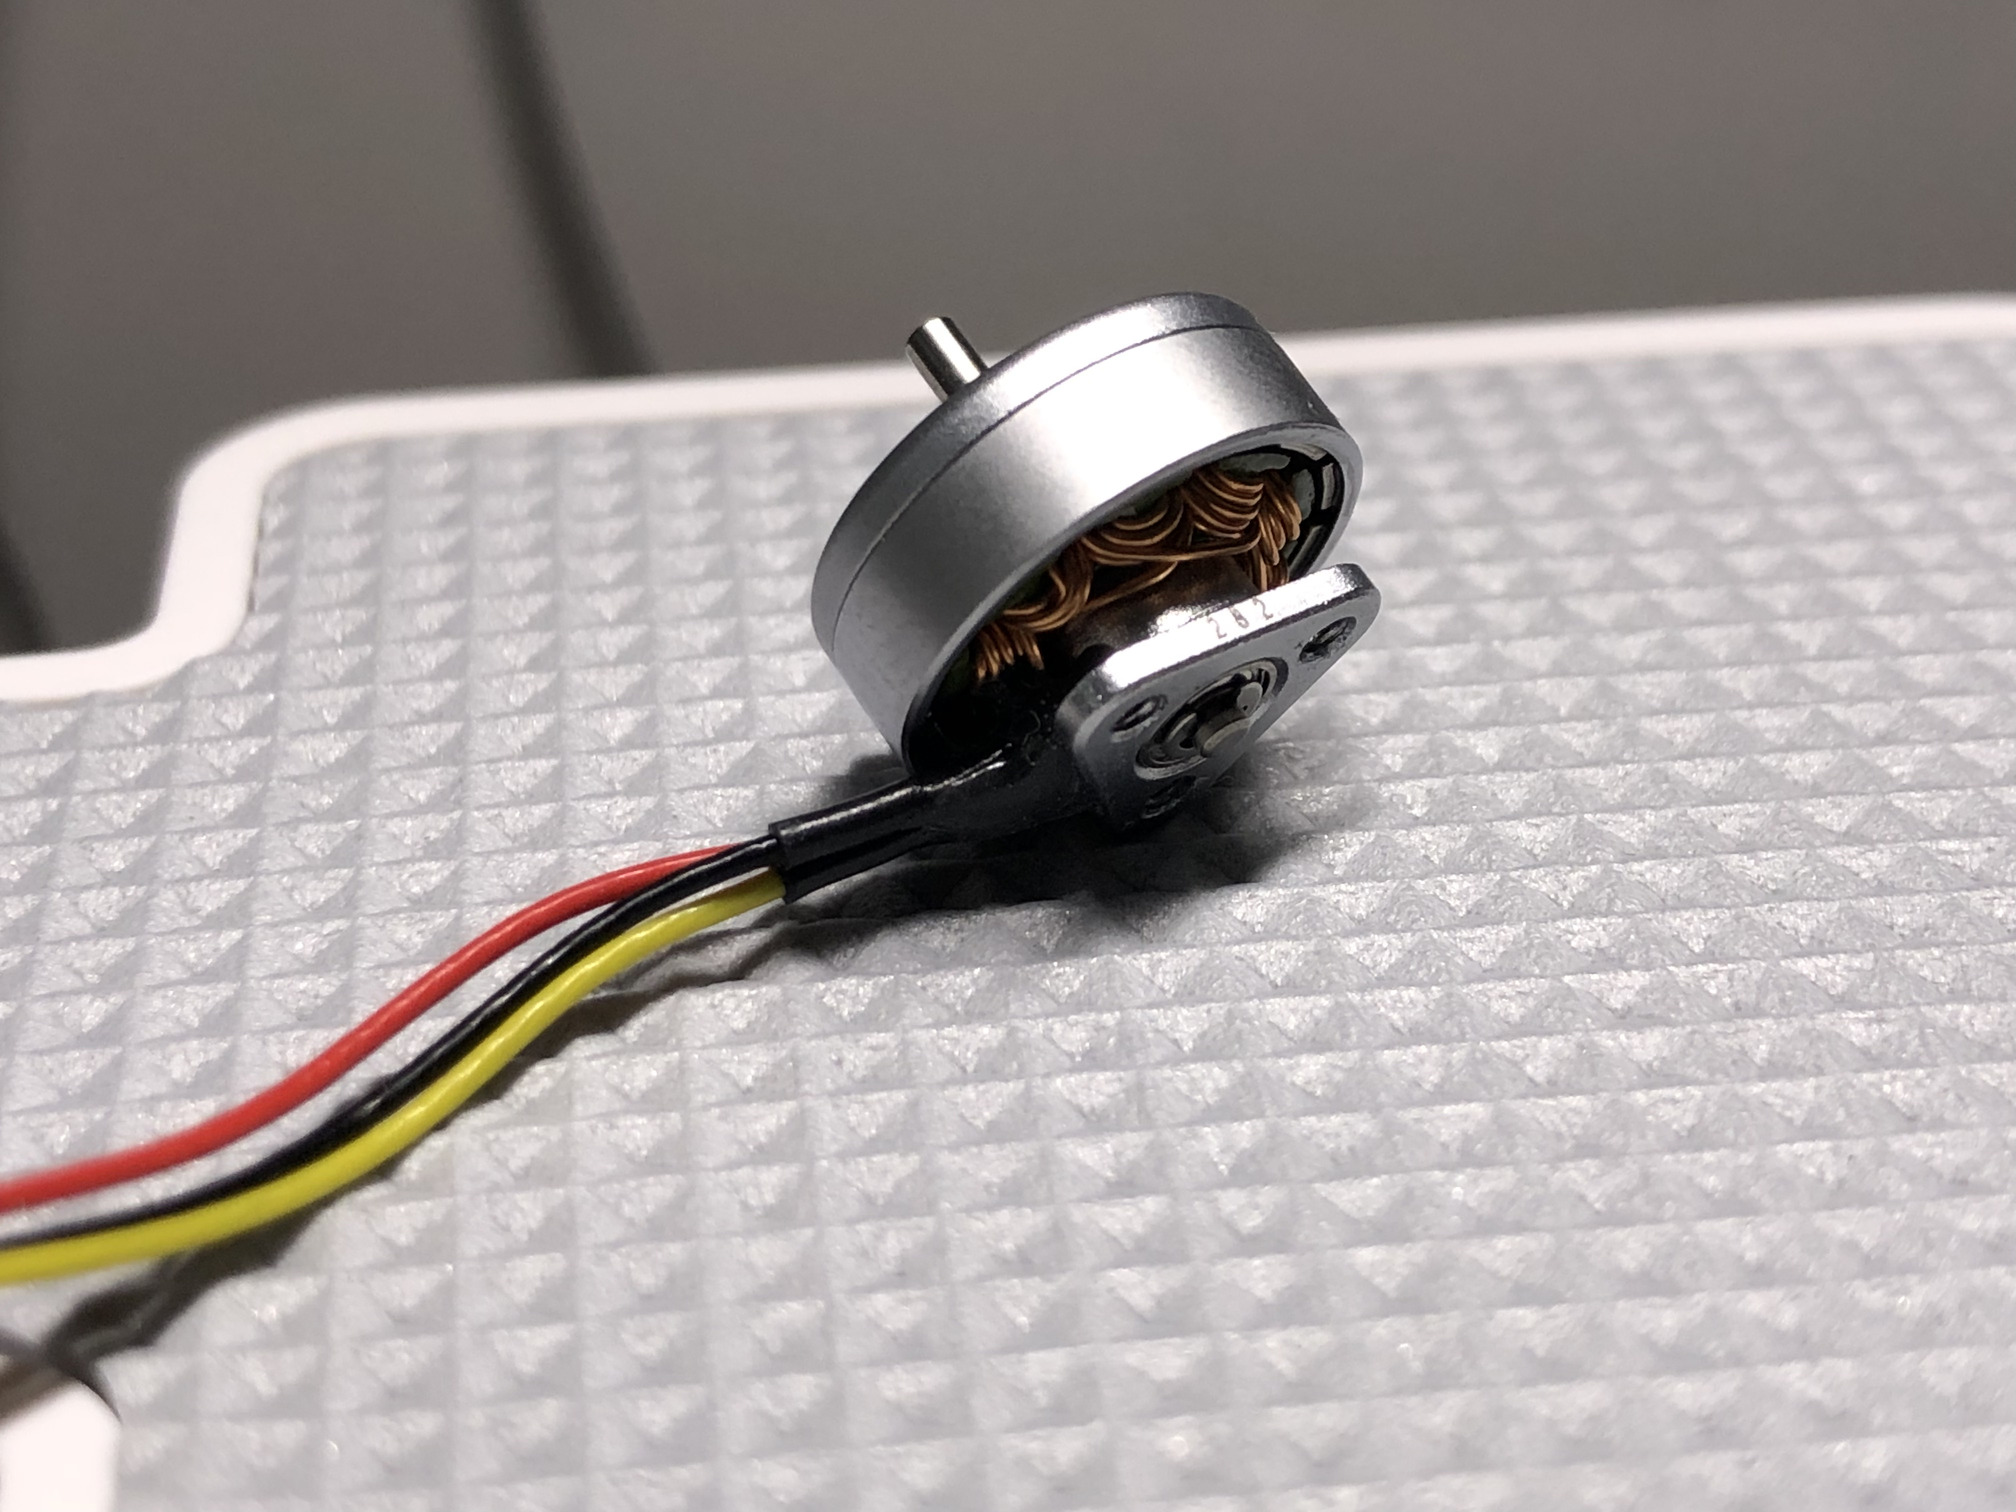
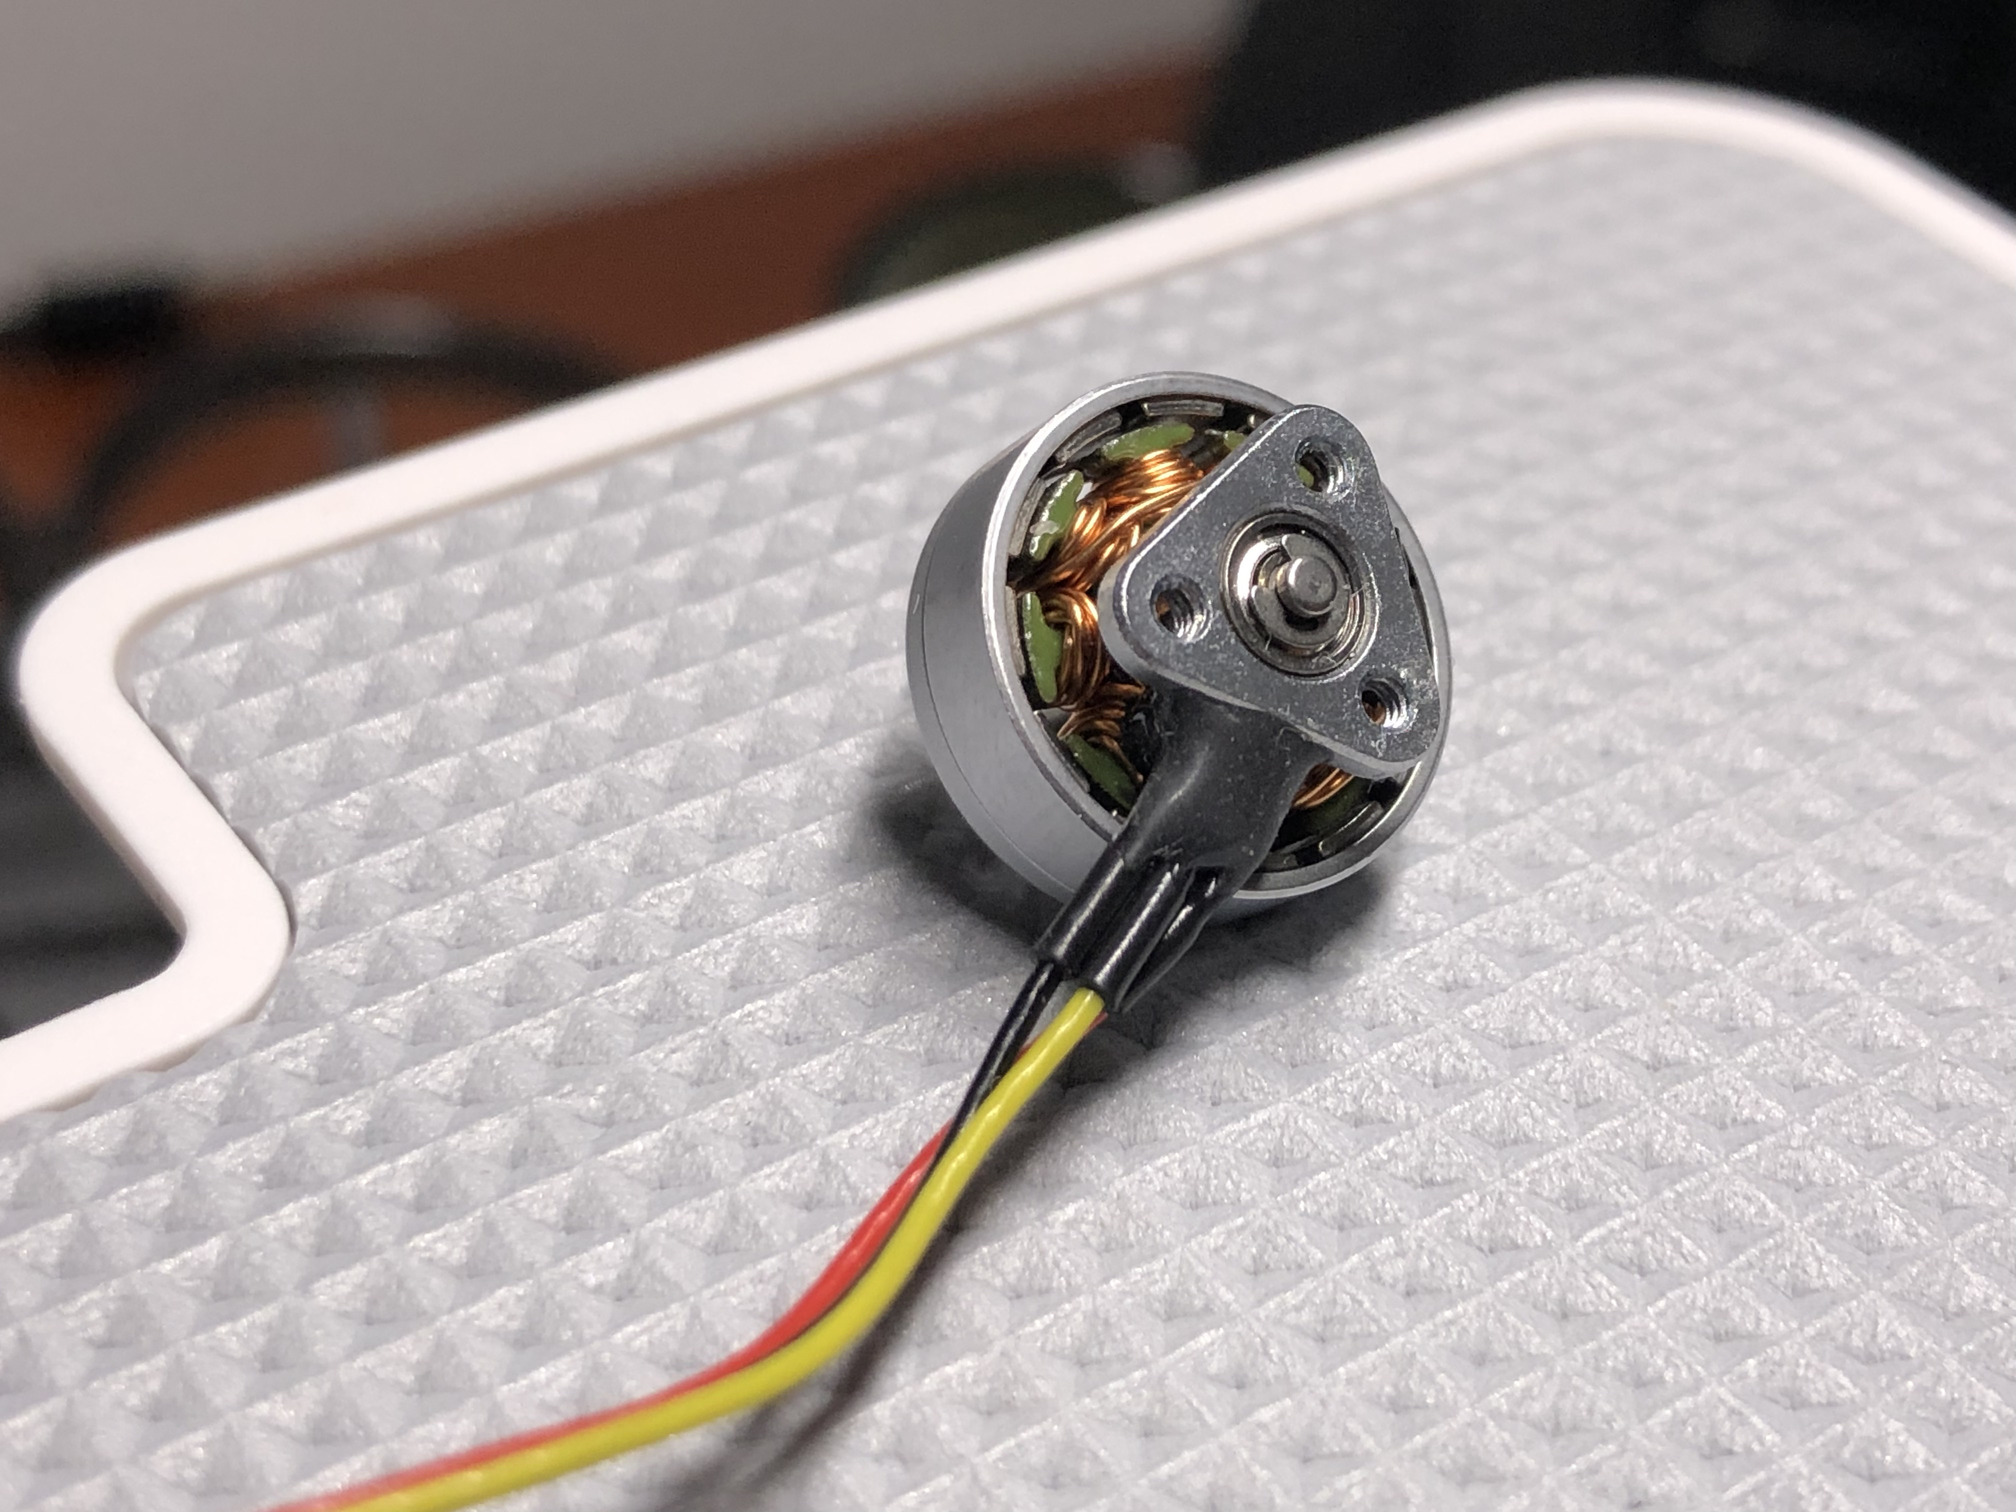
tried to use 3S with set motor_output_limit = 60, burned those the 1103 15000KV motors right after takeoff.
replaced the motors with Happymodel EX1103 11000KV 2S, at set motor_output_limit = 80 there is no more voltage sag, the problem was with the generic motors not suitable for a quad this heavy (or them being close to 1S rather than 2S) and drawing too much current. the current at hovering dropped from 4.5A@34% to 3A@41% (at ibata_scale = 400). set motor_output_limit = 100 also works without FC restarts.
got motor desync event at 15 degrees timing, moved ESCs back to 22.5 degrees
flight time at 96kHz PWM, 22.5 degrees motor timing, 90% motor limit, outside temperature around 0 degrees celsius, two LiHV 550mah 100C A30 batteries in series: around 2 minutes down to 3.3v
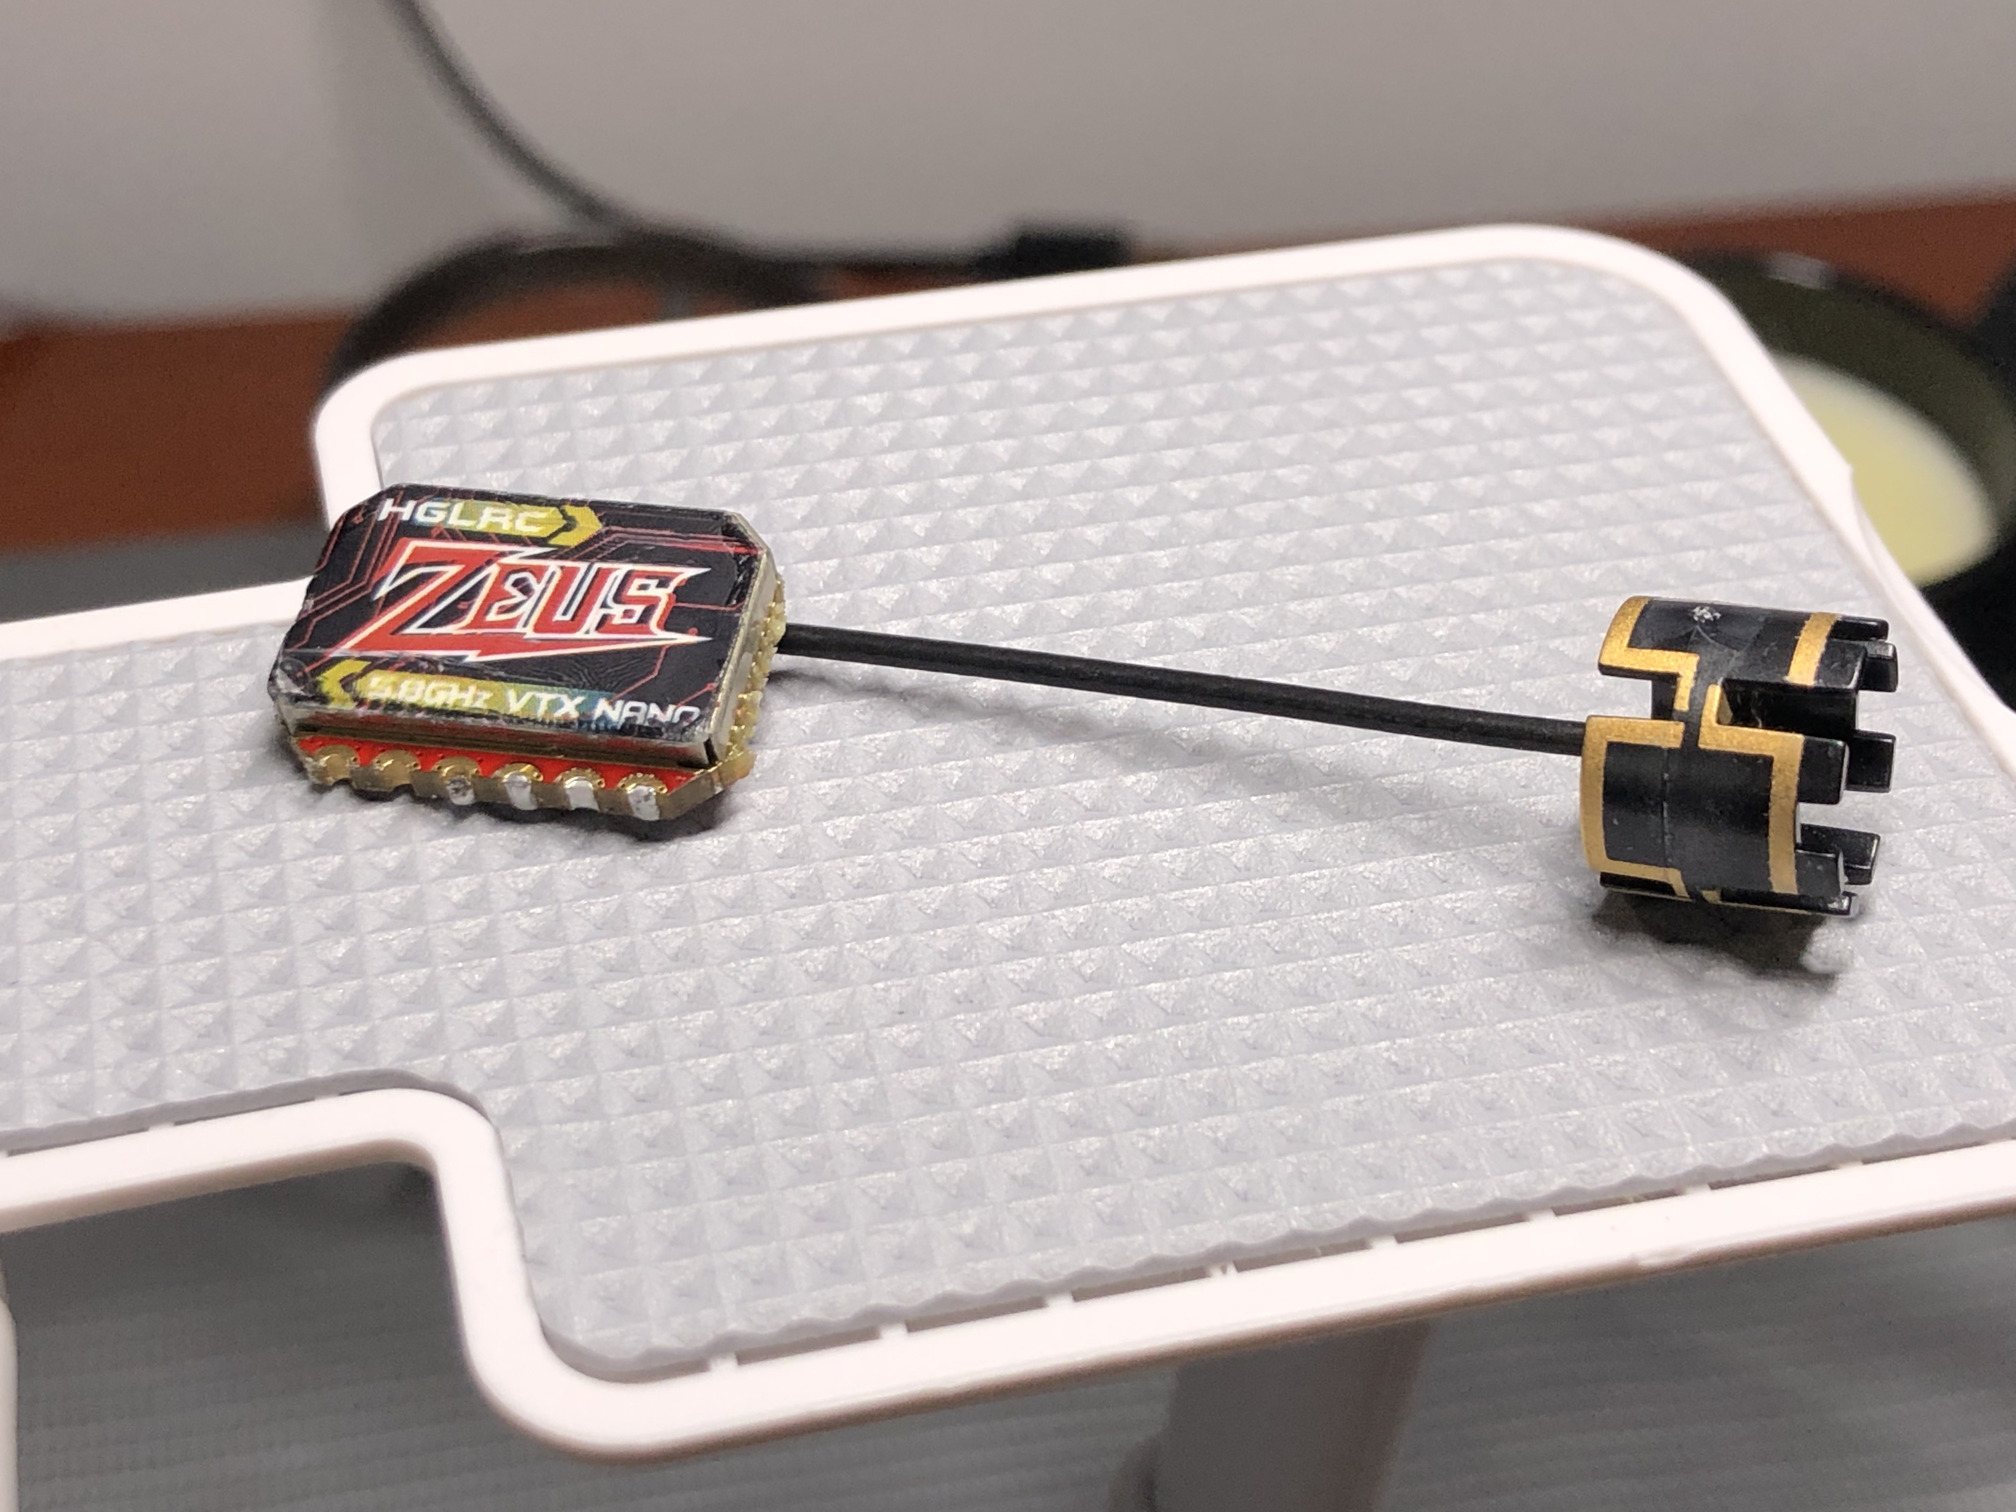
the 5GHz antenna requires putting a heatshrink to the place where the cable is soldered to the antenna itself, otherwise the shielding gradually breaks and loses contact with the antenna
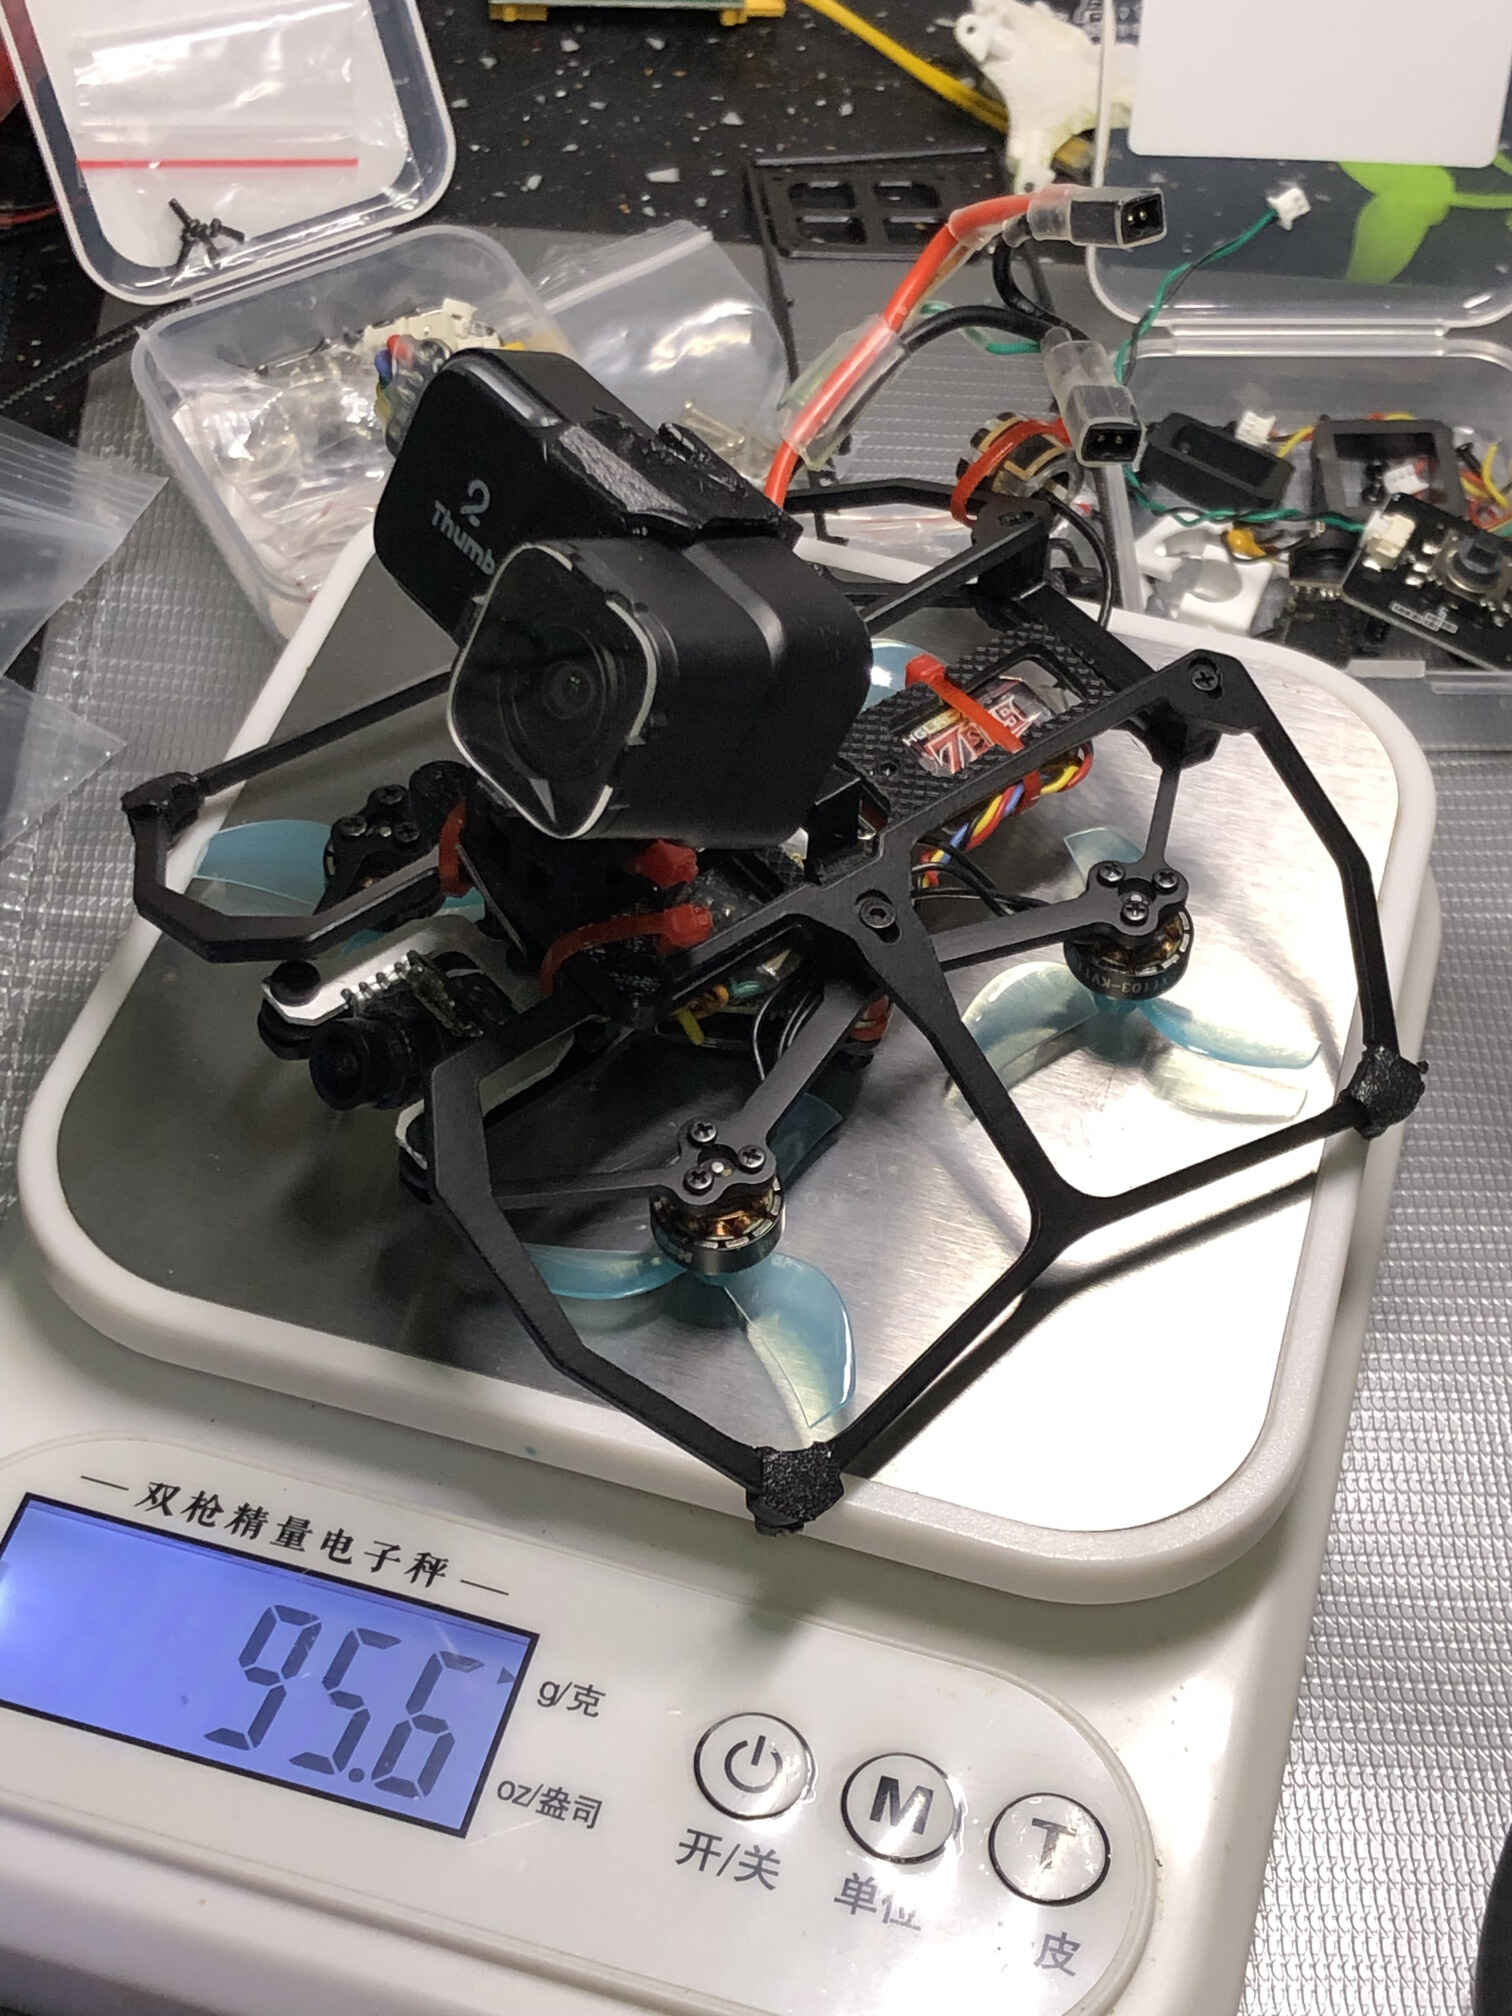
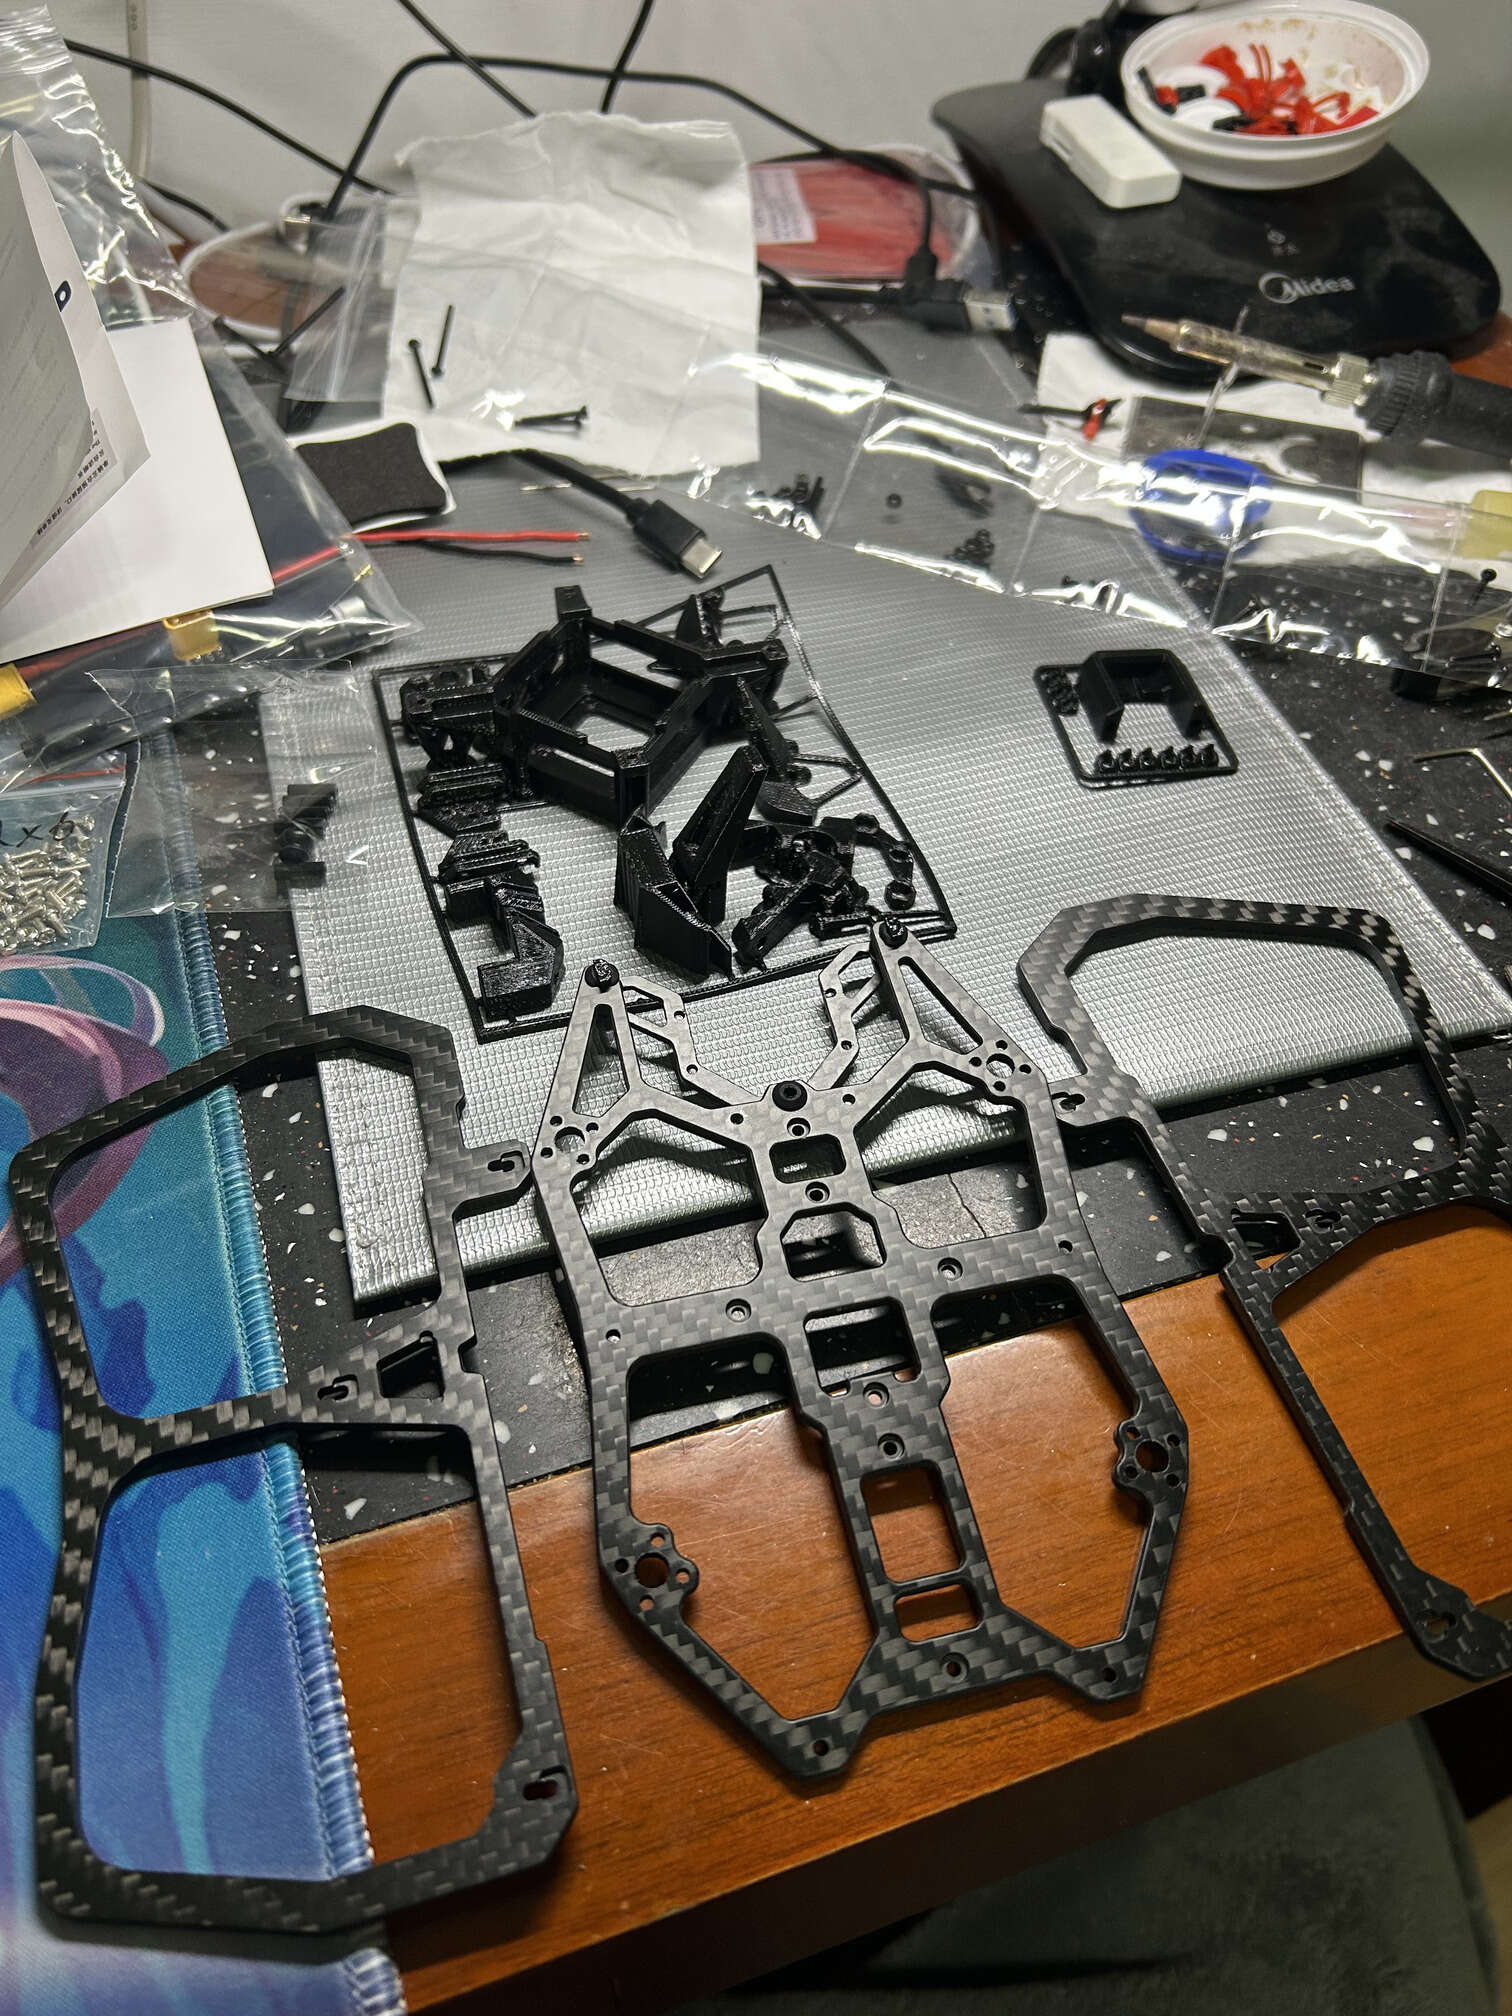
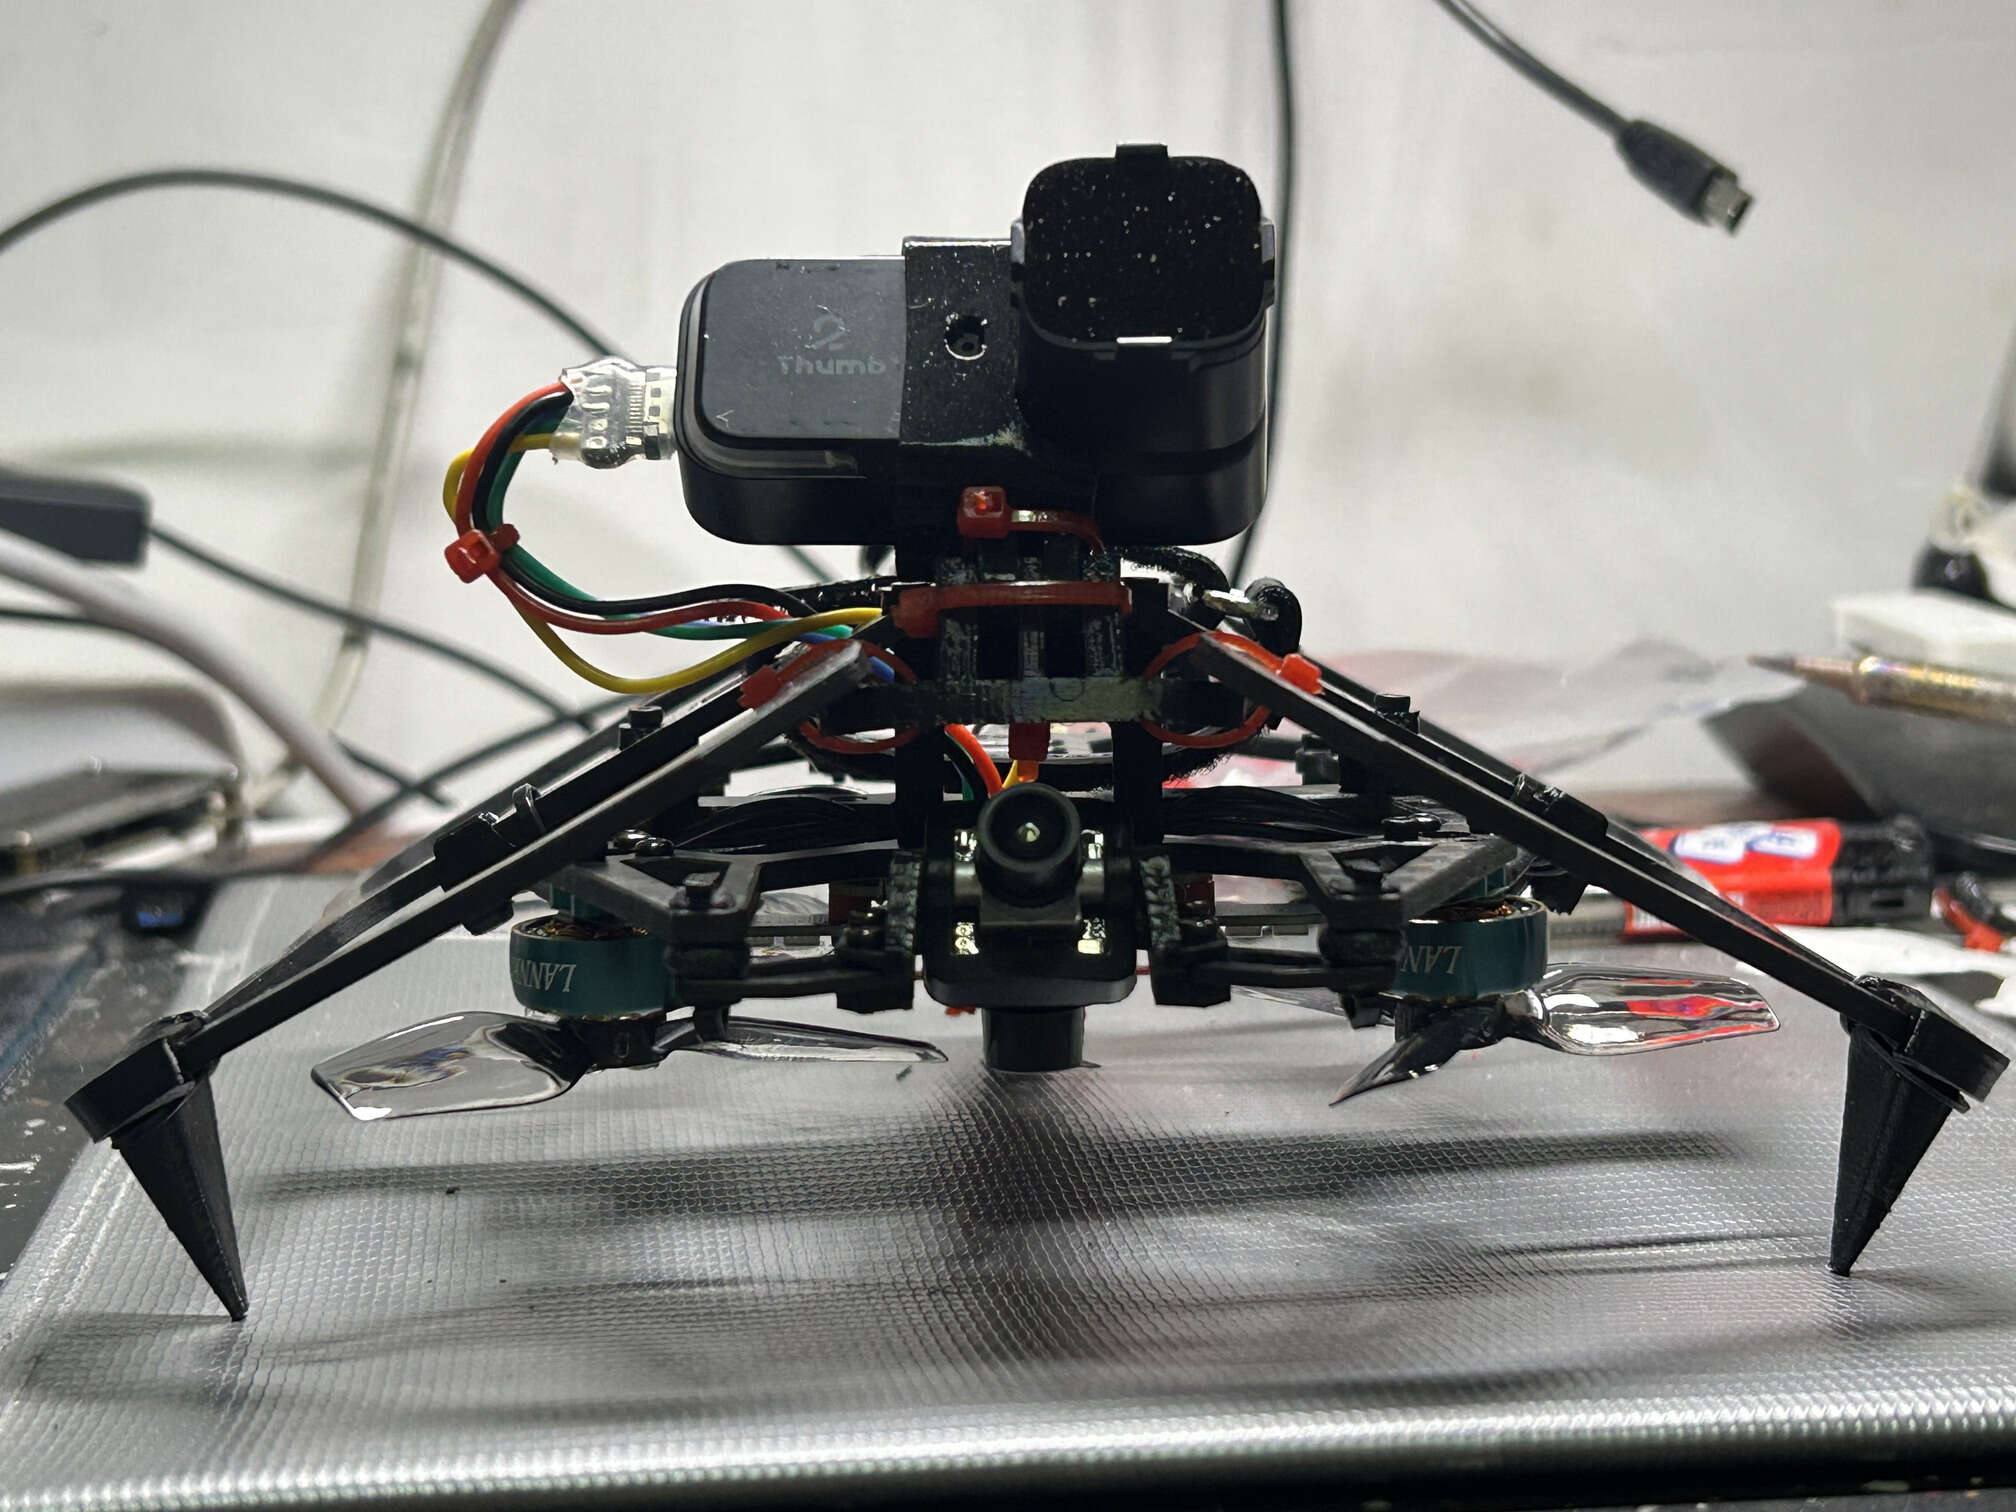
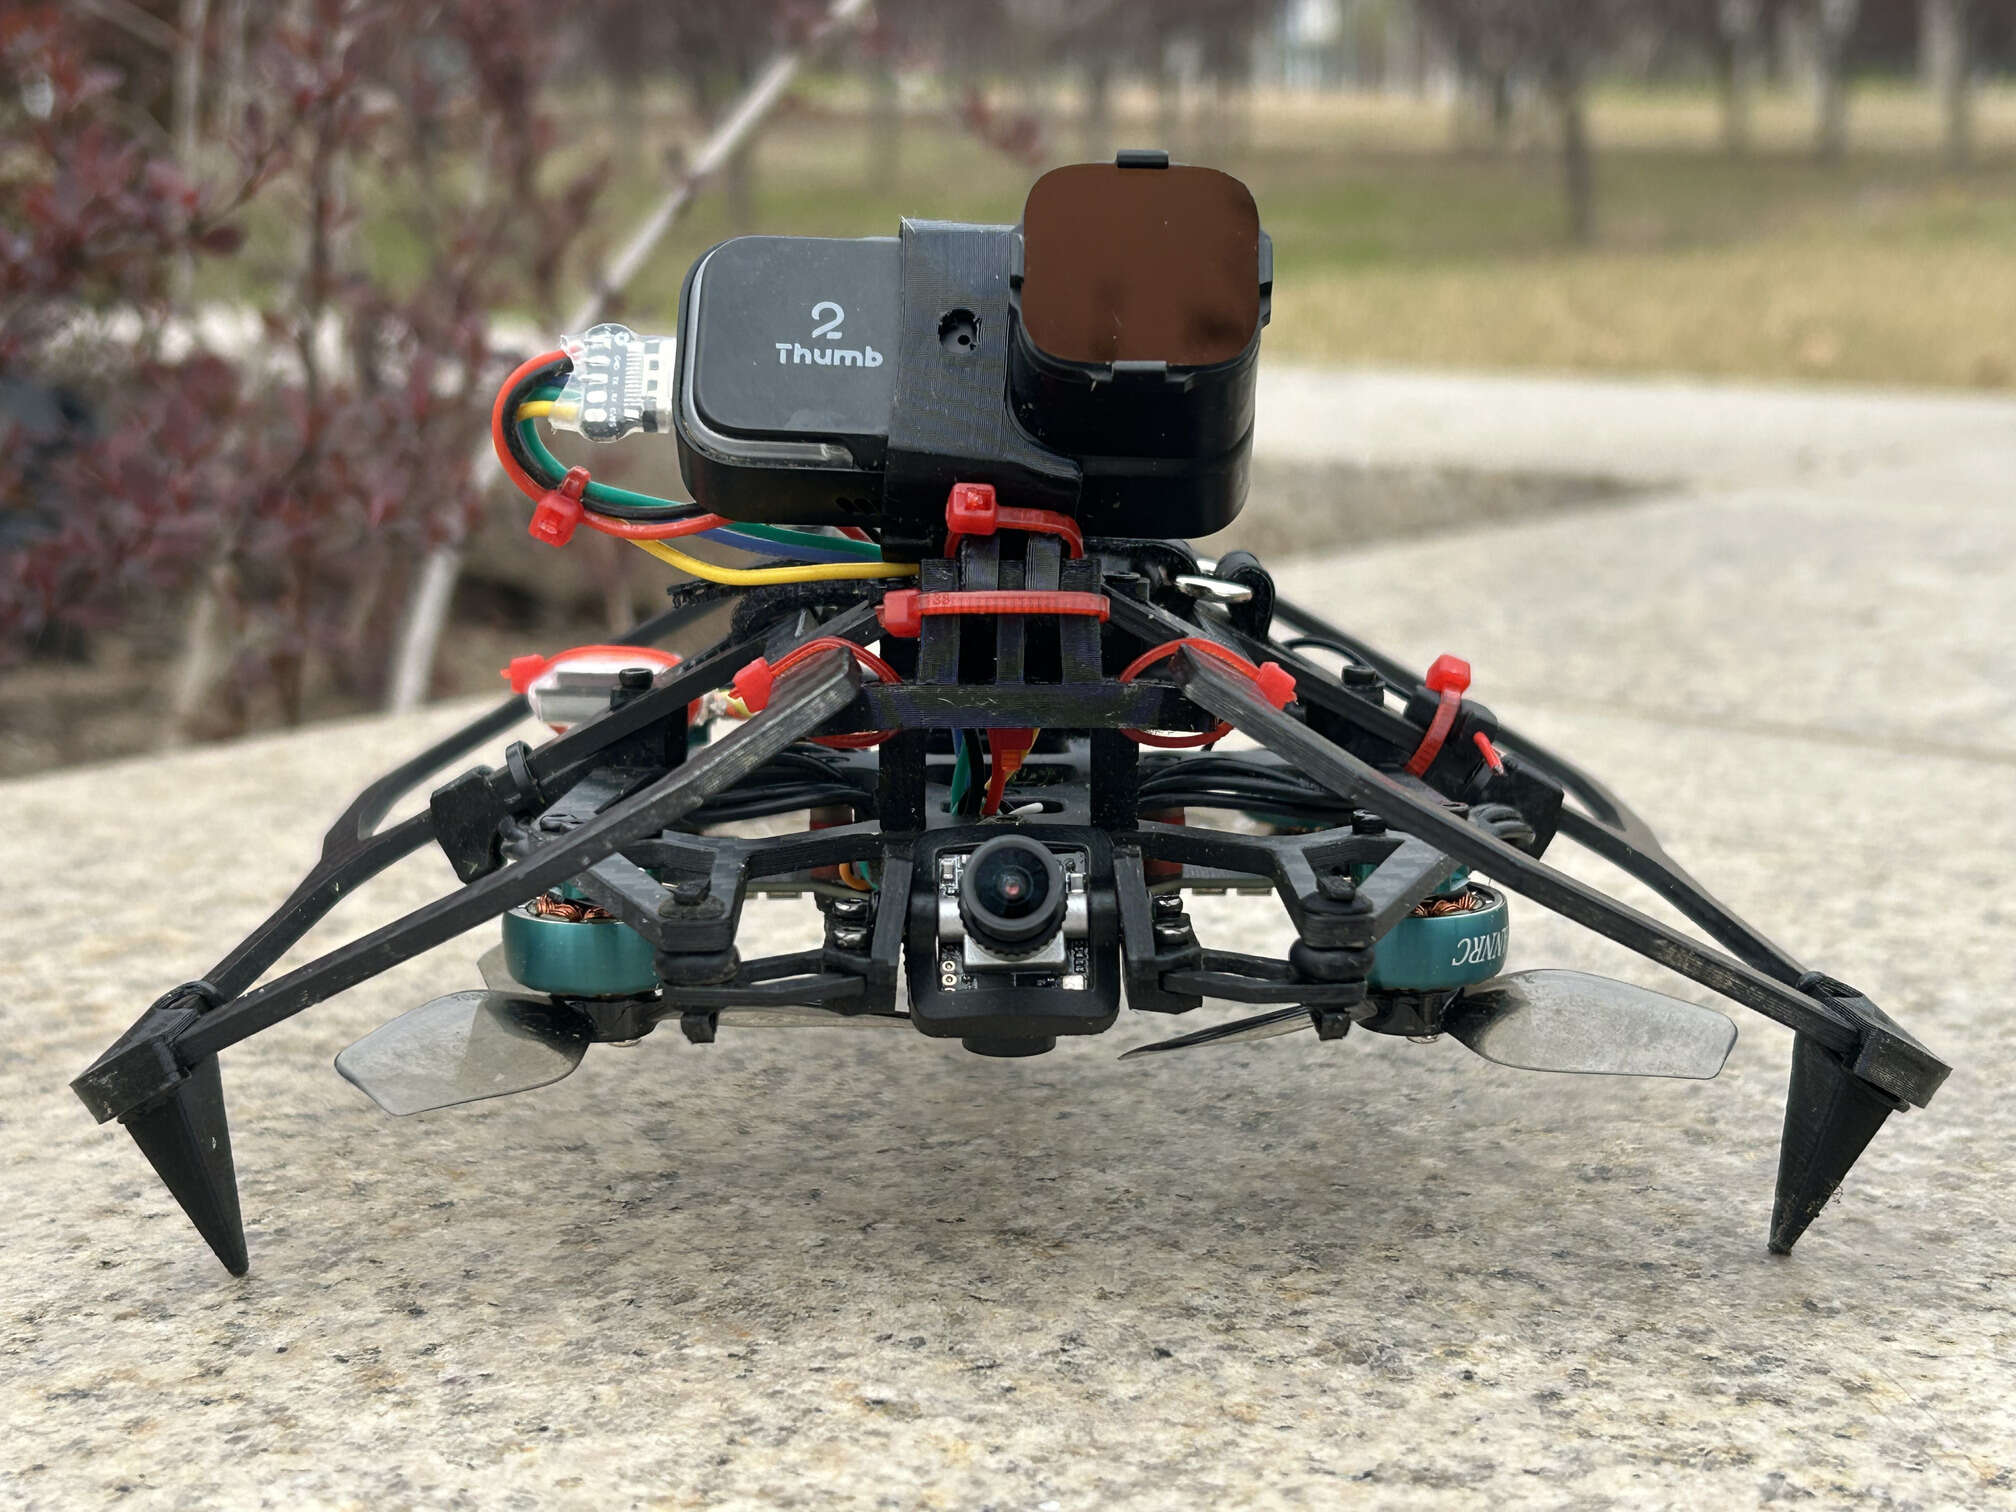
update 2: 1.8 inch frame transplant
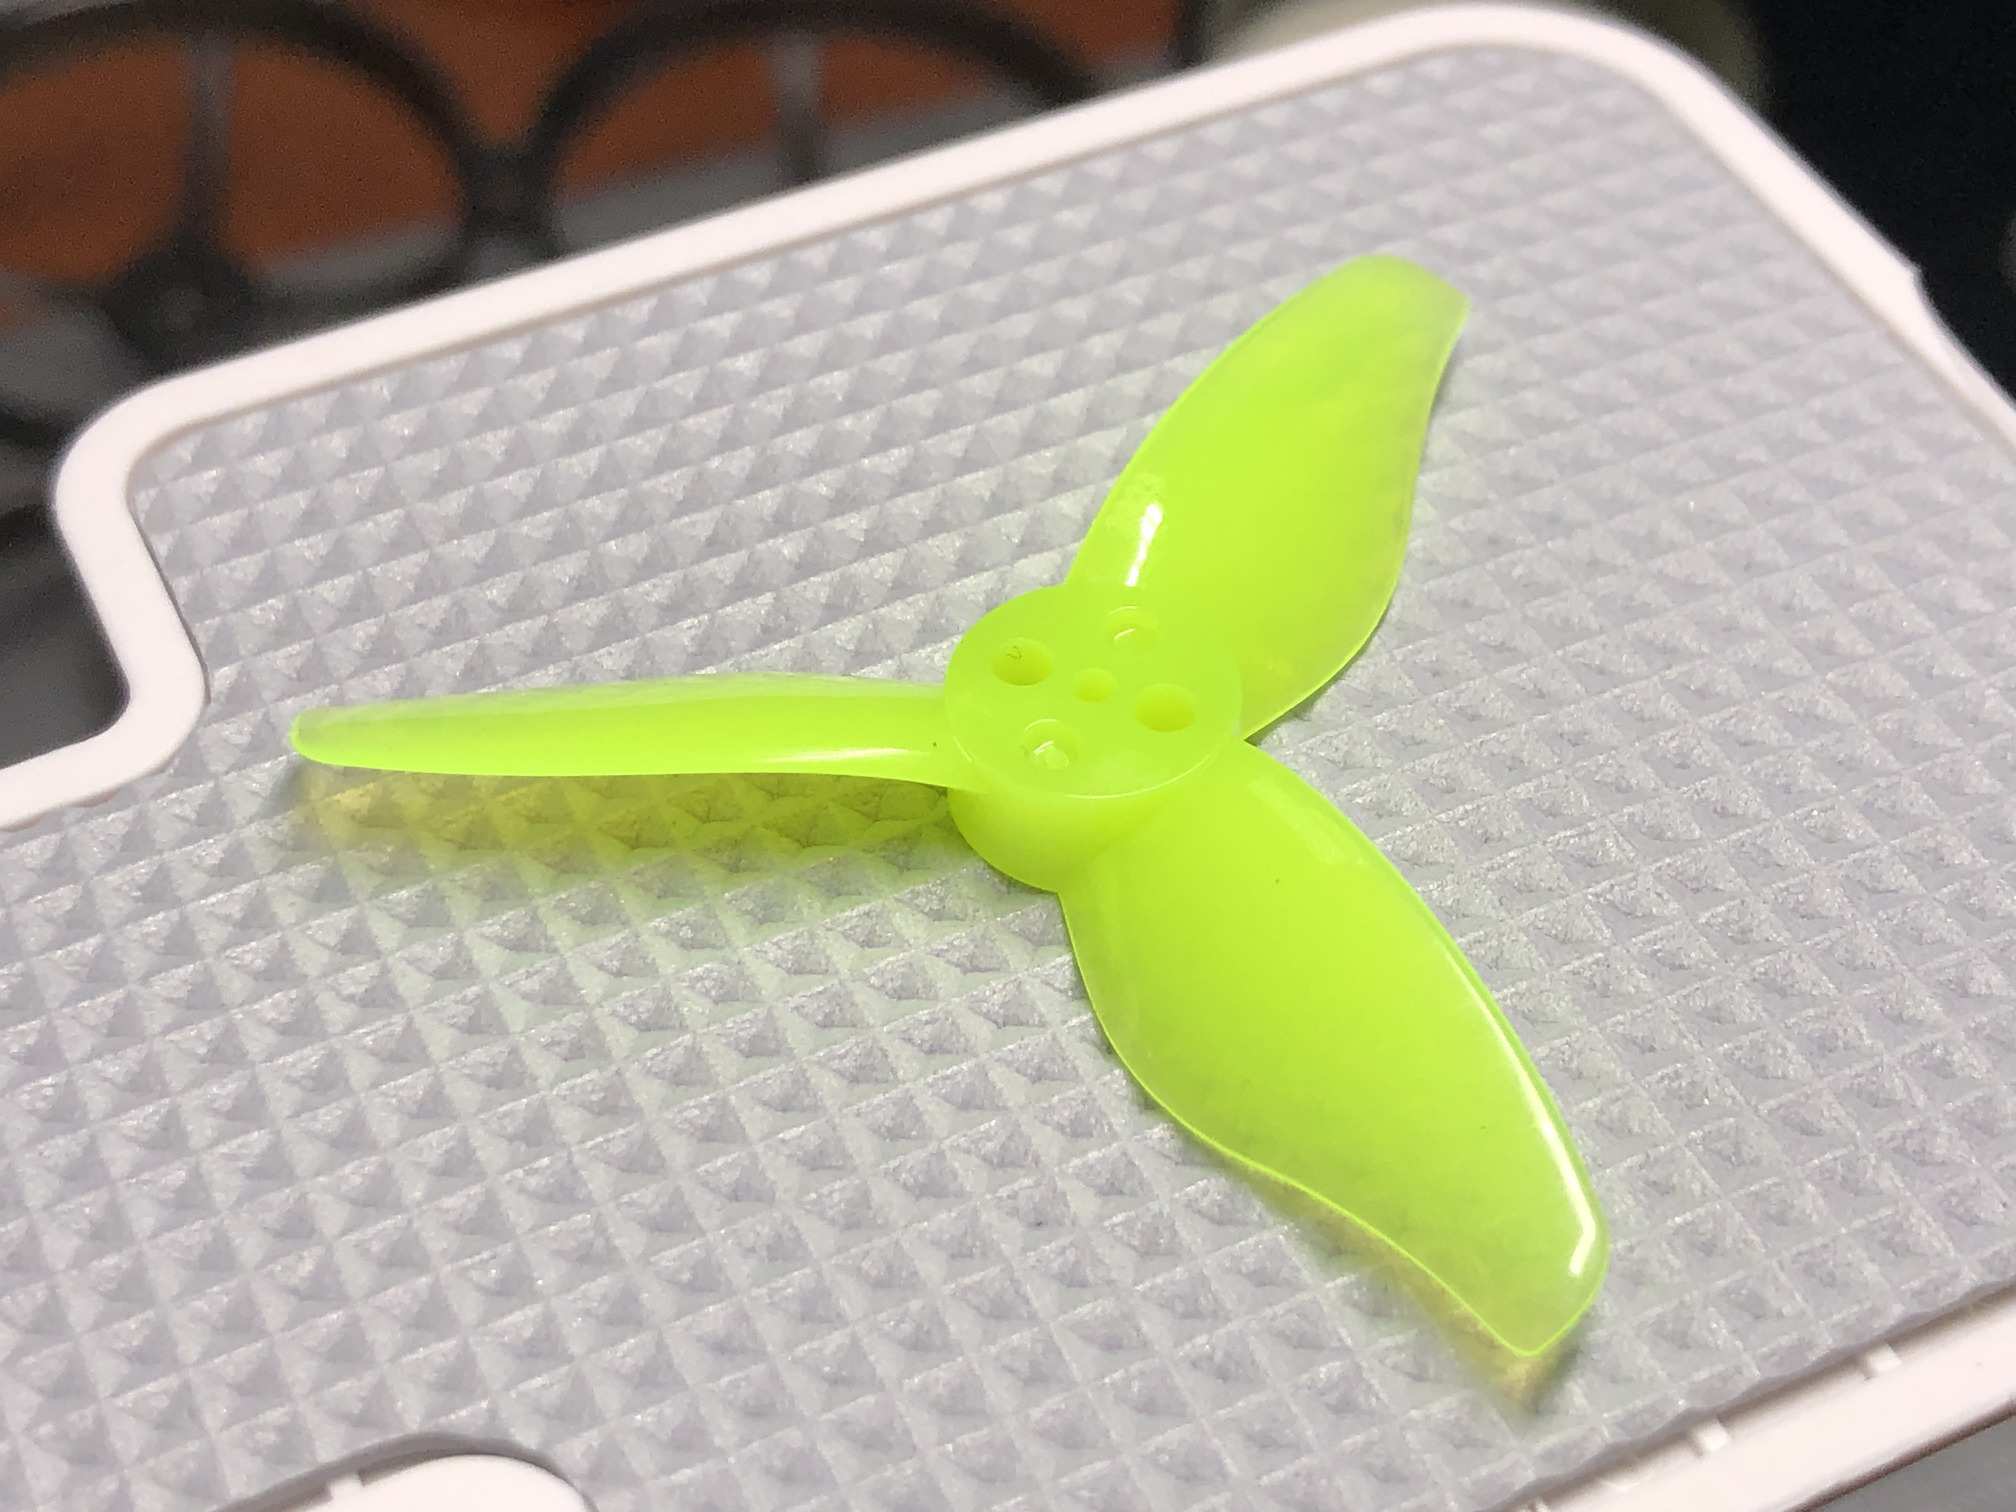
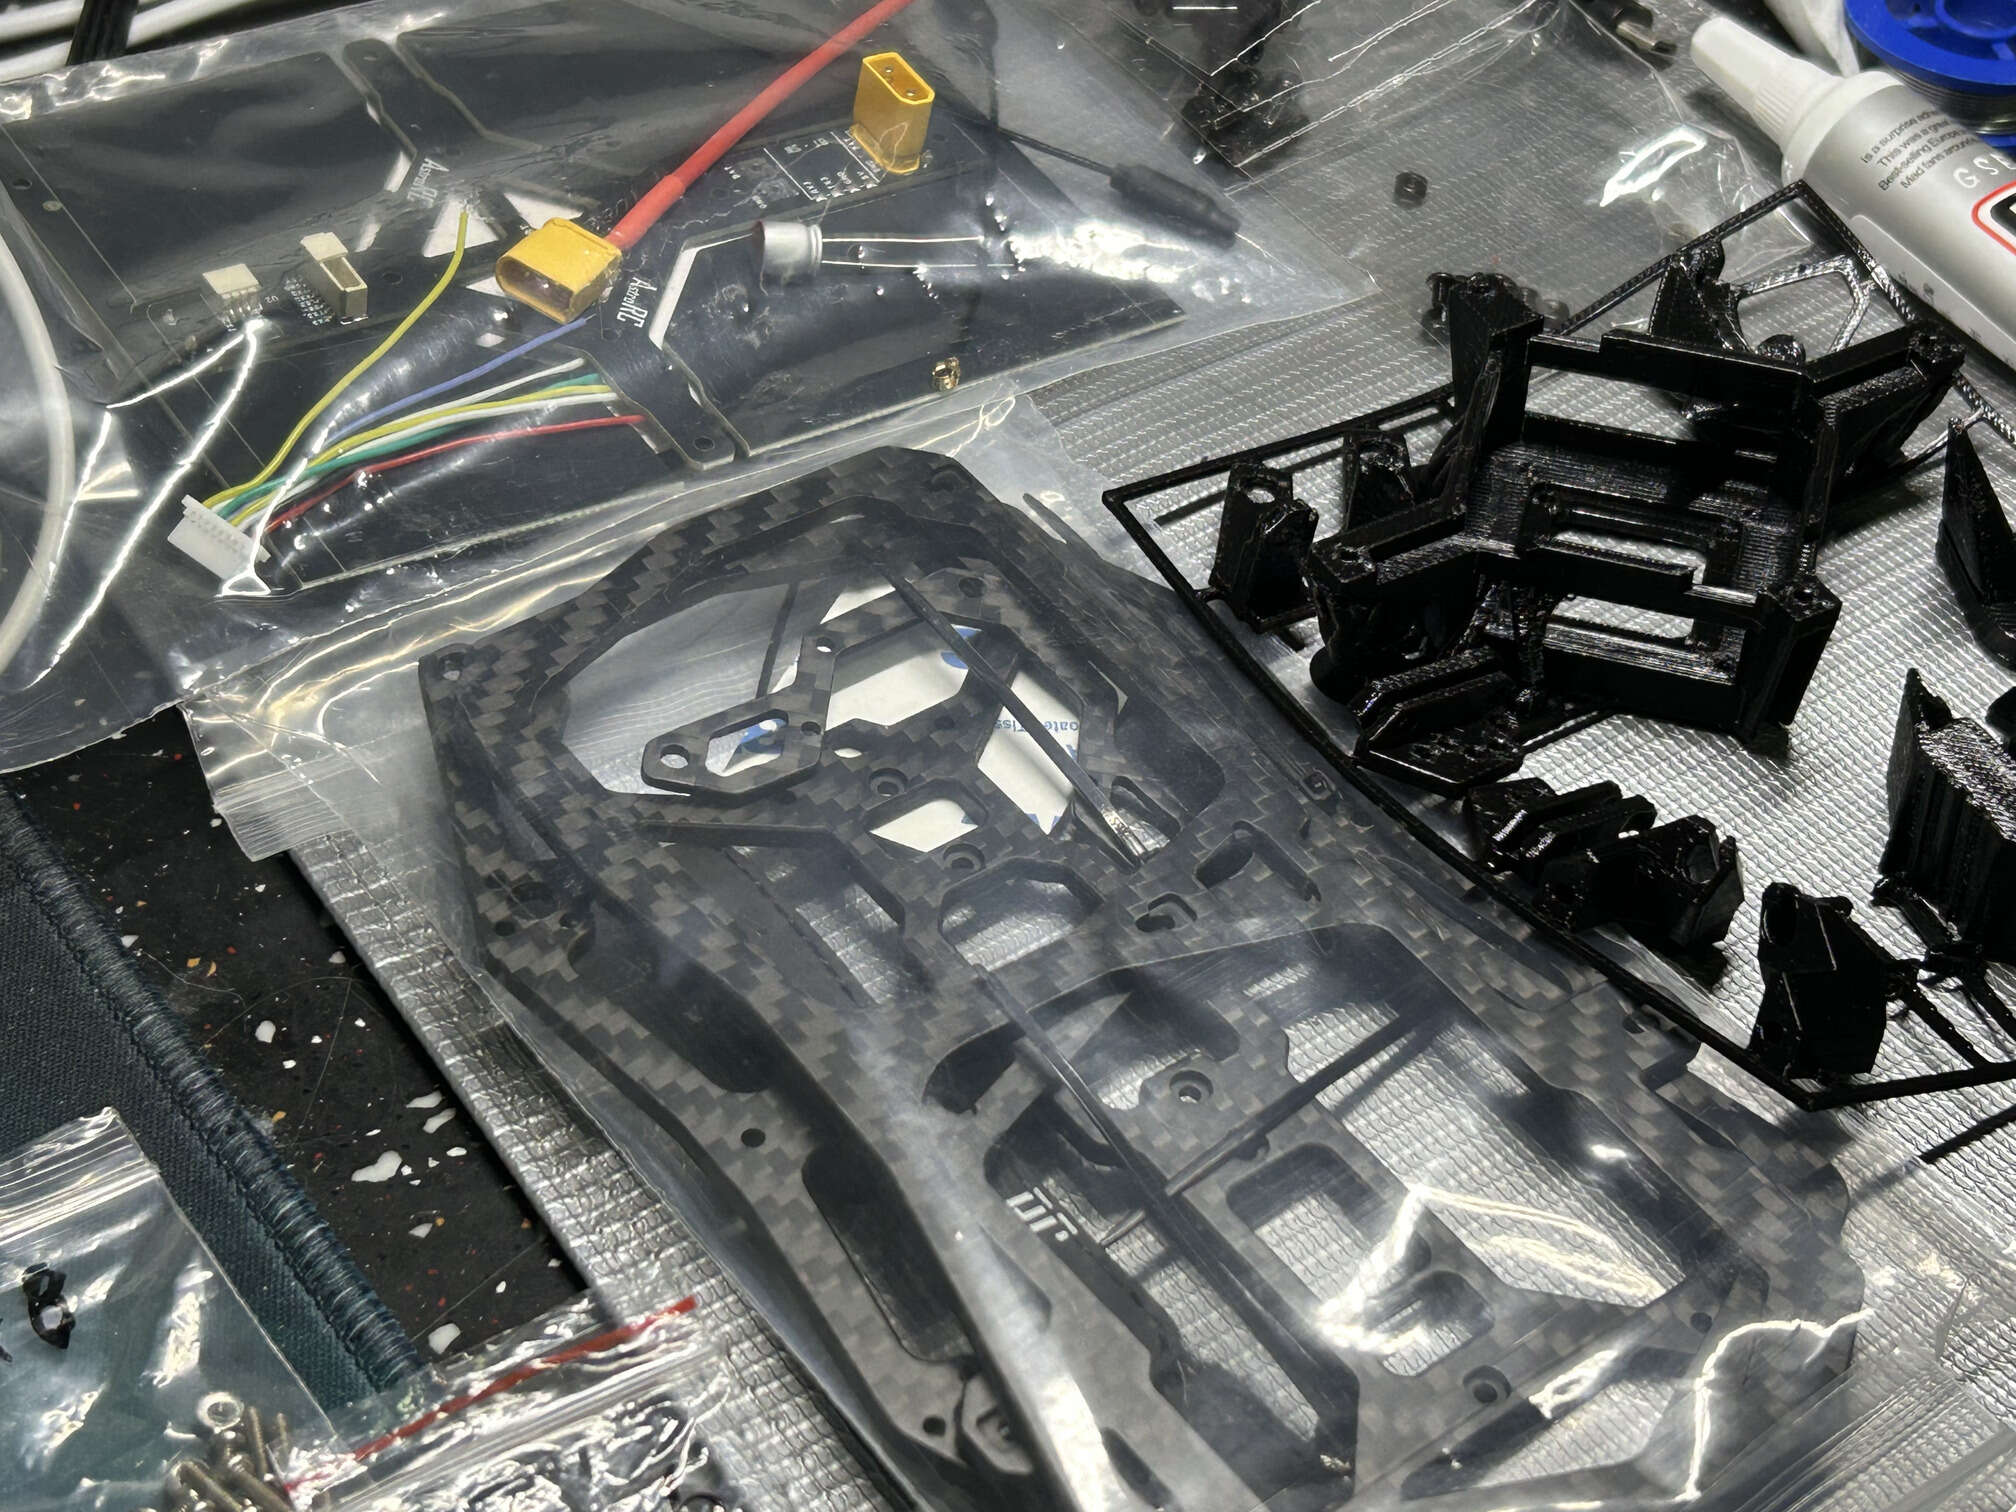
transplanting everything into a carbon fiber AstroRC Carbonfly 80 (薯片80) frame. I couldn’t choose the 2inch frame because the motor mounts are different (4 holes on 9mm radius) and I would like to keep my motors. AstroRC official frame assembly tutorial, changing the props to gemfan 45mm-3 because 2023 do not fit into the frame without modifications (that will follow)
dry weight: 95.6 grams, all up weight: 121.8 grams. flight time 3 to 3.5 minutes (winter), max current 9A.
looking for the explanation to the extended flight time
the 1103 motors with Gemfan 45mm-3 max RPM at full throttle reach 53000rpm, compared to 38000rpm with 2023 props in mobula8 frame
hypothesis: the motors do not have enough torque to spin the 2023 props (high pitch) at high RPM on a quad this heavy, so they draw more current, draining the battery while not producing enough thrust. and the smaller props, on contrary, are able to spin to higher RPM, producing more thrust at lower current draw. so presumably on a lighter quad like the original analog mobula8 with 1103 motors the 2023 props would work just fine. the intuition behind is represented by “disk loading”, explained with the prop tip speed and AUP
2023 props test: use 4mm aluminum alloy standoffs and M1.6x8 screws. motors at full throttle rpm reach 40000rpm, overloads the battery on high throttle maneuvers (FC restarts on crash but not in flight). hovering at 3.4A@40%. flight time feels a bit shorter (around 2.5 to 3 minutes). switched back to gemfan 45mm-3
update 3
tried gemfan 2023S props (50.8mm, pitch 2in). max current 12A, flight time almost the same as with 2023. switched back to gemfan 45mm-3
set crash_recovery = OFF because if ON and landing on an exhausted battery it might trigger the recovery and cause voltage dip, leading to the Thumb losing power and not writing the gyro data onto the memory card.
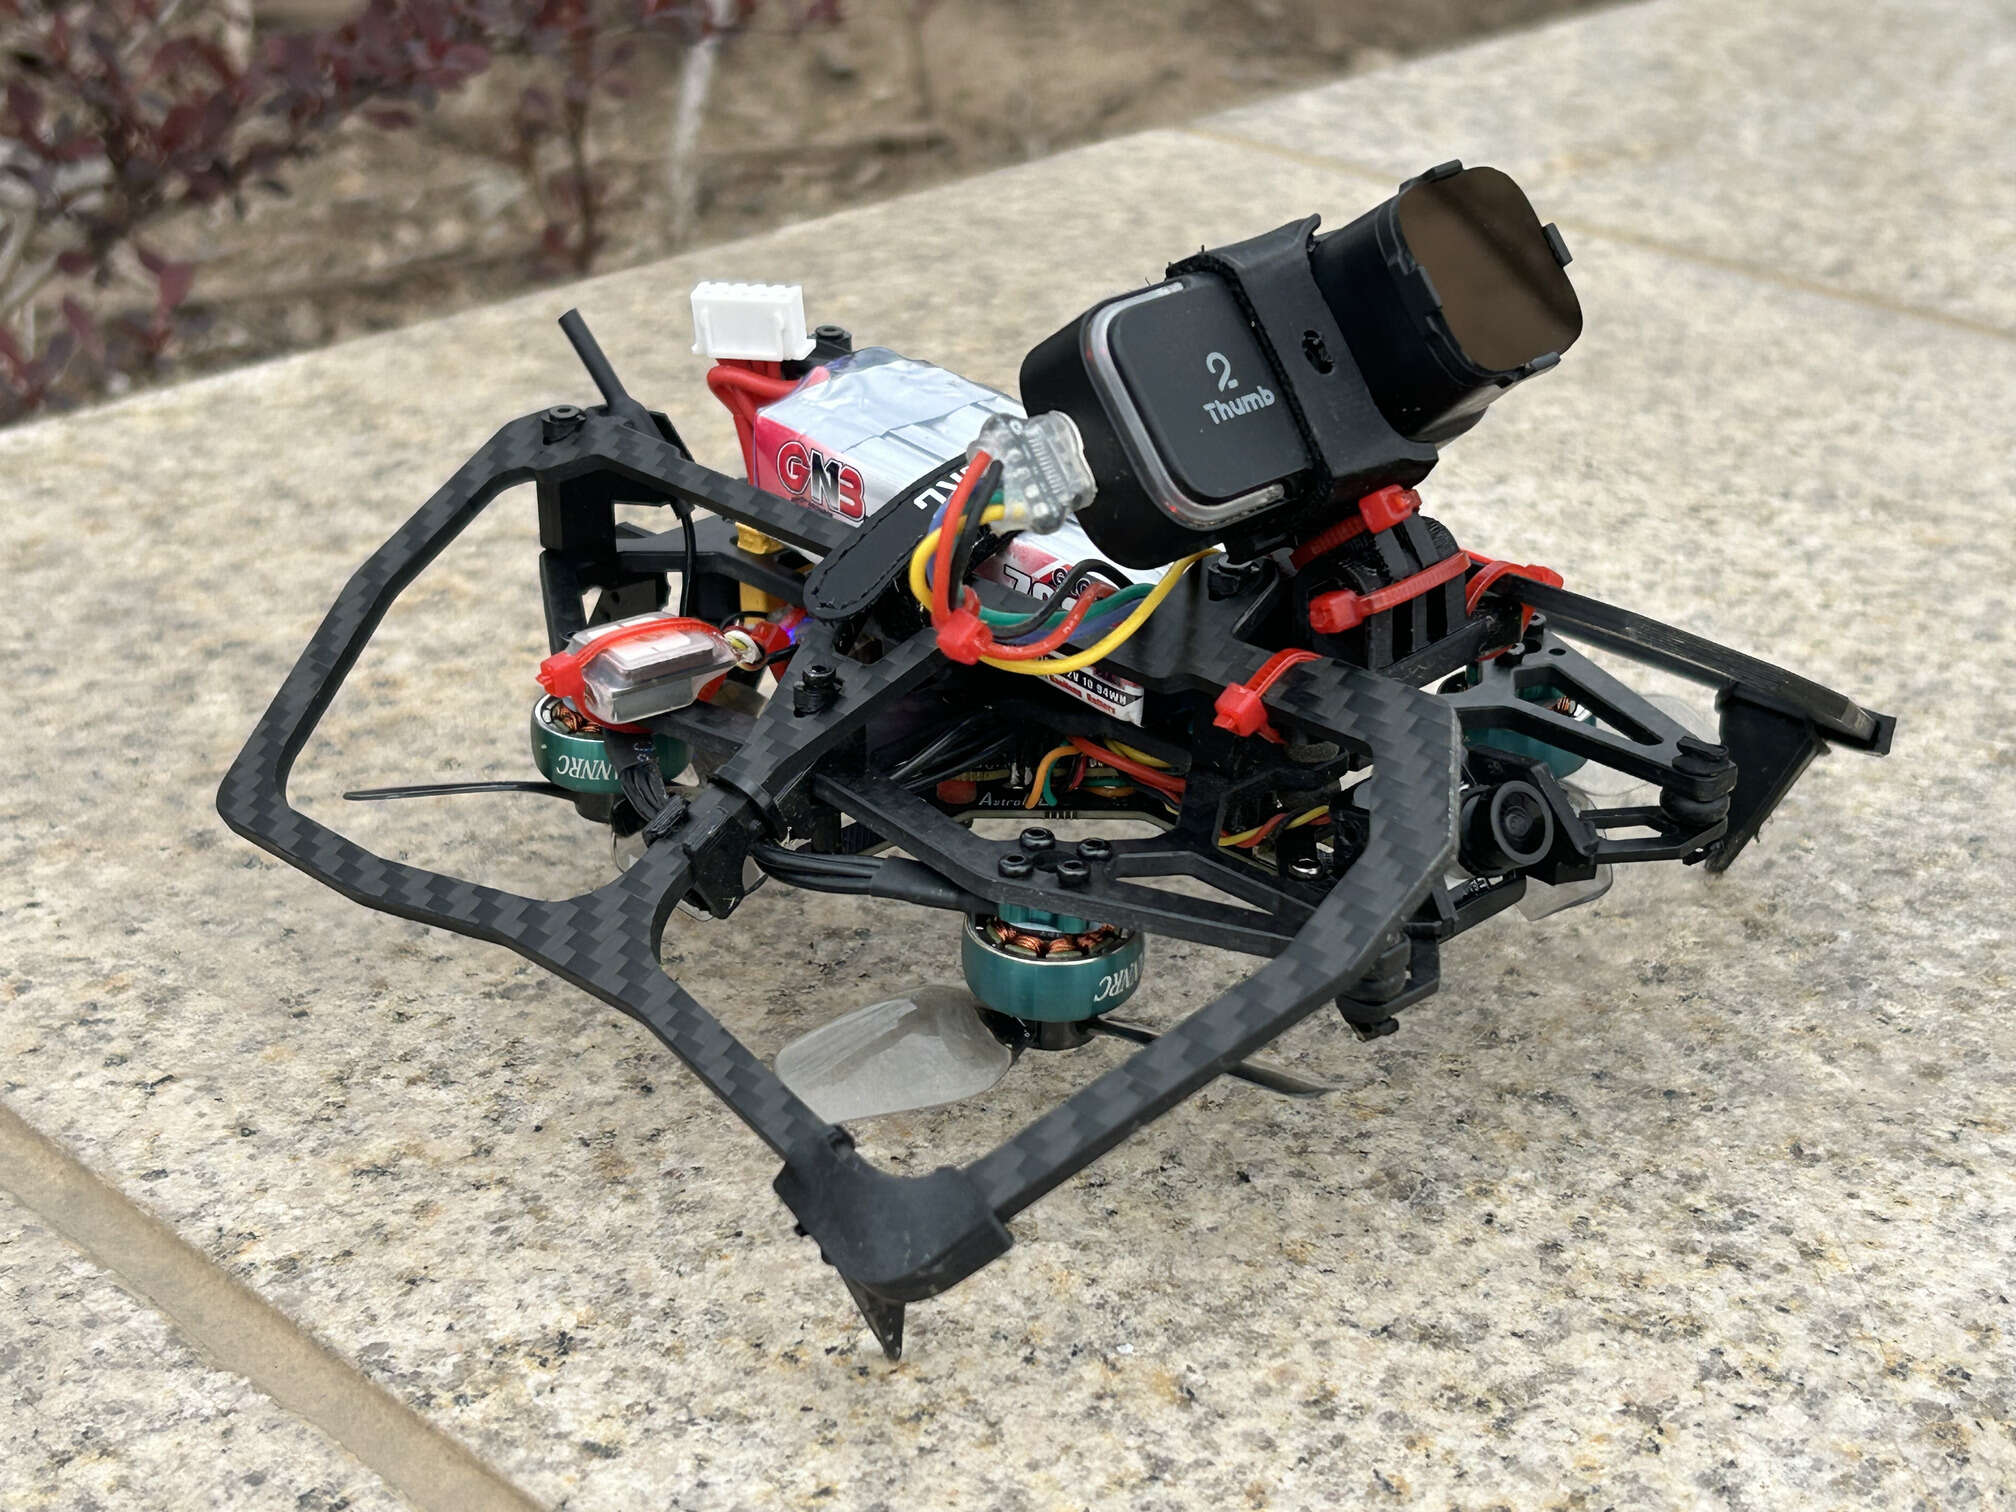
update 4: 2.5 inch frame transplant
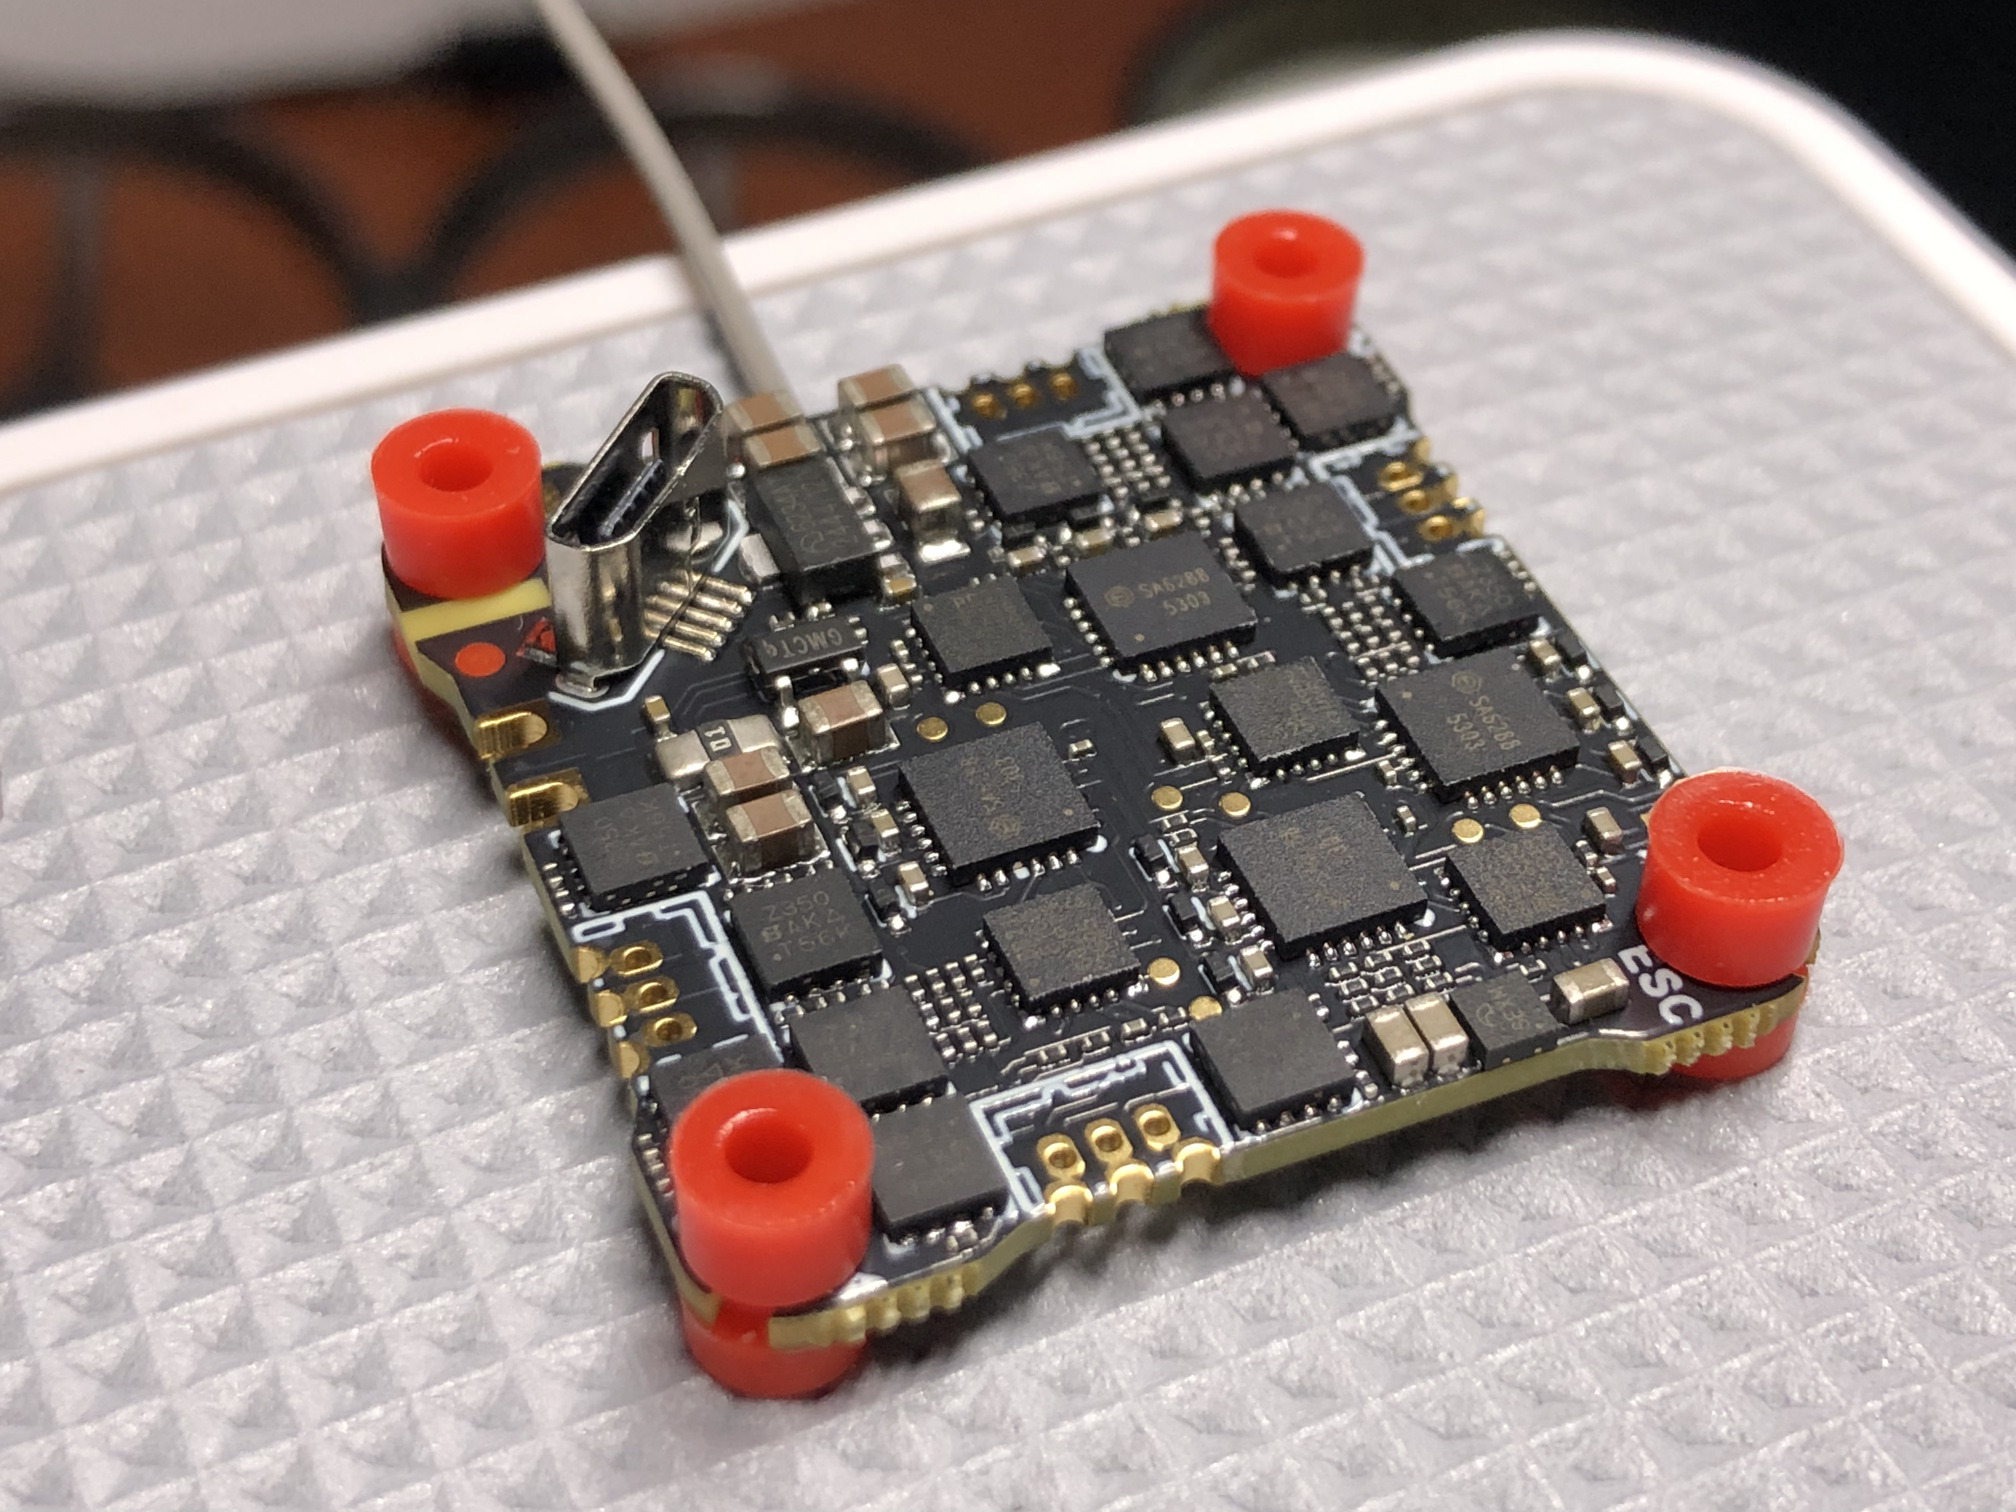
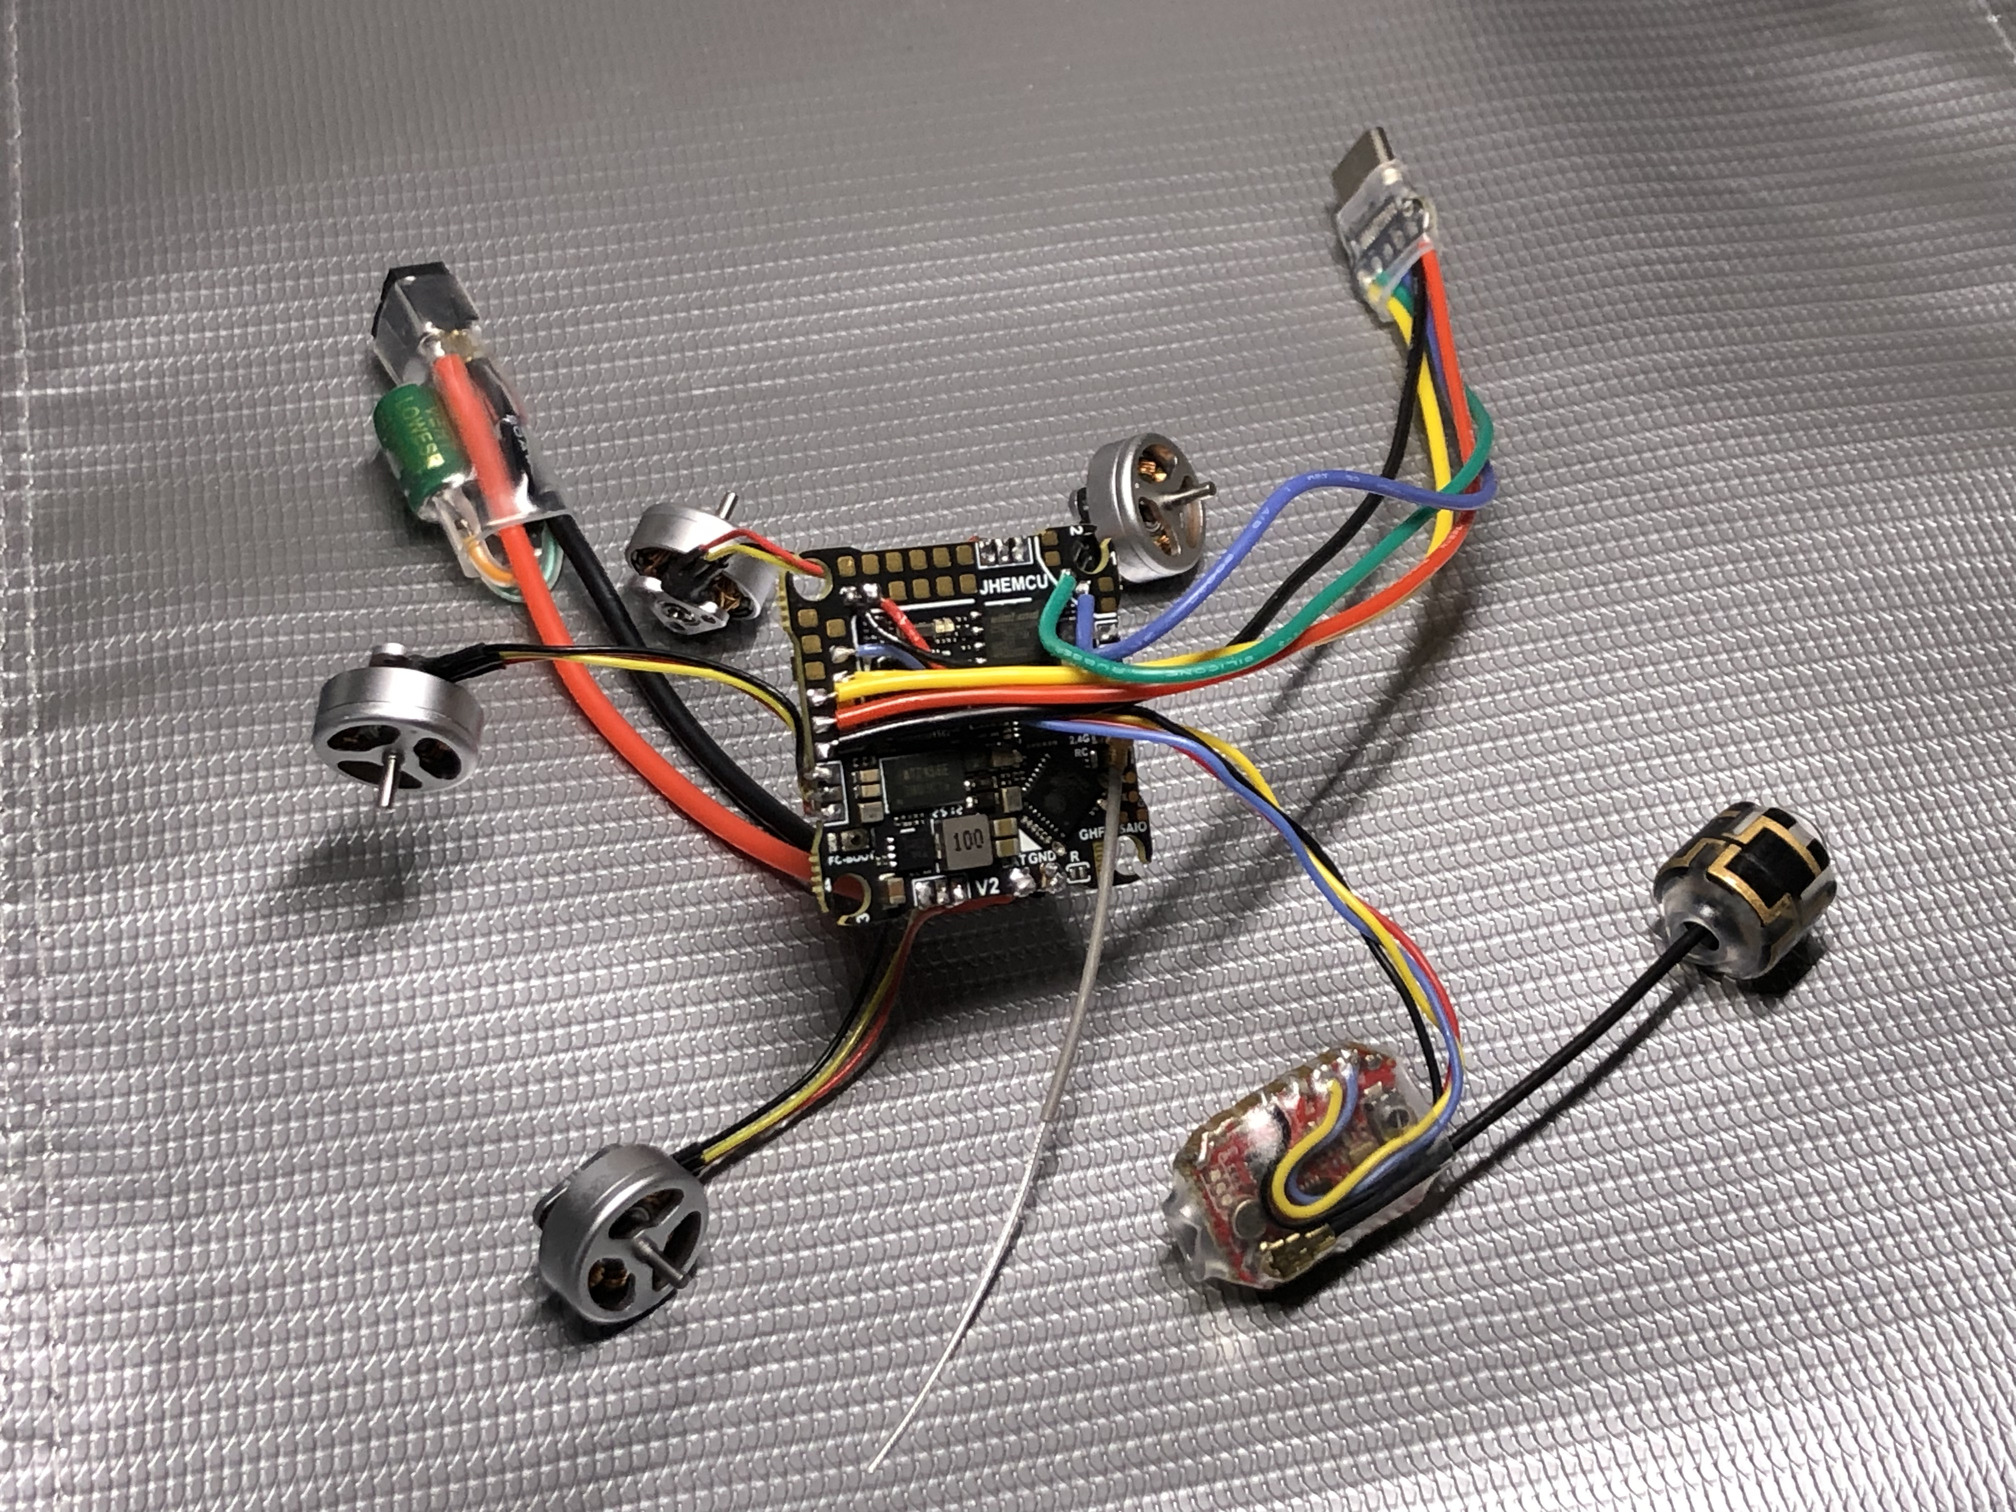
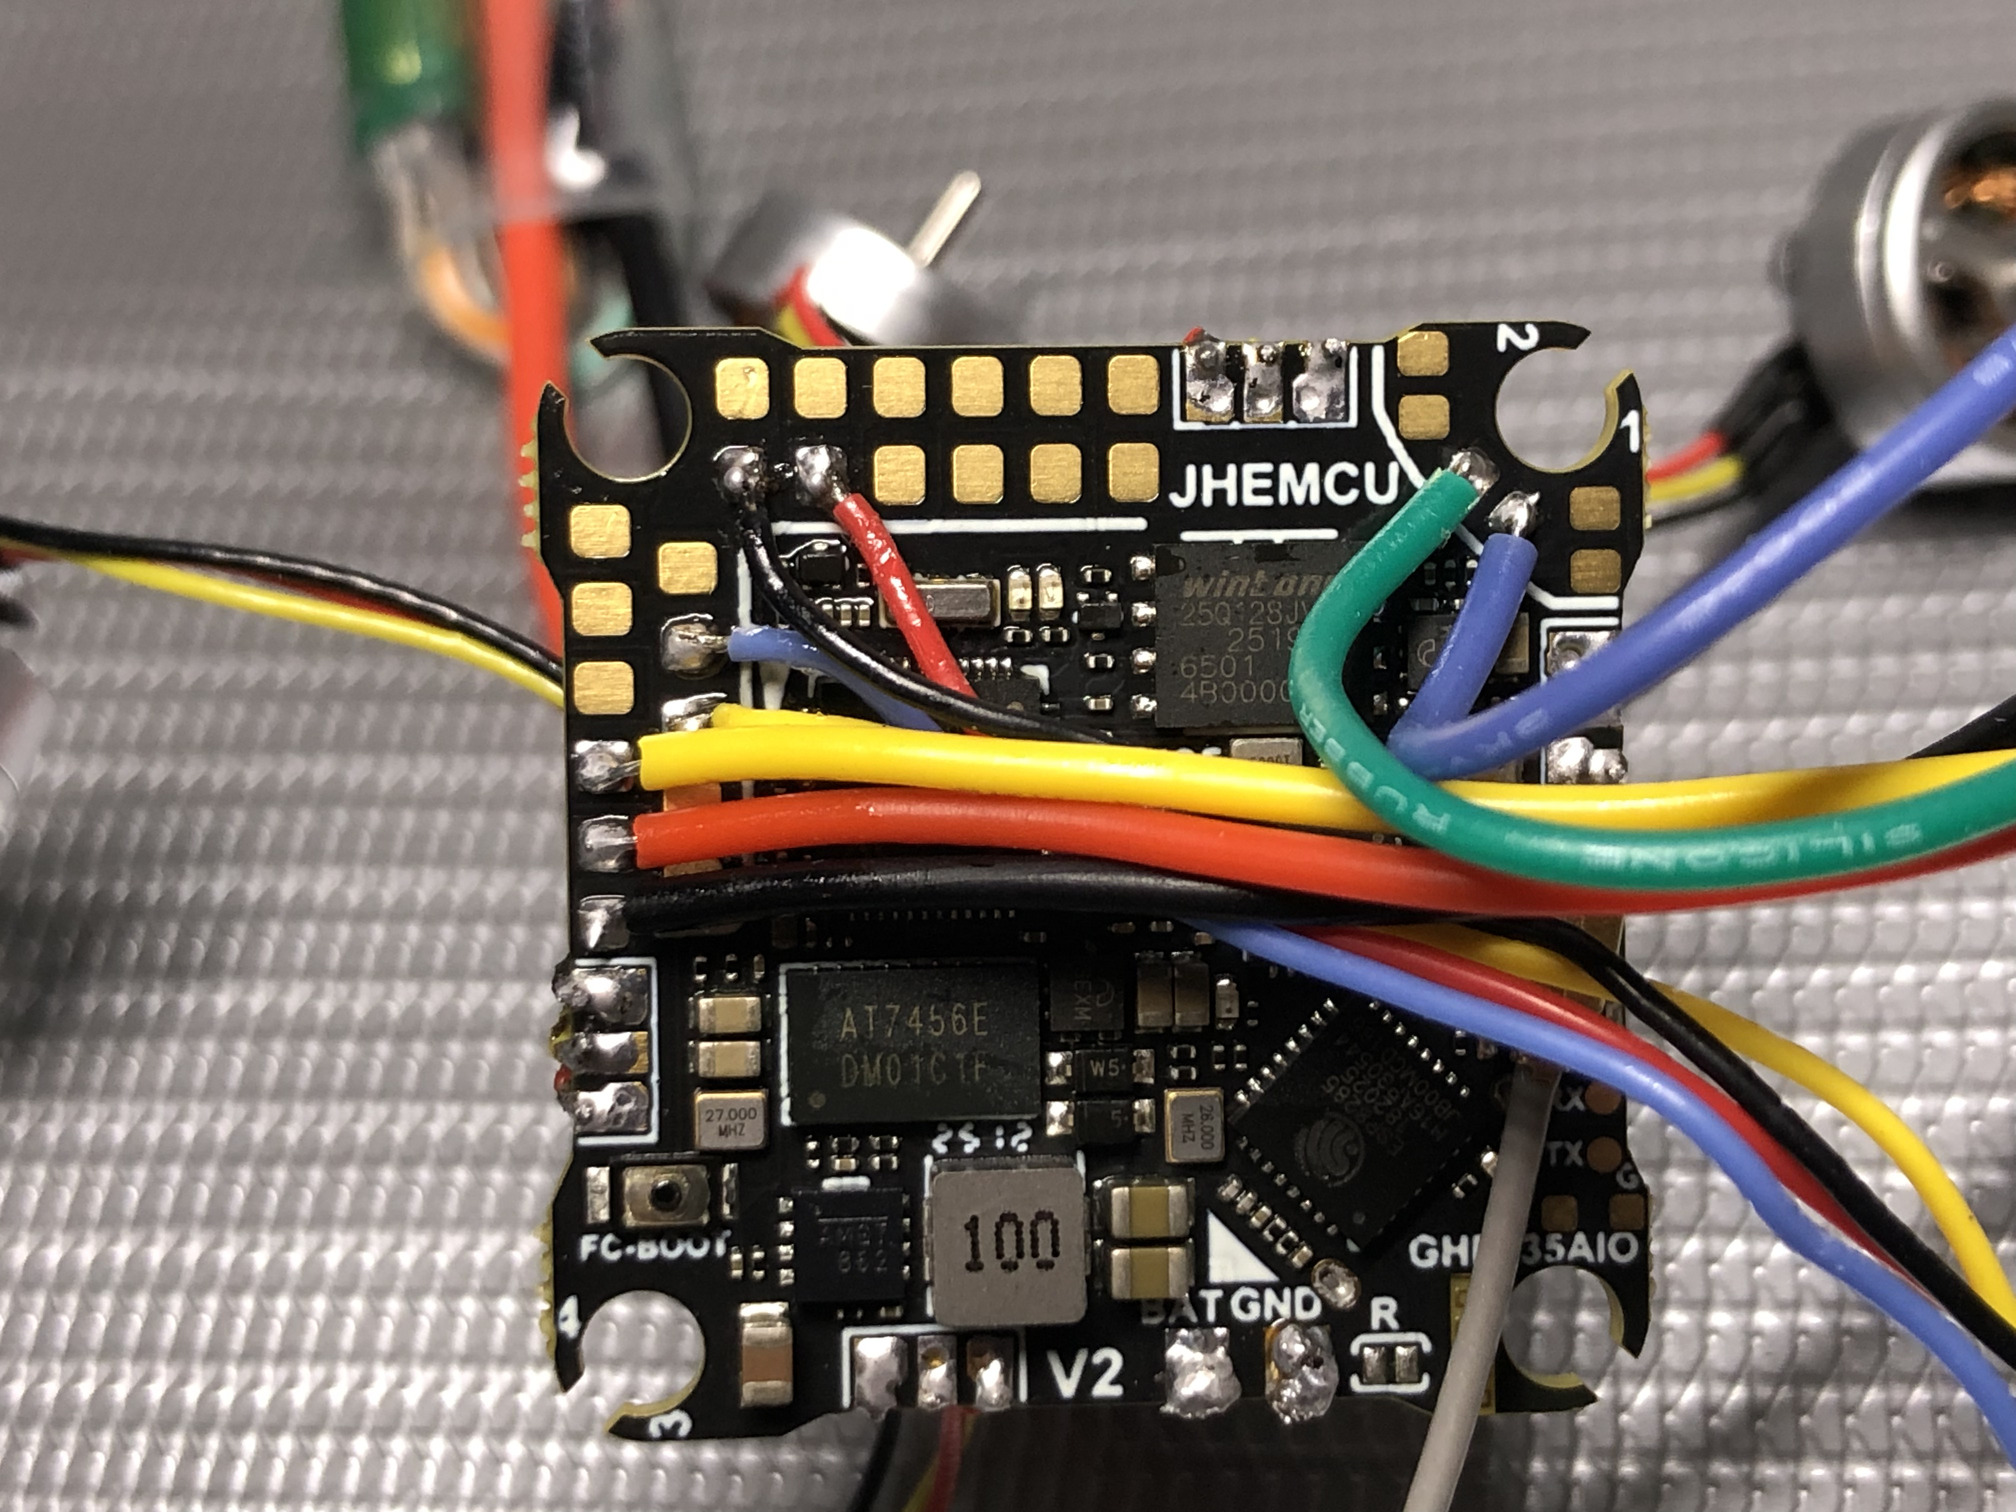
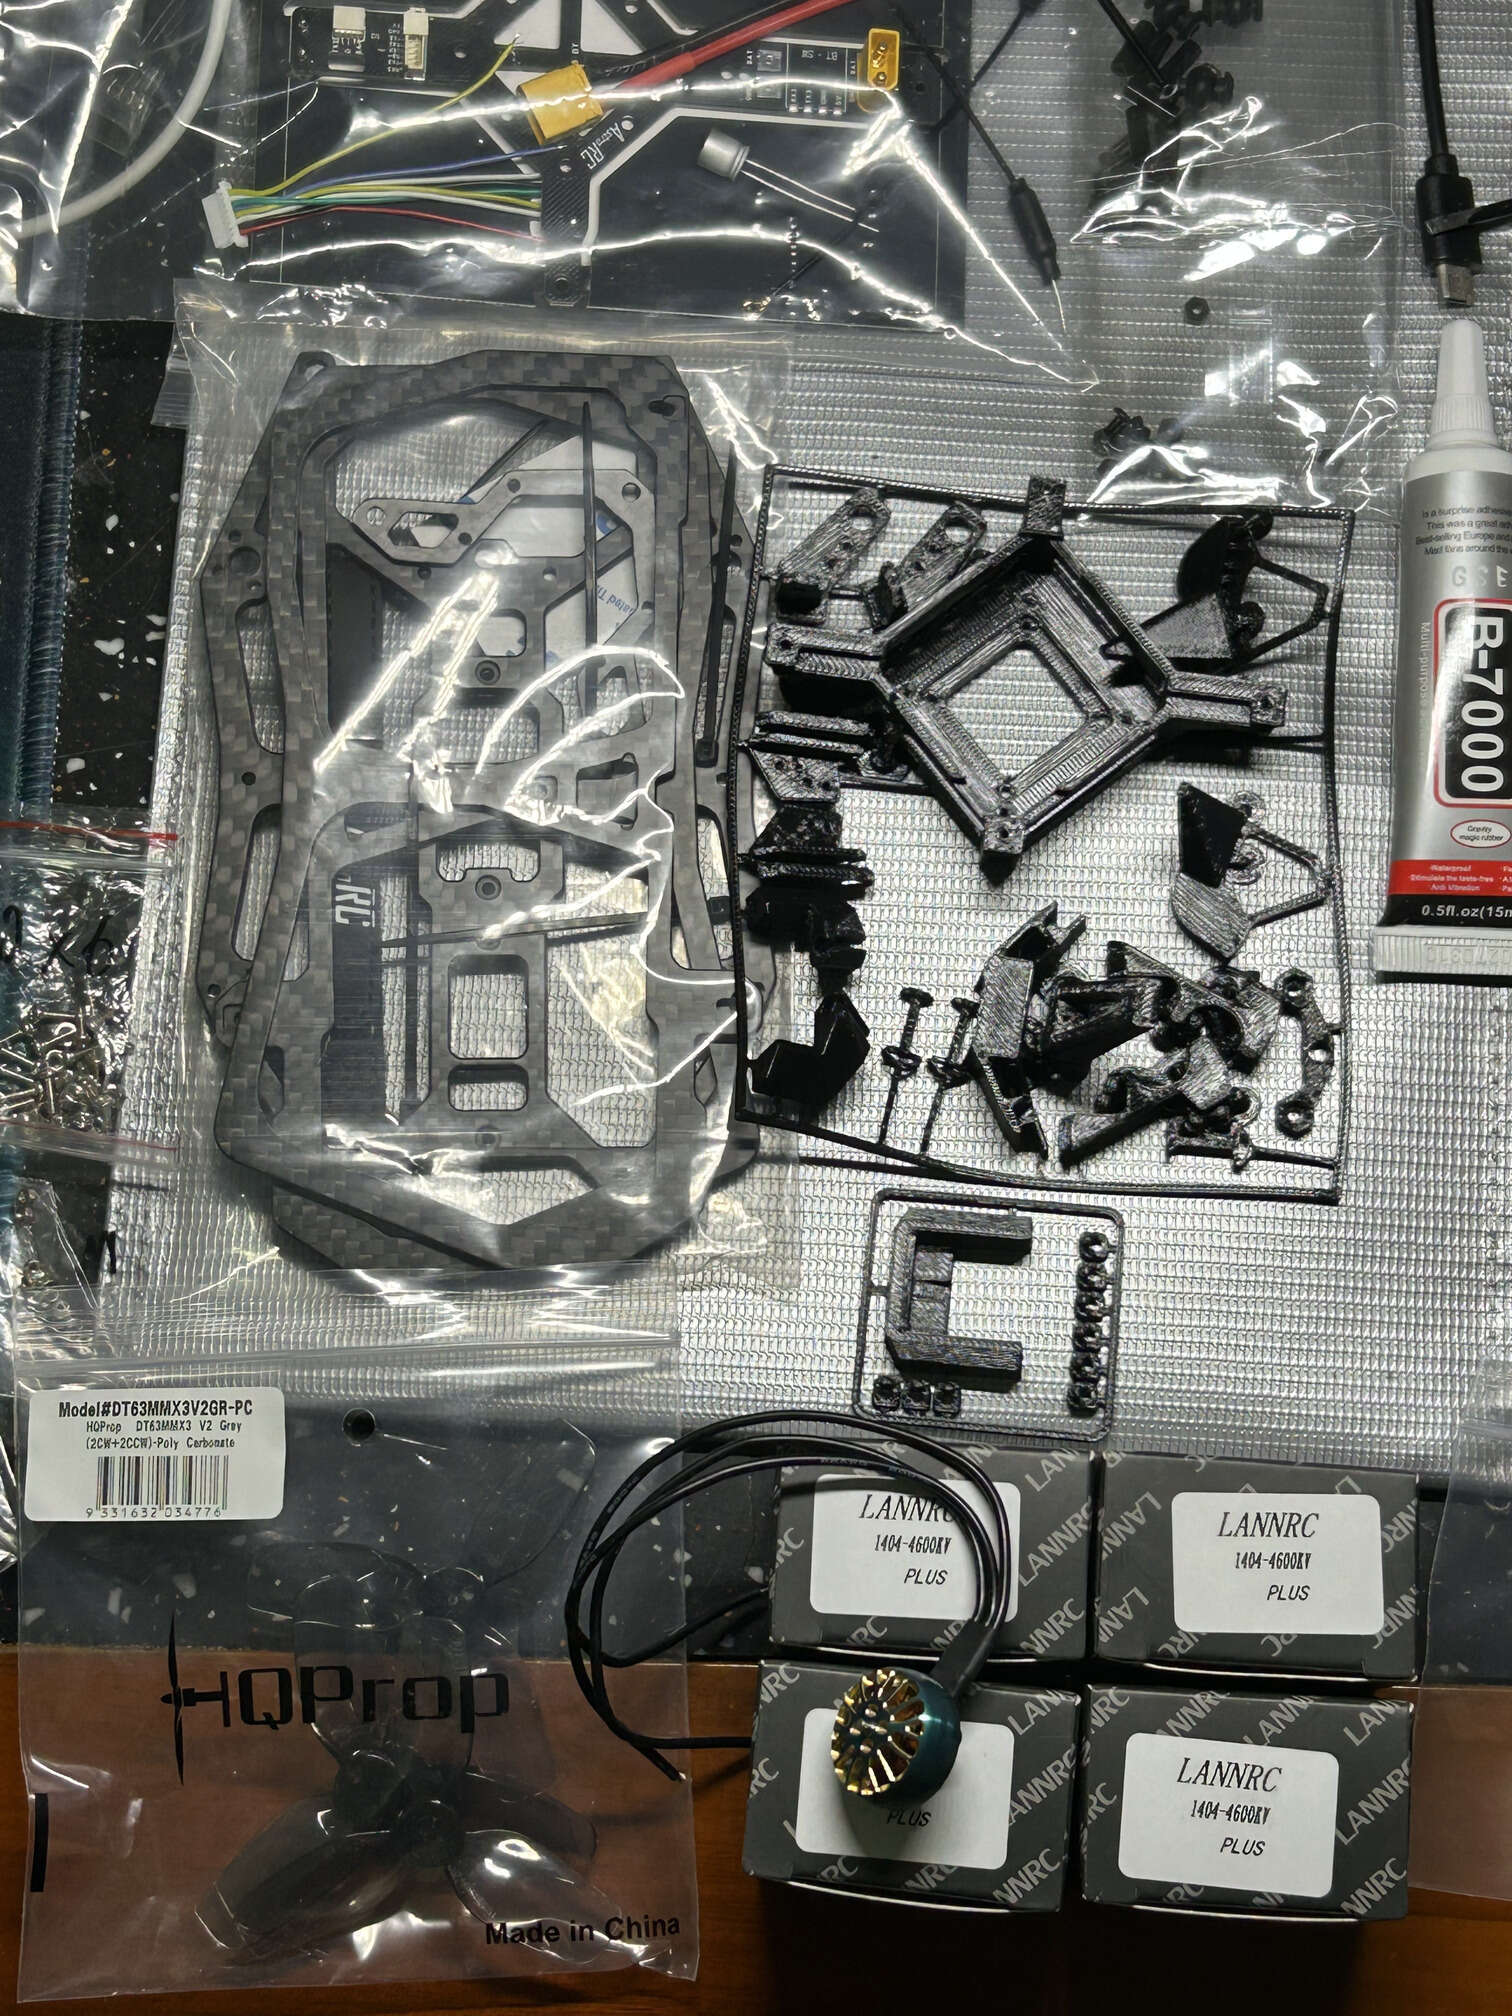
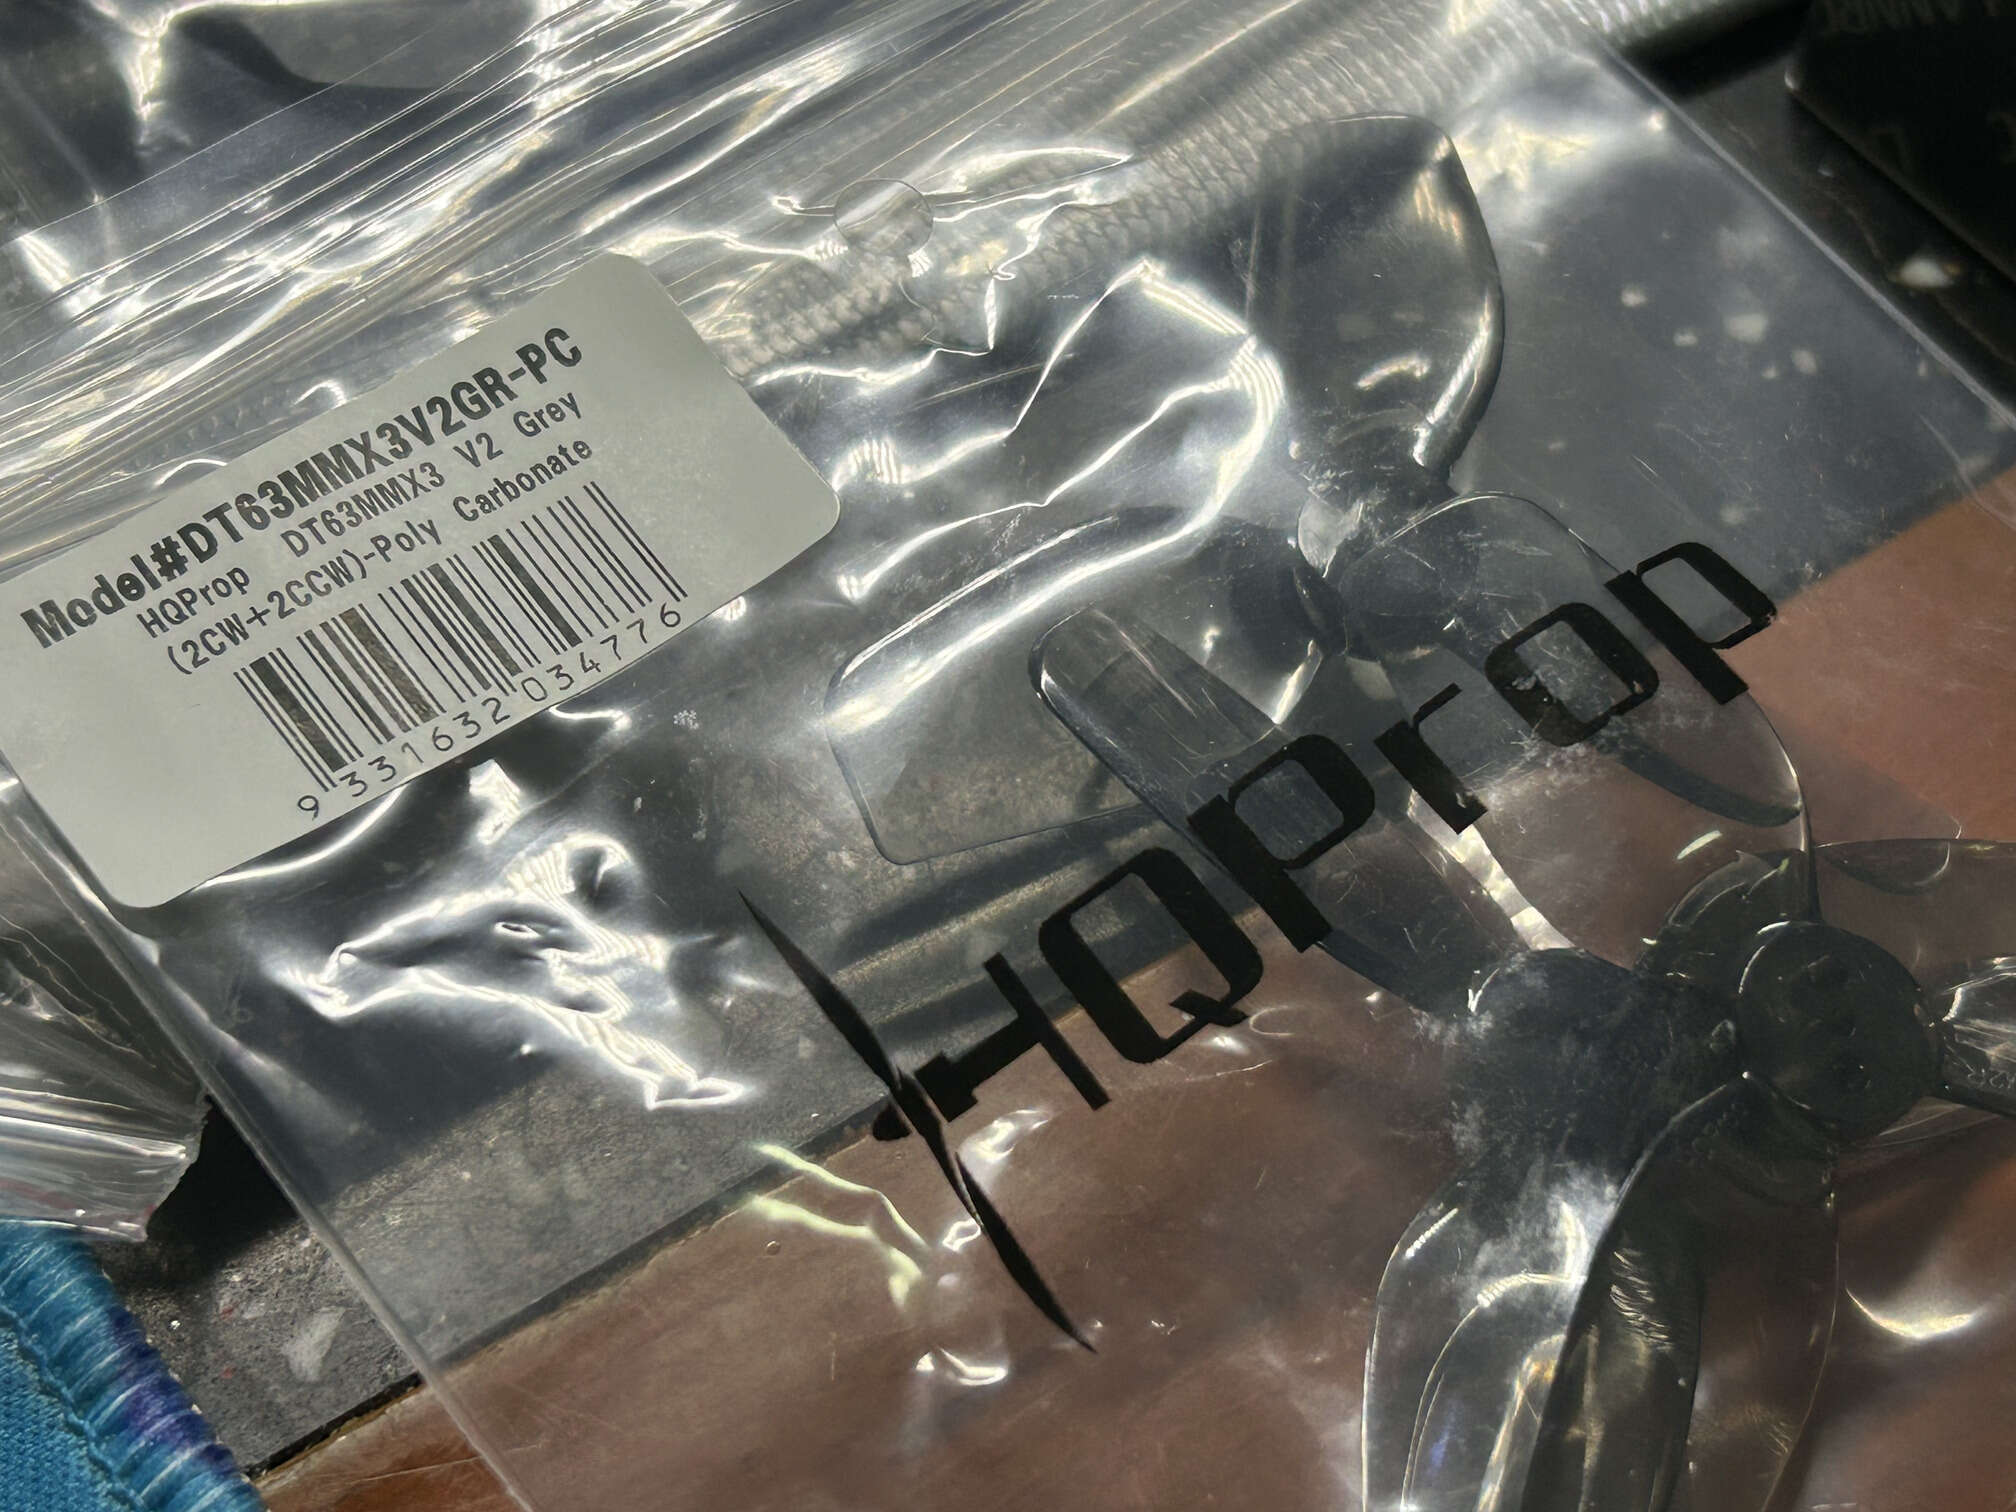
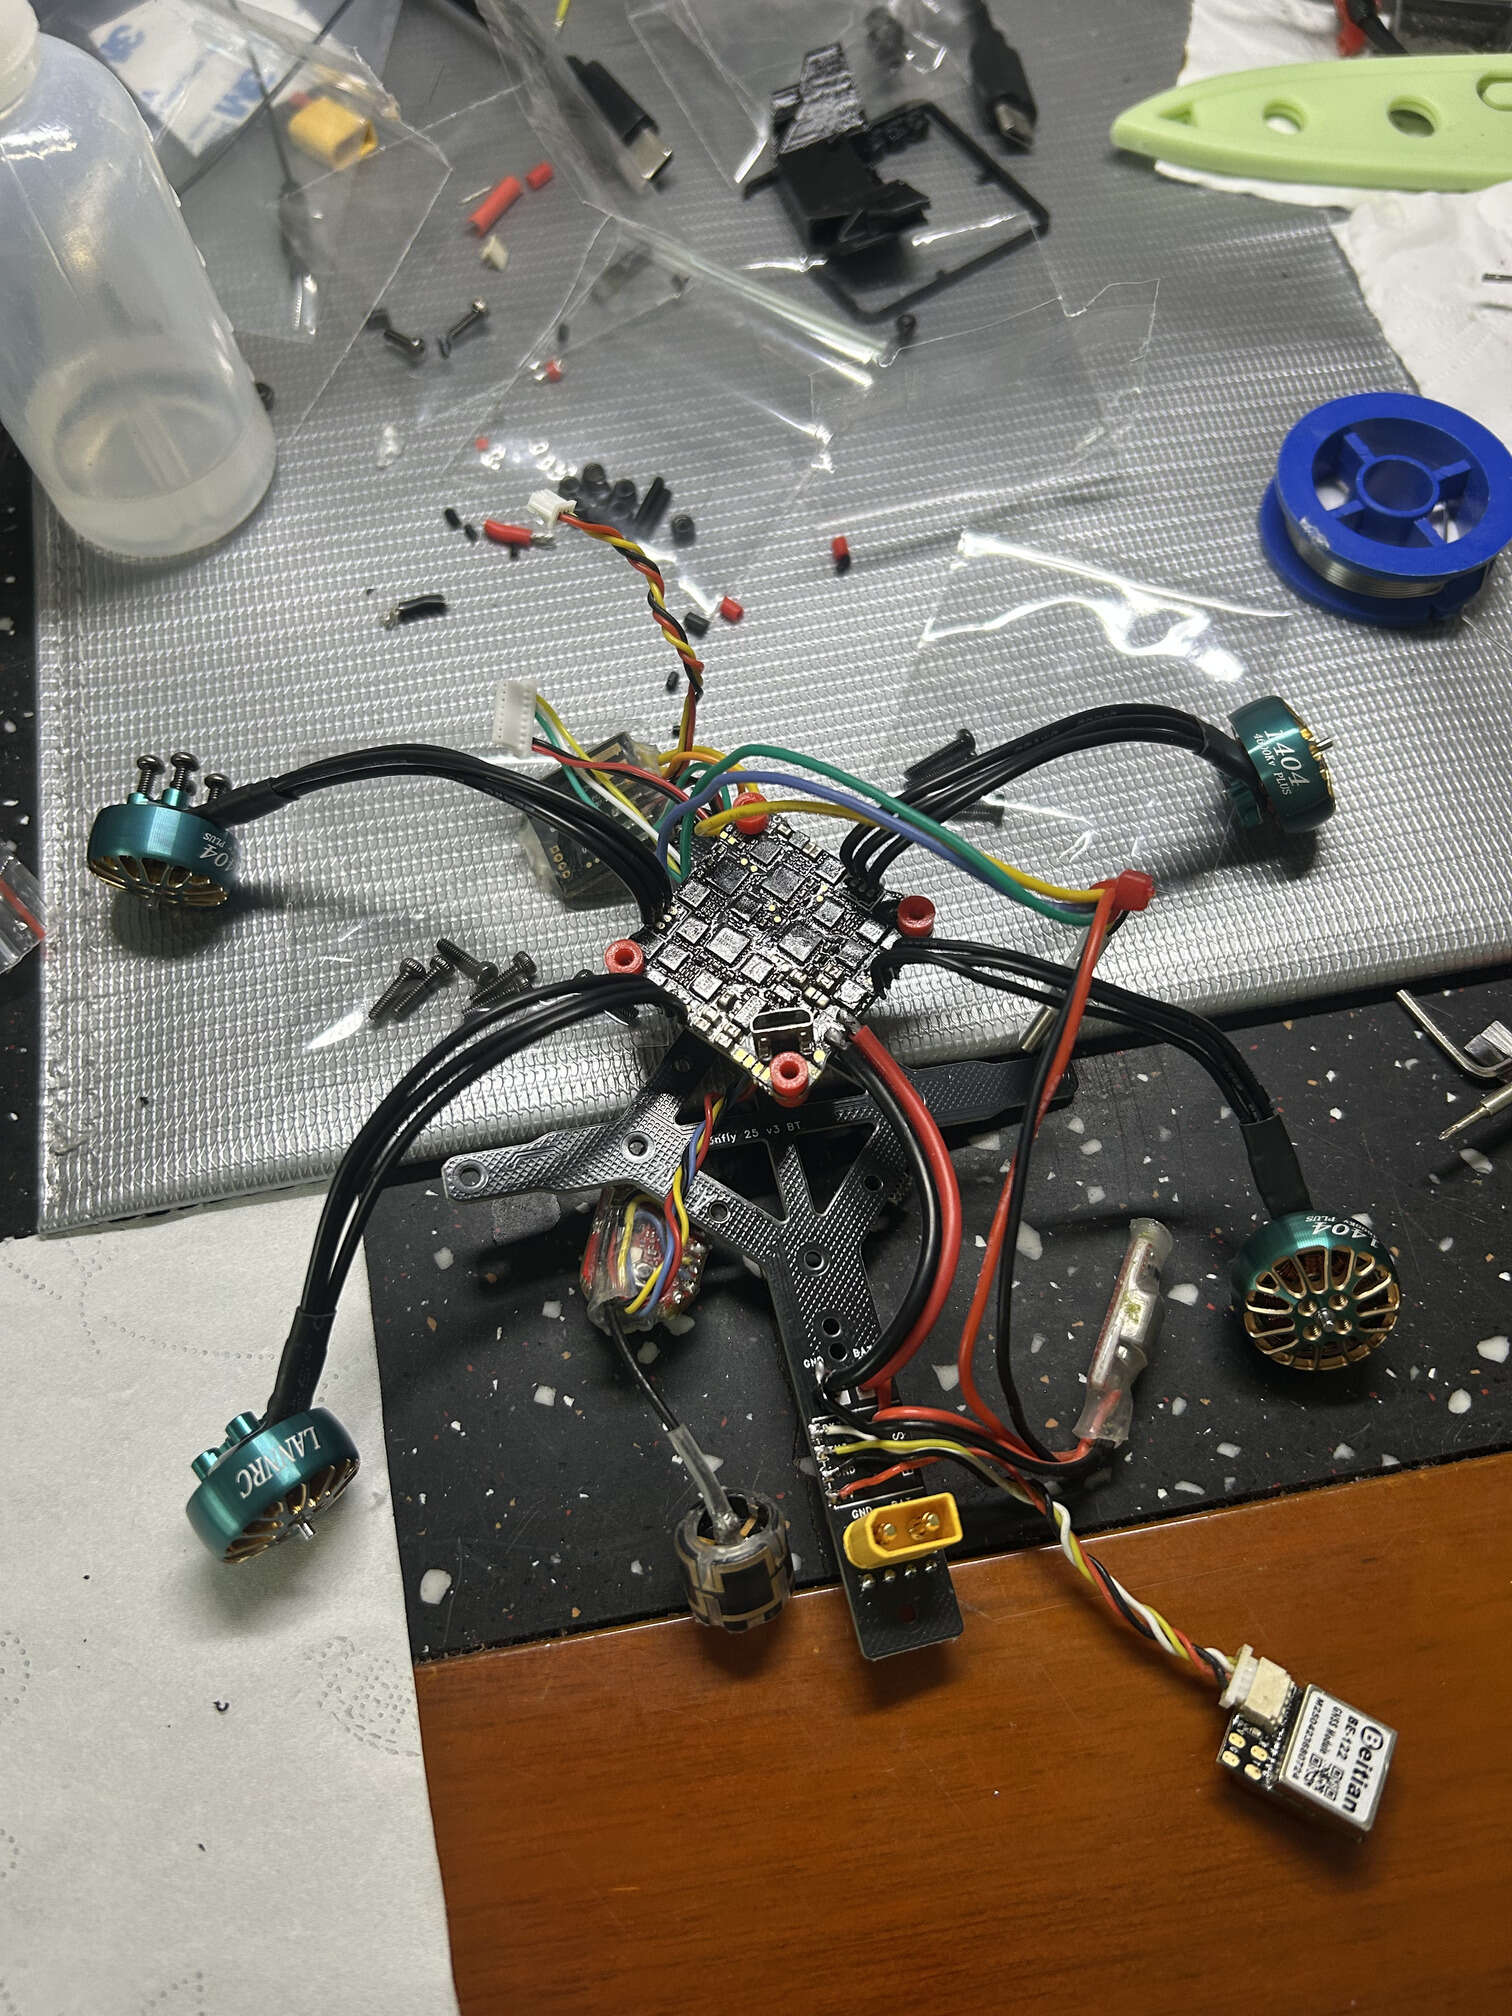
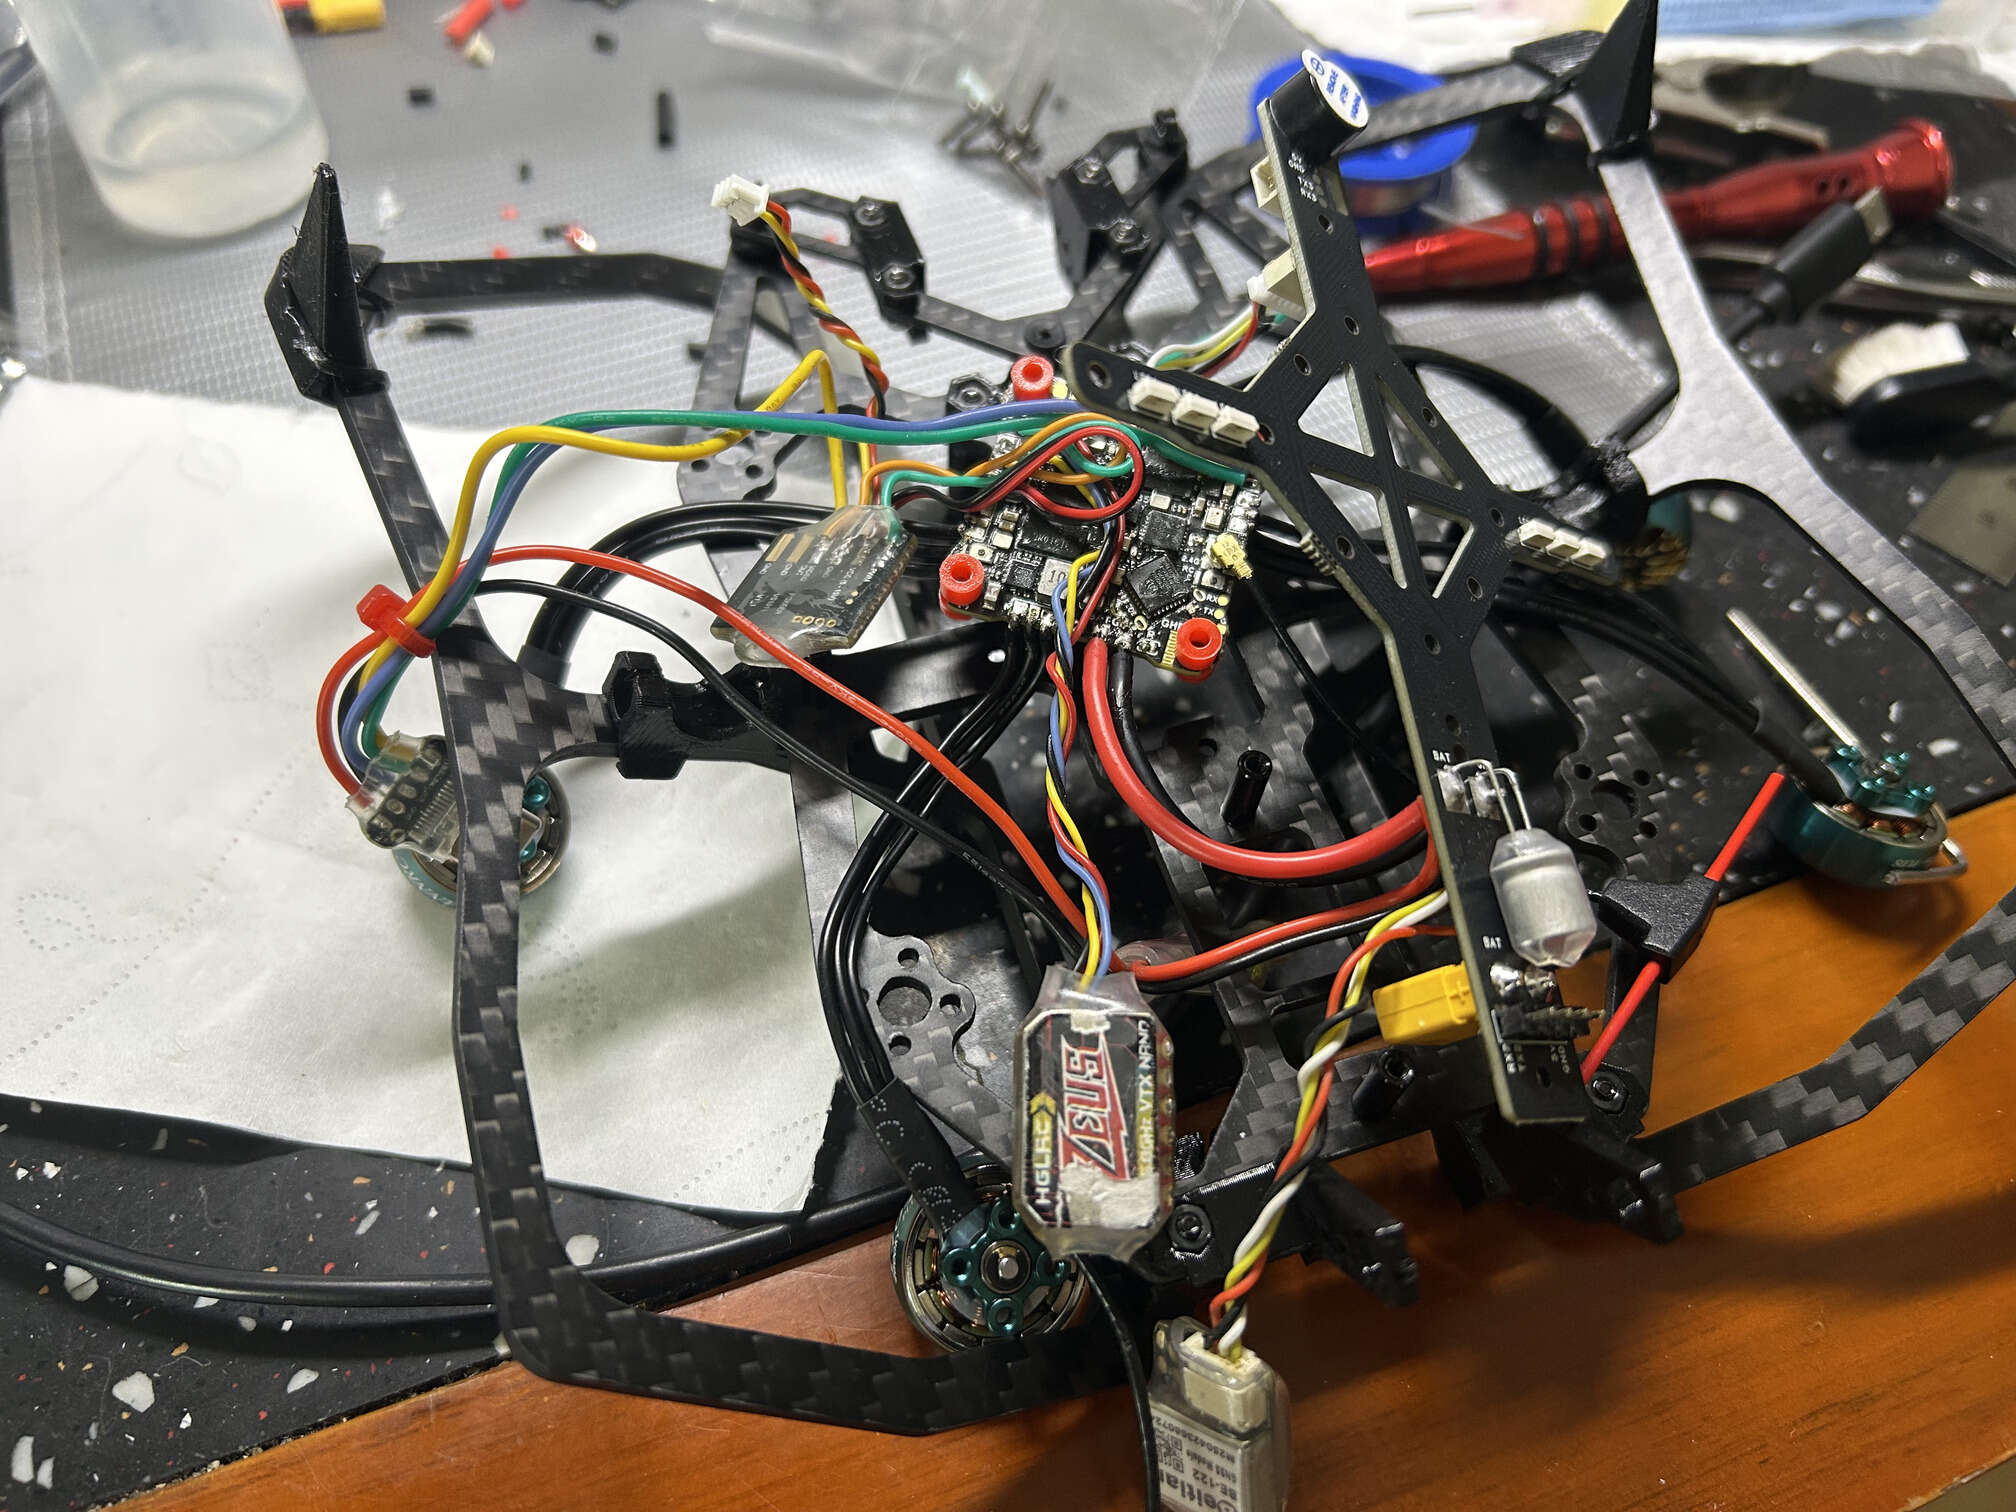
got tired of lack of thrust. decided to transplant the project into a 2.5” frame, AstroRC Carbonfly 25 V3. frame assembly tutorial for v2. changed the motors to LANNRC 1404 4600kv, props HQprop DT63mmX3V2 are the same that come with this frame in BNF version. solder gps to UART3.recompile the firmware with softserial support, turn on the feature, remap the resources of SCL and SDA pads to softserial1, resolder runcam tx3->scl and rx3->sda and change in the settings camera control from uart3 to softseral1, bz- is not suitable for use with softserial because the pad has an npn transistor in the circuit. but bz- can be used for PINIO, solder bz- pad to PWM input on the Runcam. if 20A ESCs would not hold, I will replace the AIO with GH743AIO (480MHz, 7 UARTS, 40A ESCs, 3s-6s, 16AWG lead). the motor screws that came with the motors are M2x6 and are too long for this frame, must use M2x4.5. The frame set was missing 4 M2x16 screws for the FC. M2x6 screws for the props. also removed 5V BEC used for the Runcam, because with 4s battery there is no voltage sag now.
weight with camera 180.7 g, AUP 247.3 g with the 4s 720mah battery.
Happymodel Crown LDS antenna breaks very easly, the traces with the soldering joint are ripped from the antenna’s body. I used linear polarized dipole temporarily.
flight time 4 m 40 sec, max current 24A
because there are not enough UARTs on this AIO and softserial was implemented only for STM32 MCUs and is not available for ArteryTek MCUs, I had to disable camera control using UART in favor of running the GPS module. camera control will be implemented using the PWM input in the socket on the back of the camera, connected to SCL pad (can not use SCL or SDA, because both resources must be mapped to the I2C bus in order for the barometer to work) BZ- on the AIO, which will be remapped to PINIO1. it is also possible to use servo output instead of PINIO.
update 5
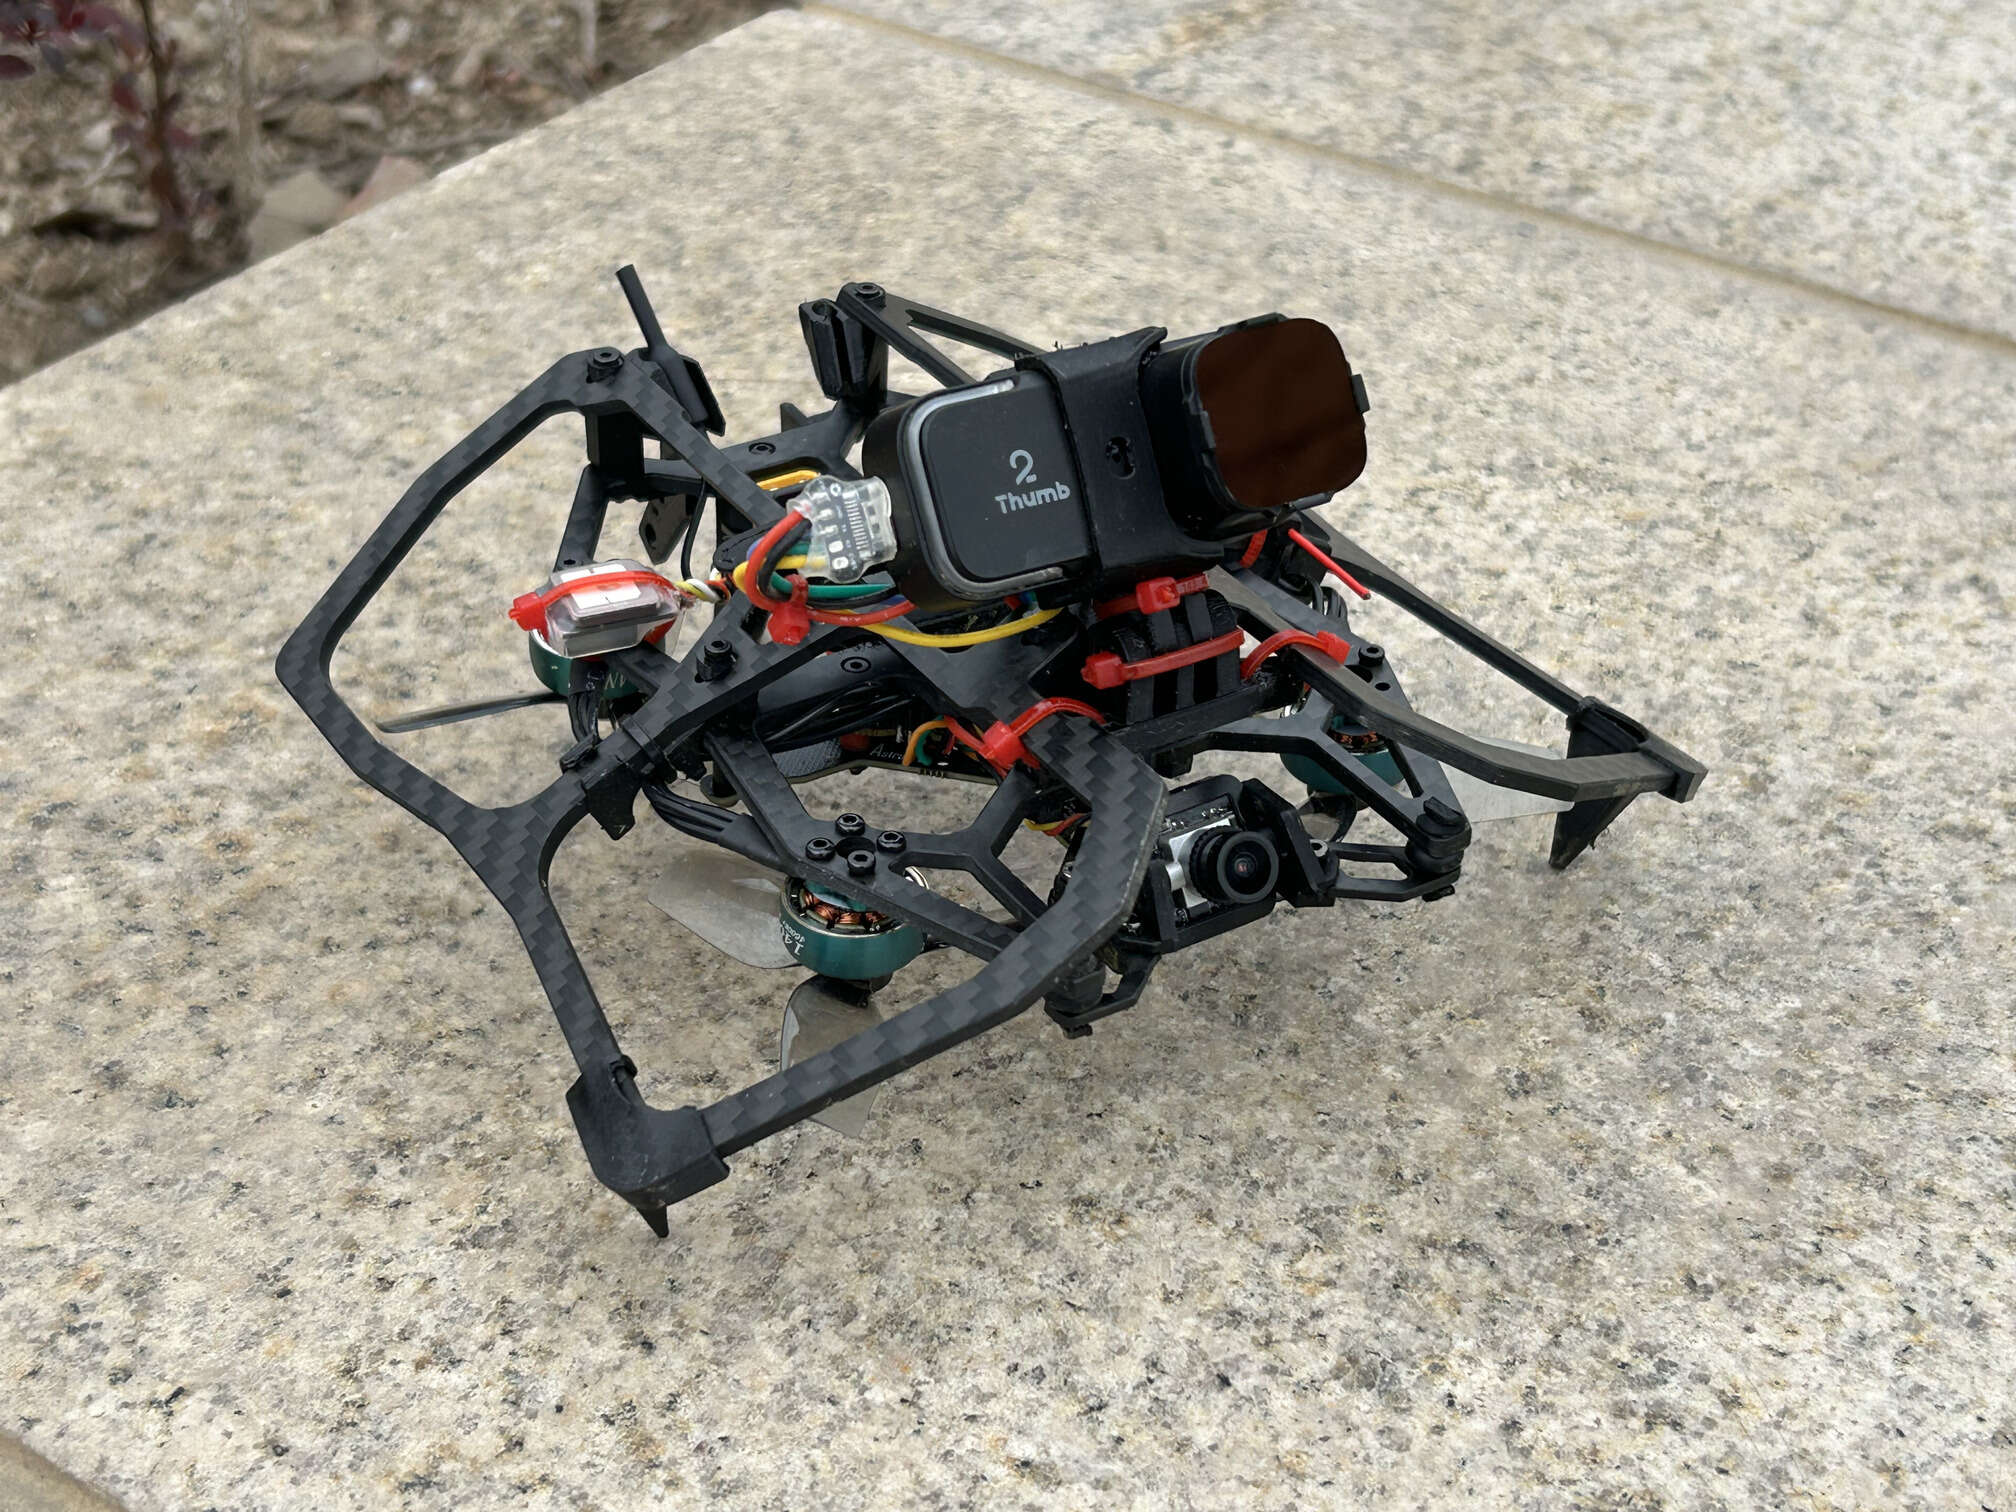
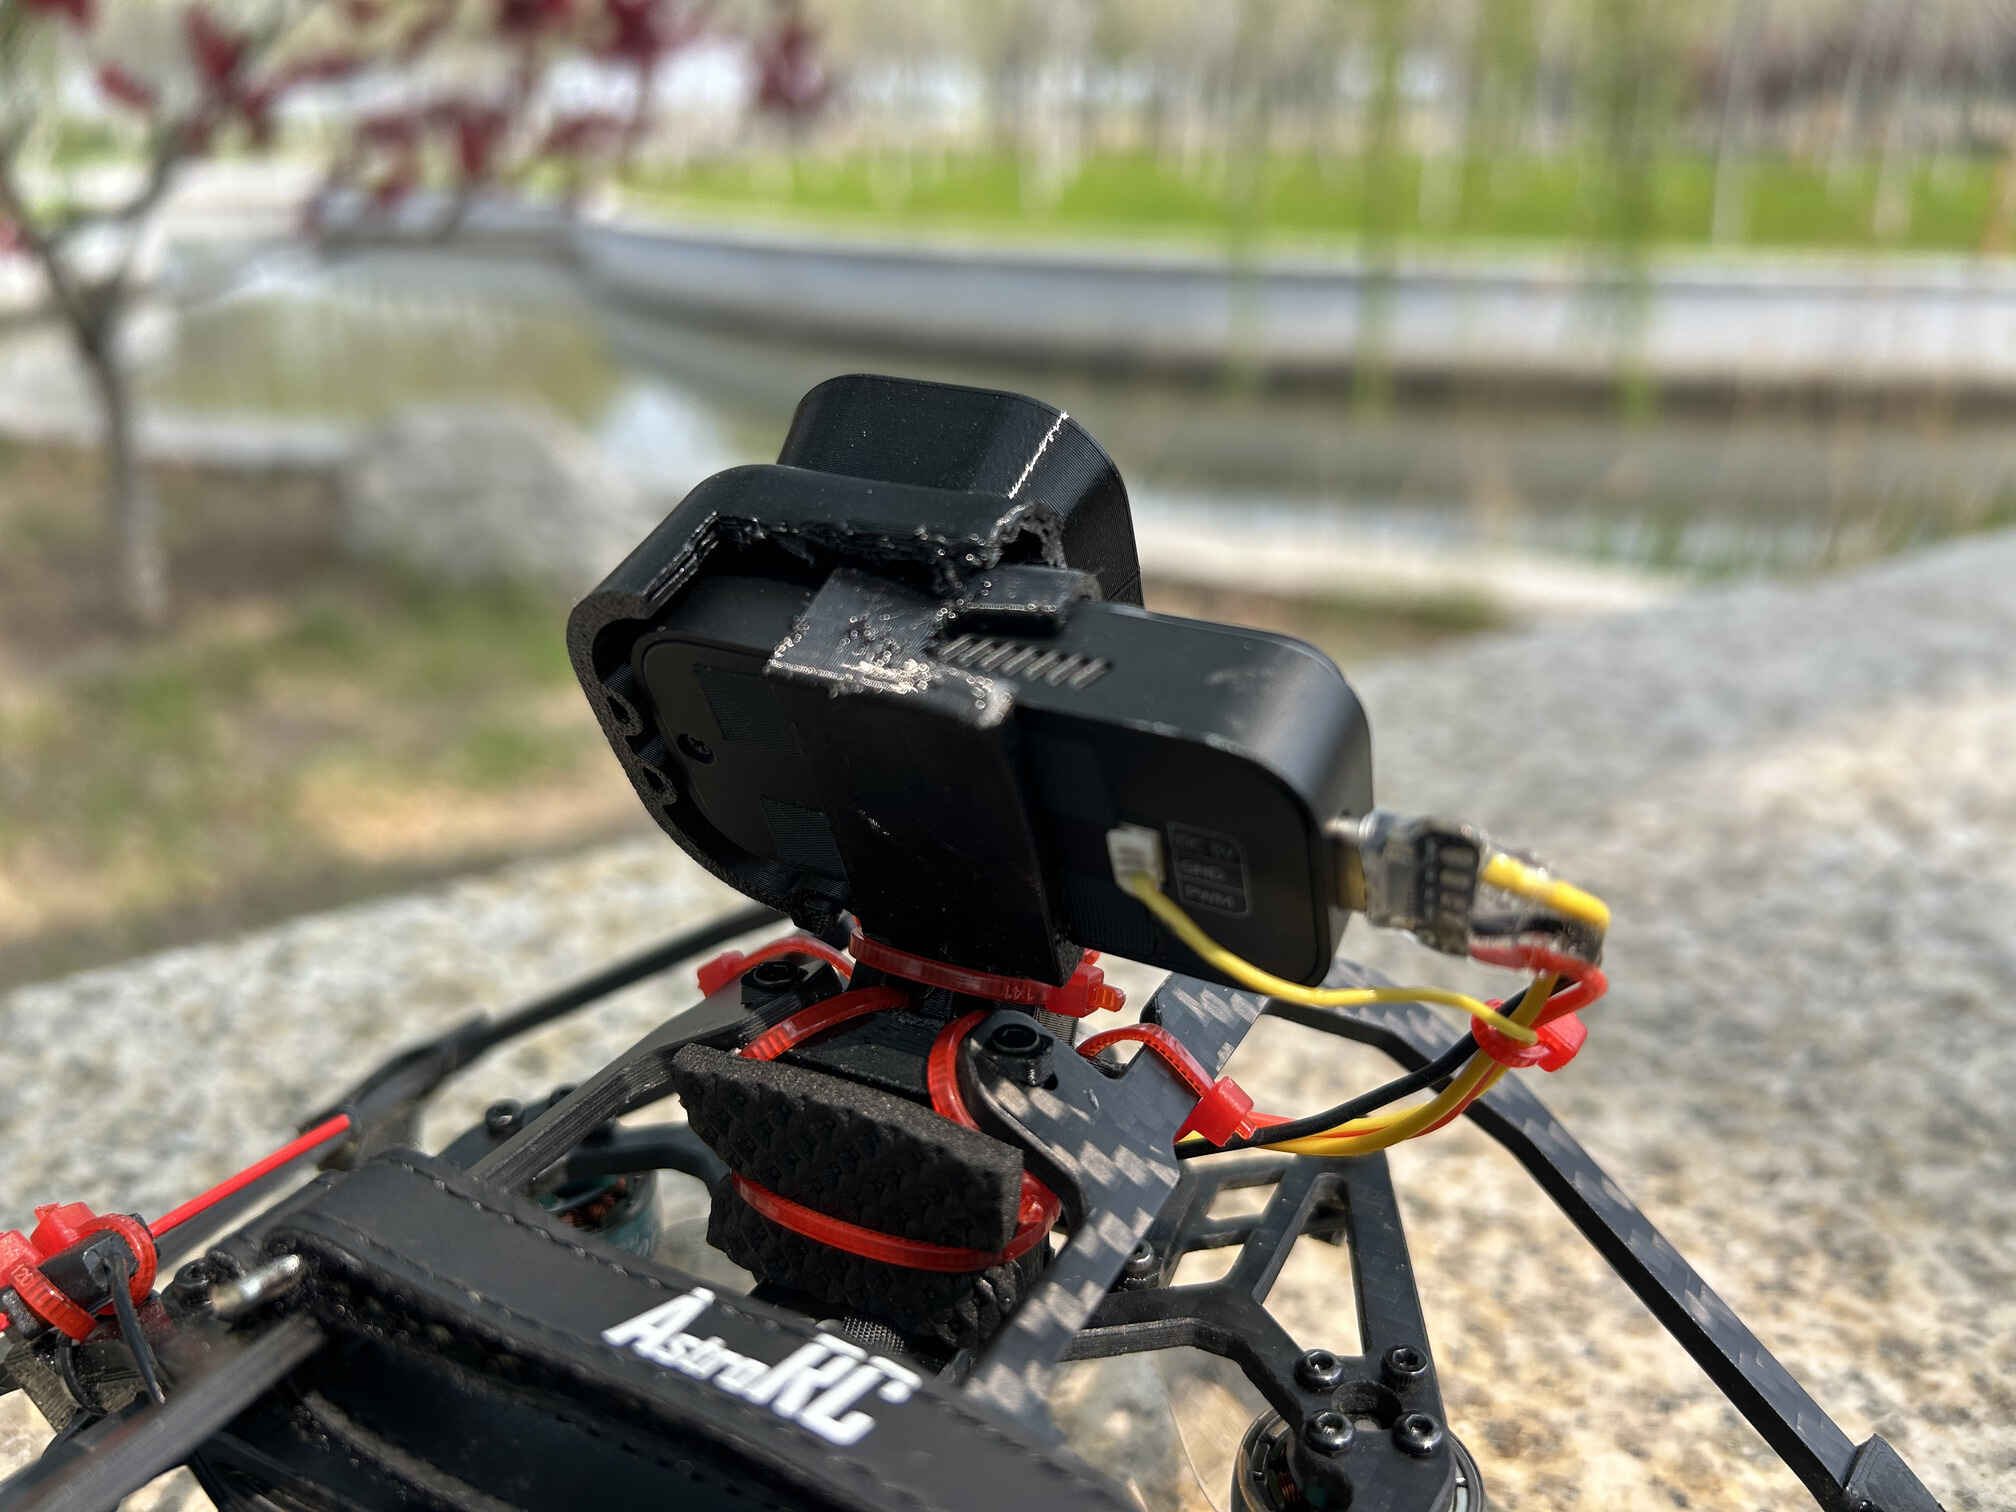
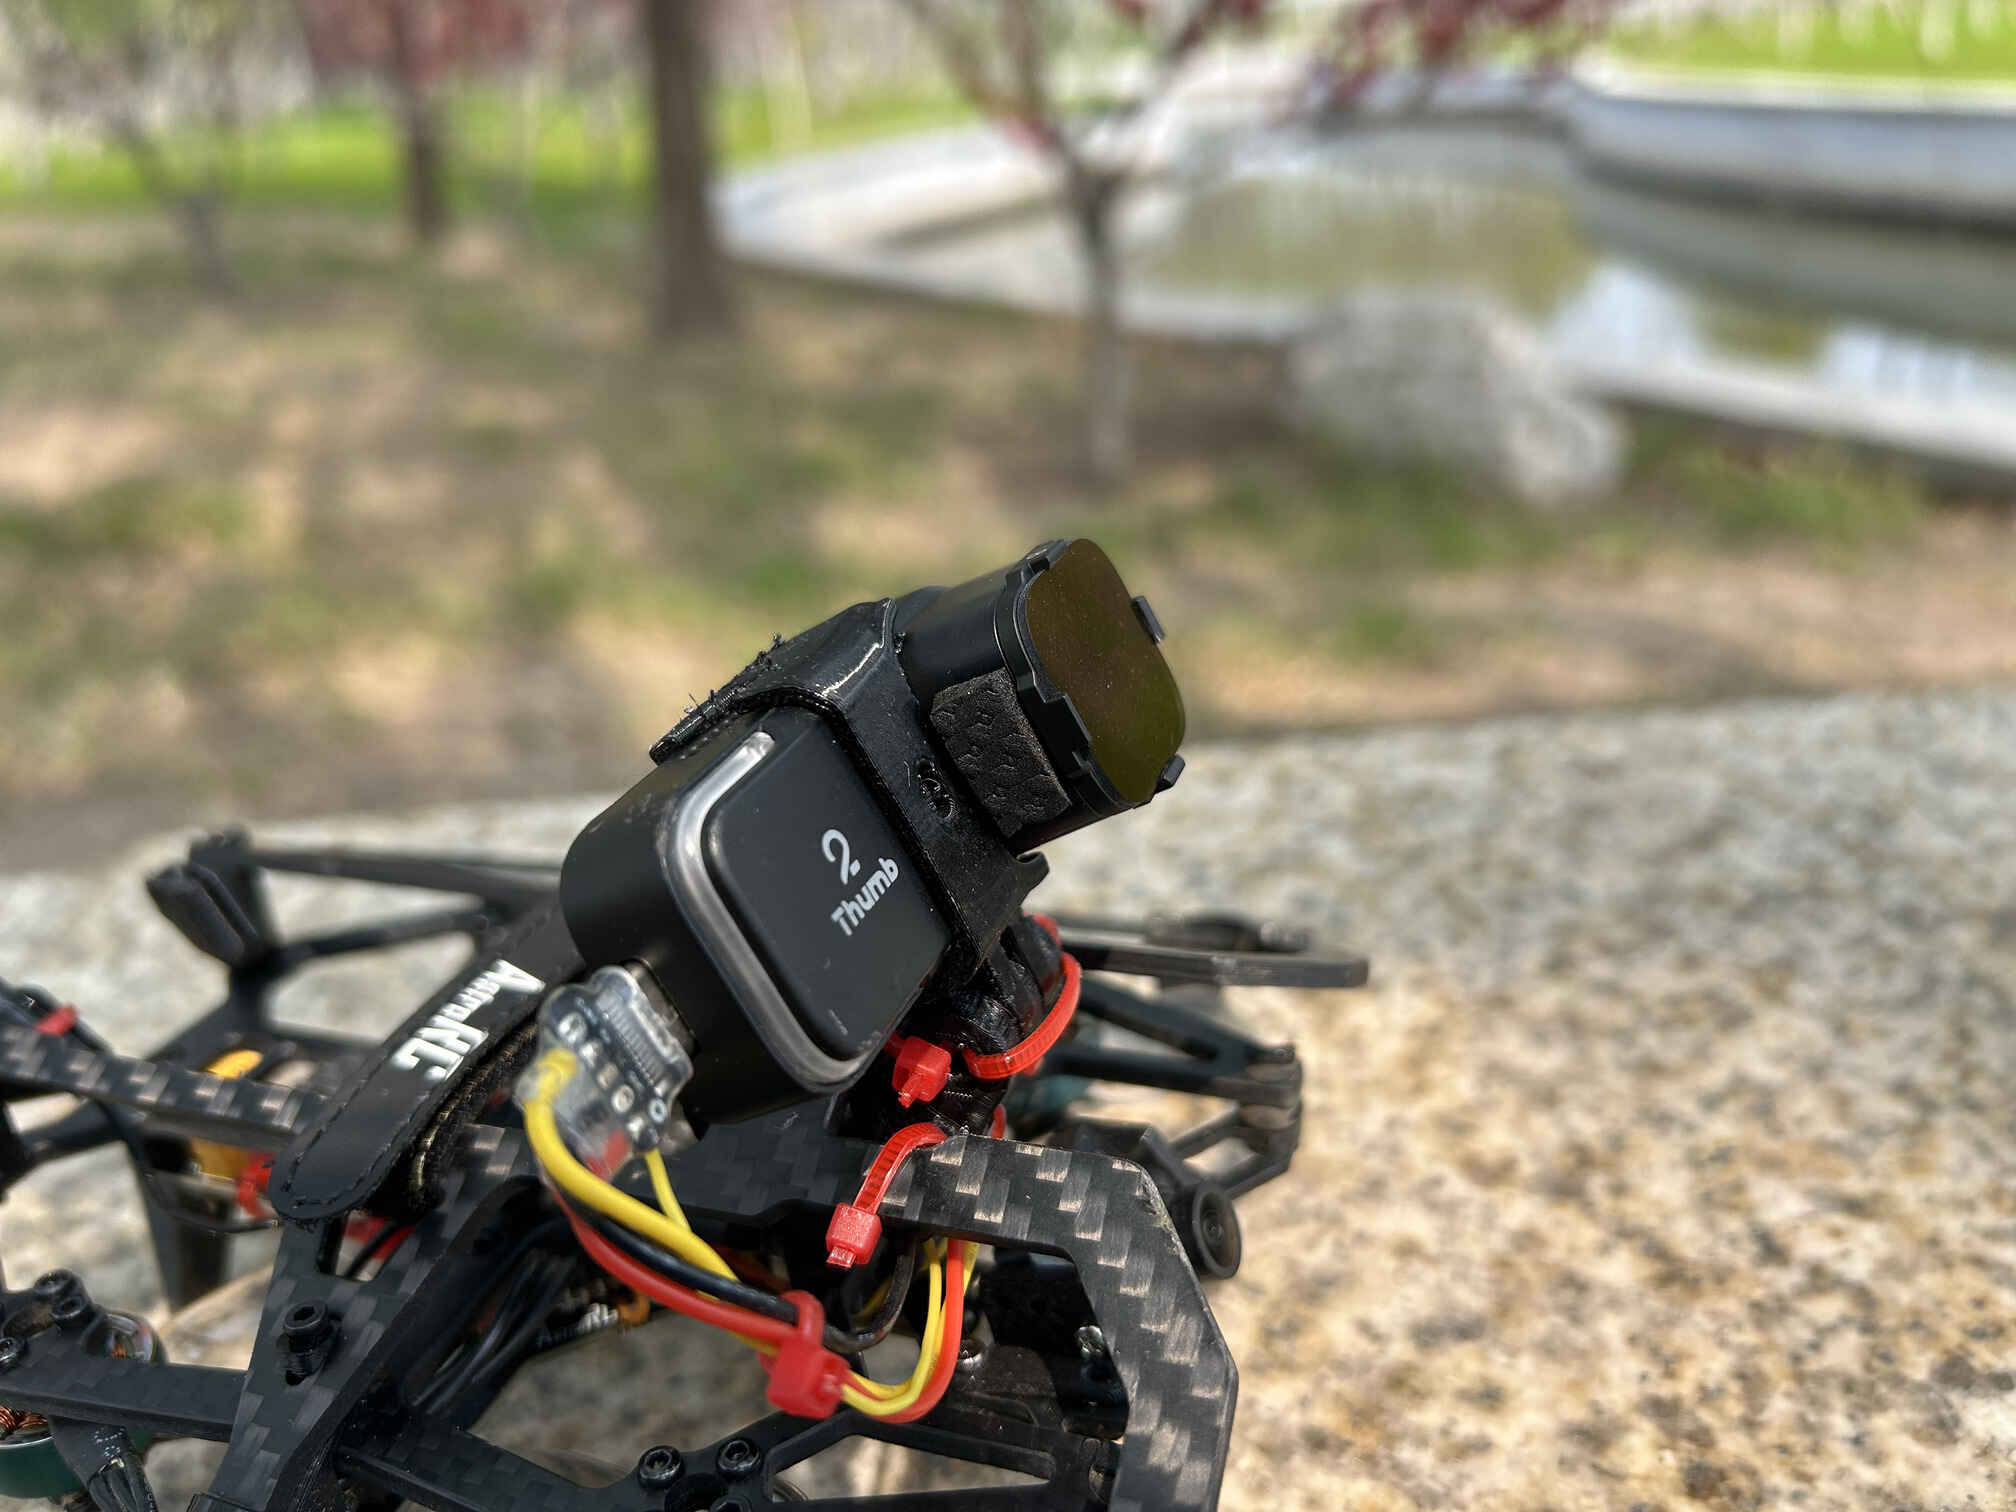
because of my poor piloting skills I was going through ND filters way too fast and was worried that sooner or later I will destroy the Runcam’s lens itself. so I decided to print the shell from black TPU, cut out the part around the lens and attach it (using the friction by putting a tiny EVA foam patch between the camera and the cutout) to the camera that is already secured to the frame using the original Runcam Thumb 2 mount. the shell weights 14.9 g, the cutout is around a half of that weight.
set crash_recovery = DISARM to save (others from) the props. also, crash_recovery = ON increases the risk of burning an ESC.
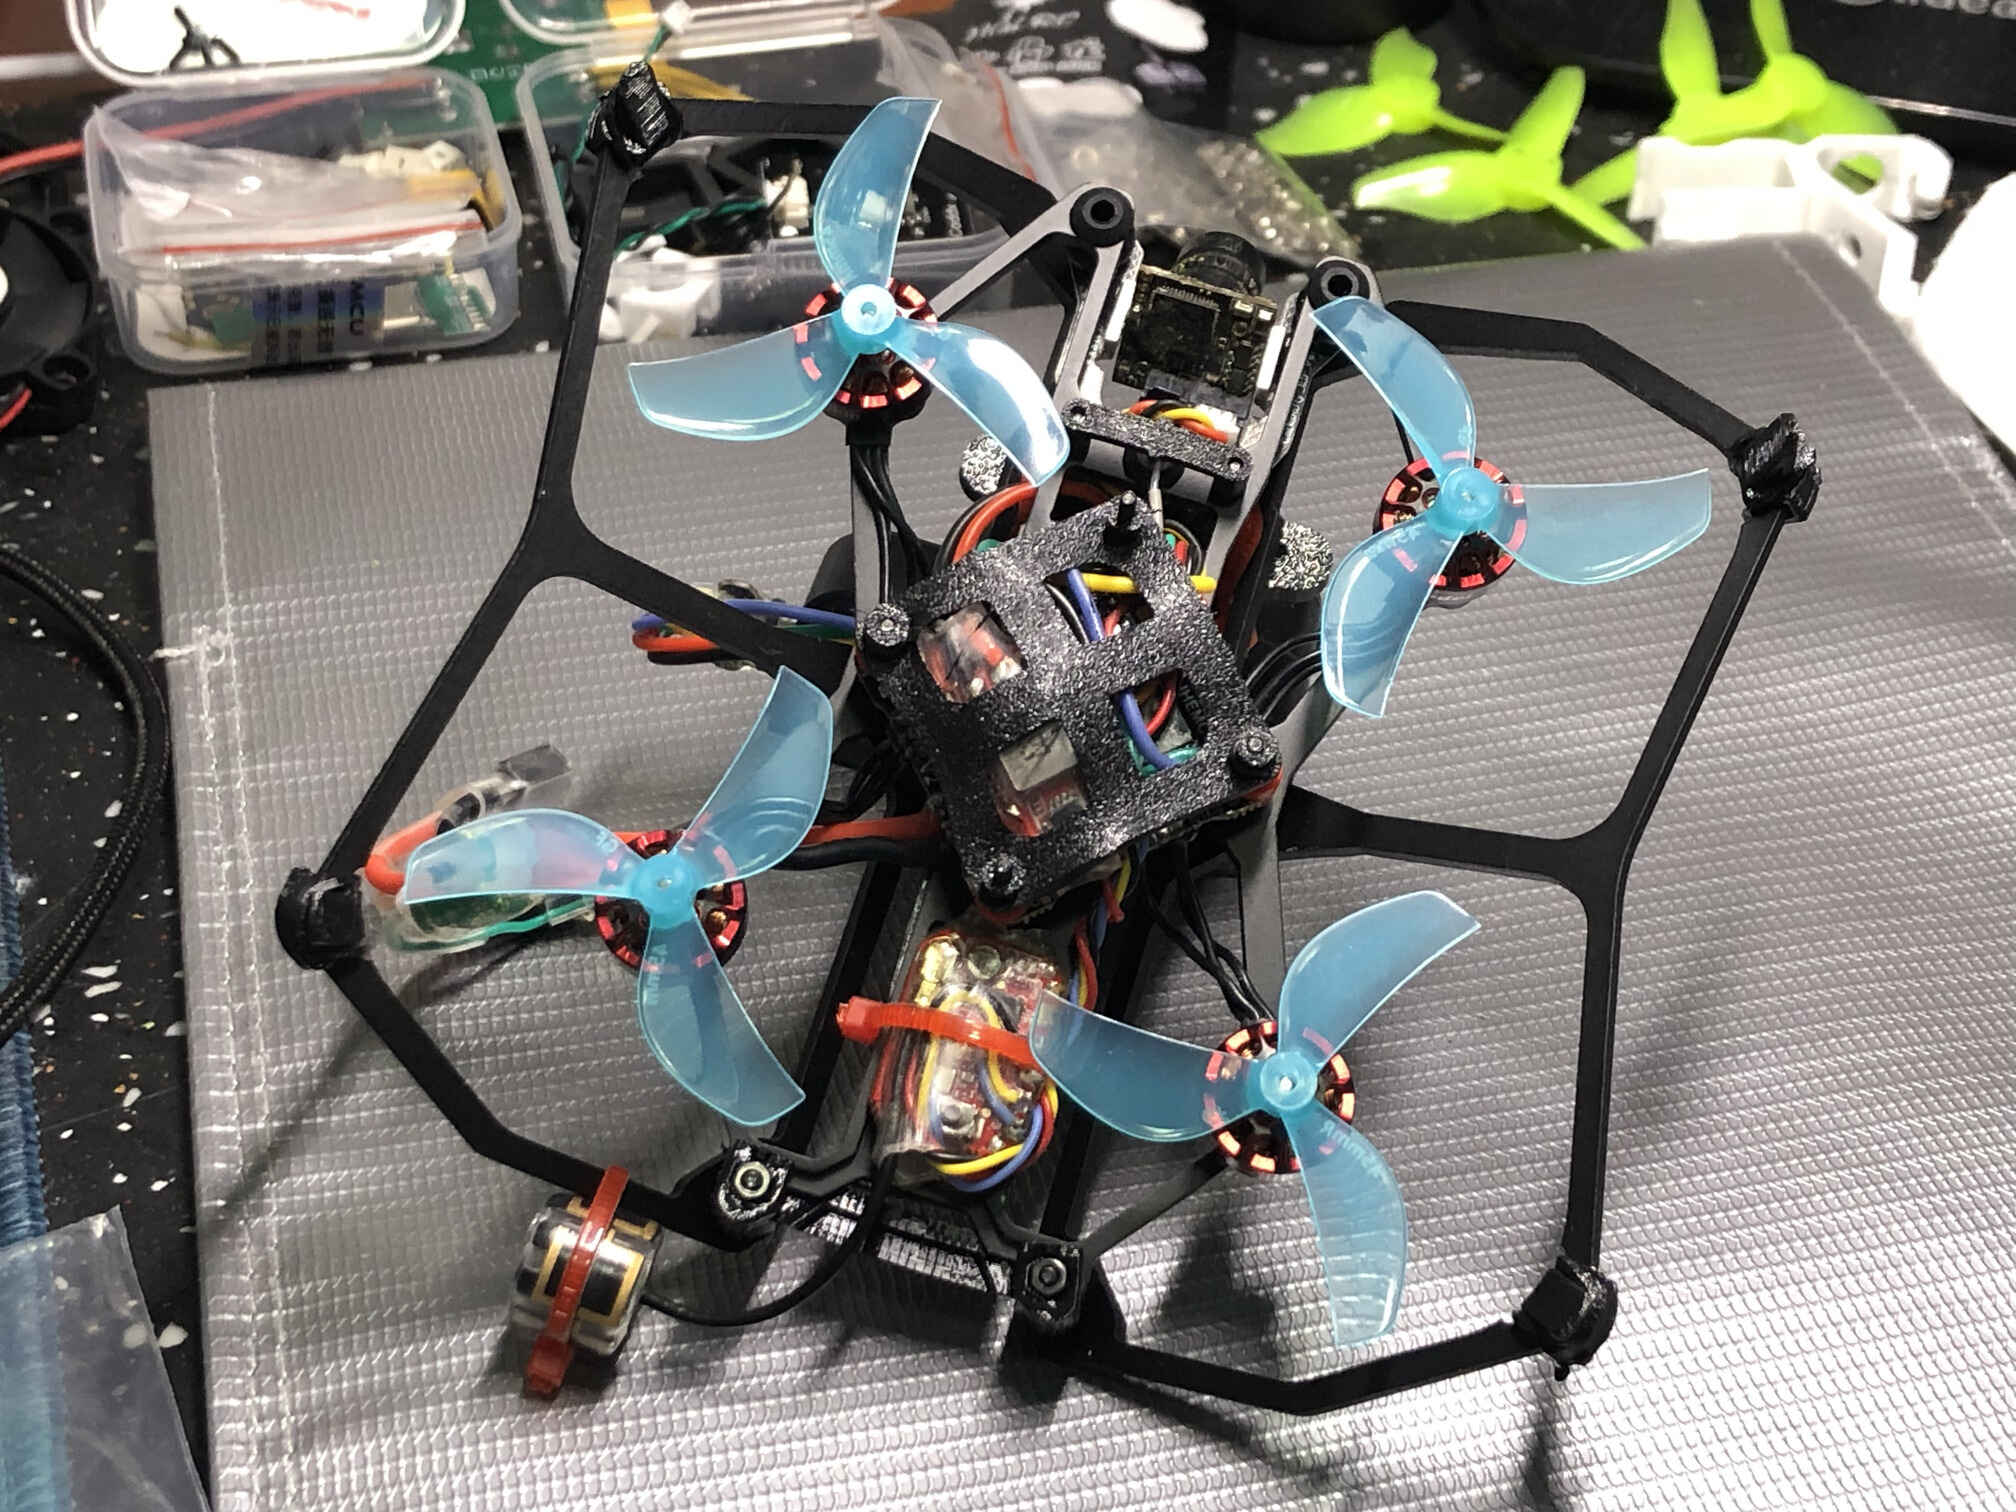
ungodly amount of zipties
gps rescue and pos hold are kinda useless on this quad, so I removed the GPS module - weight with the camera mount but without the camera and the shell 150.4 g. weight with the camera and the shell(cutout): 182.2 g. weight with the camera, the shell and the battery: 248.8 g
HQprop DT63mmX3V2 hover at 18000 rpm, 35%, 3.97A (without the camera, weight with the battery 216.8 g)
update 6
HQprop DT63mmX3V2 props blow up into pieces on any contact with other objects. decided to change the props to gemfan 2512 (1.2 inch pitch). I should get higher rpm with 2512 since it has lower pitch angle. then try 2520-3 (2 inch pitch).
gemfan 2520-3 hover at 22000 rpm, 40%, 3.87A (without the camera, weight with the battery 216.8 g). 5m~7m down to 3.4v. will go with these props for now.
gemfan 2512-3 hover at 28000 rpm, 47%, 3.9A (without the camera, weight with the battery 216.8 g). 7m15s to 3.4v. very weak thrust.
update 7
the camera shell cutout is not secure
todo
tune filters
tune PIDs (with PIDtoolbox)
adjust the current sensor calibration value
initial build video (mobula8 frame)
video about transplanting into a carbon fiber frame (and changing props to 45mm-3)
video about trying the original 2023 props instead of 45mm-3
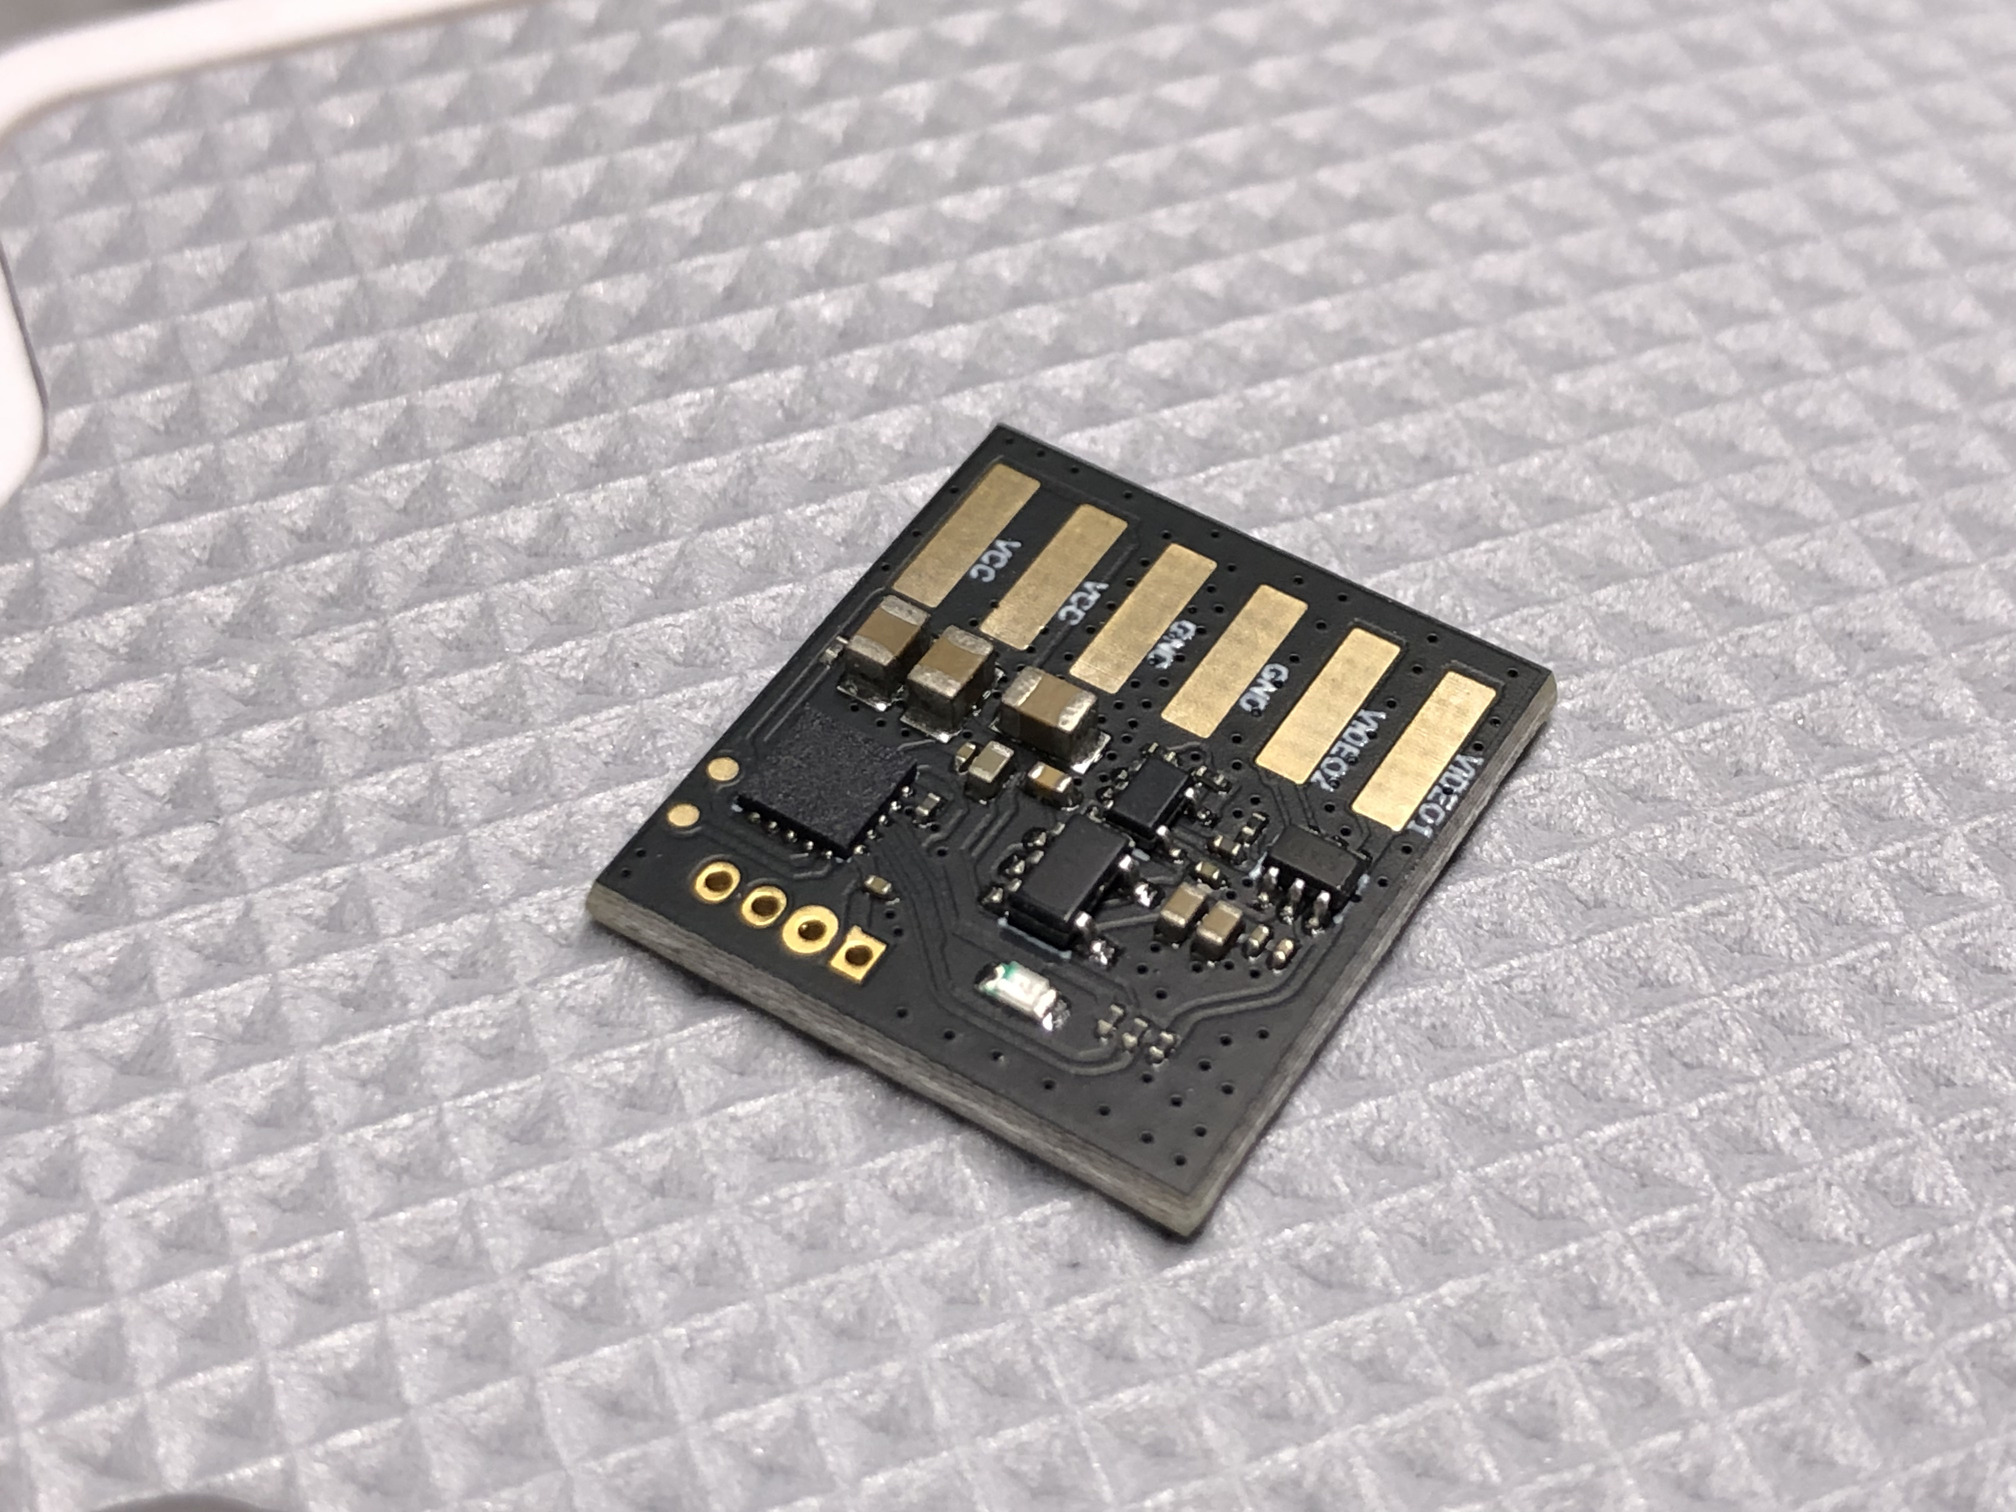
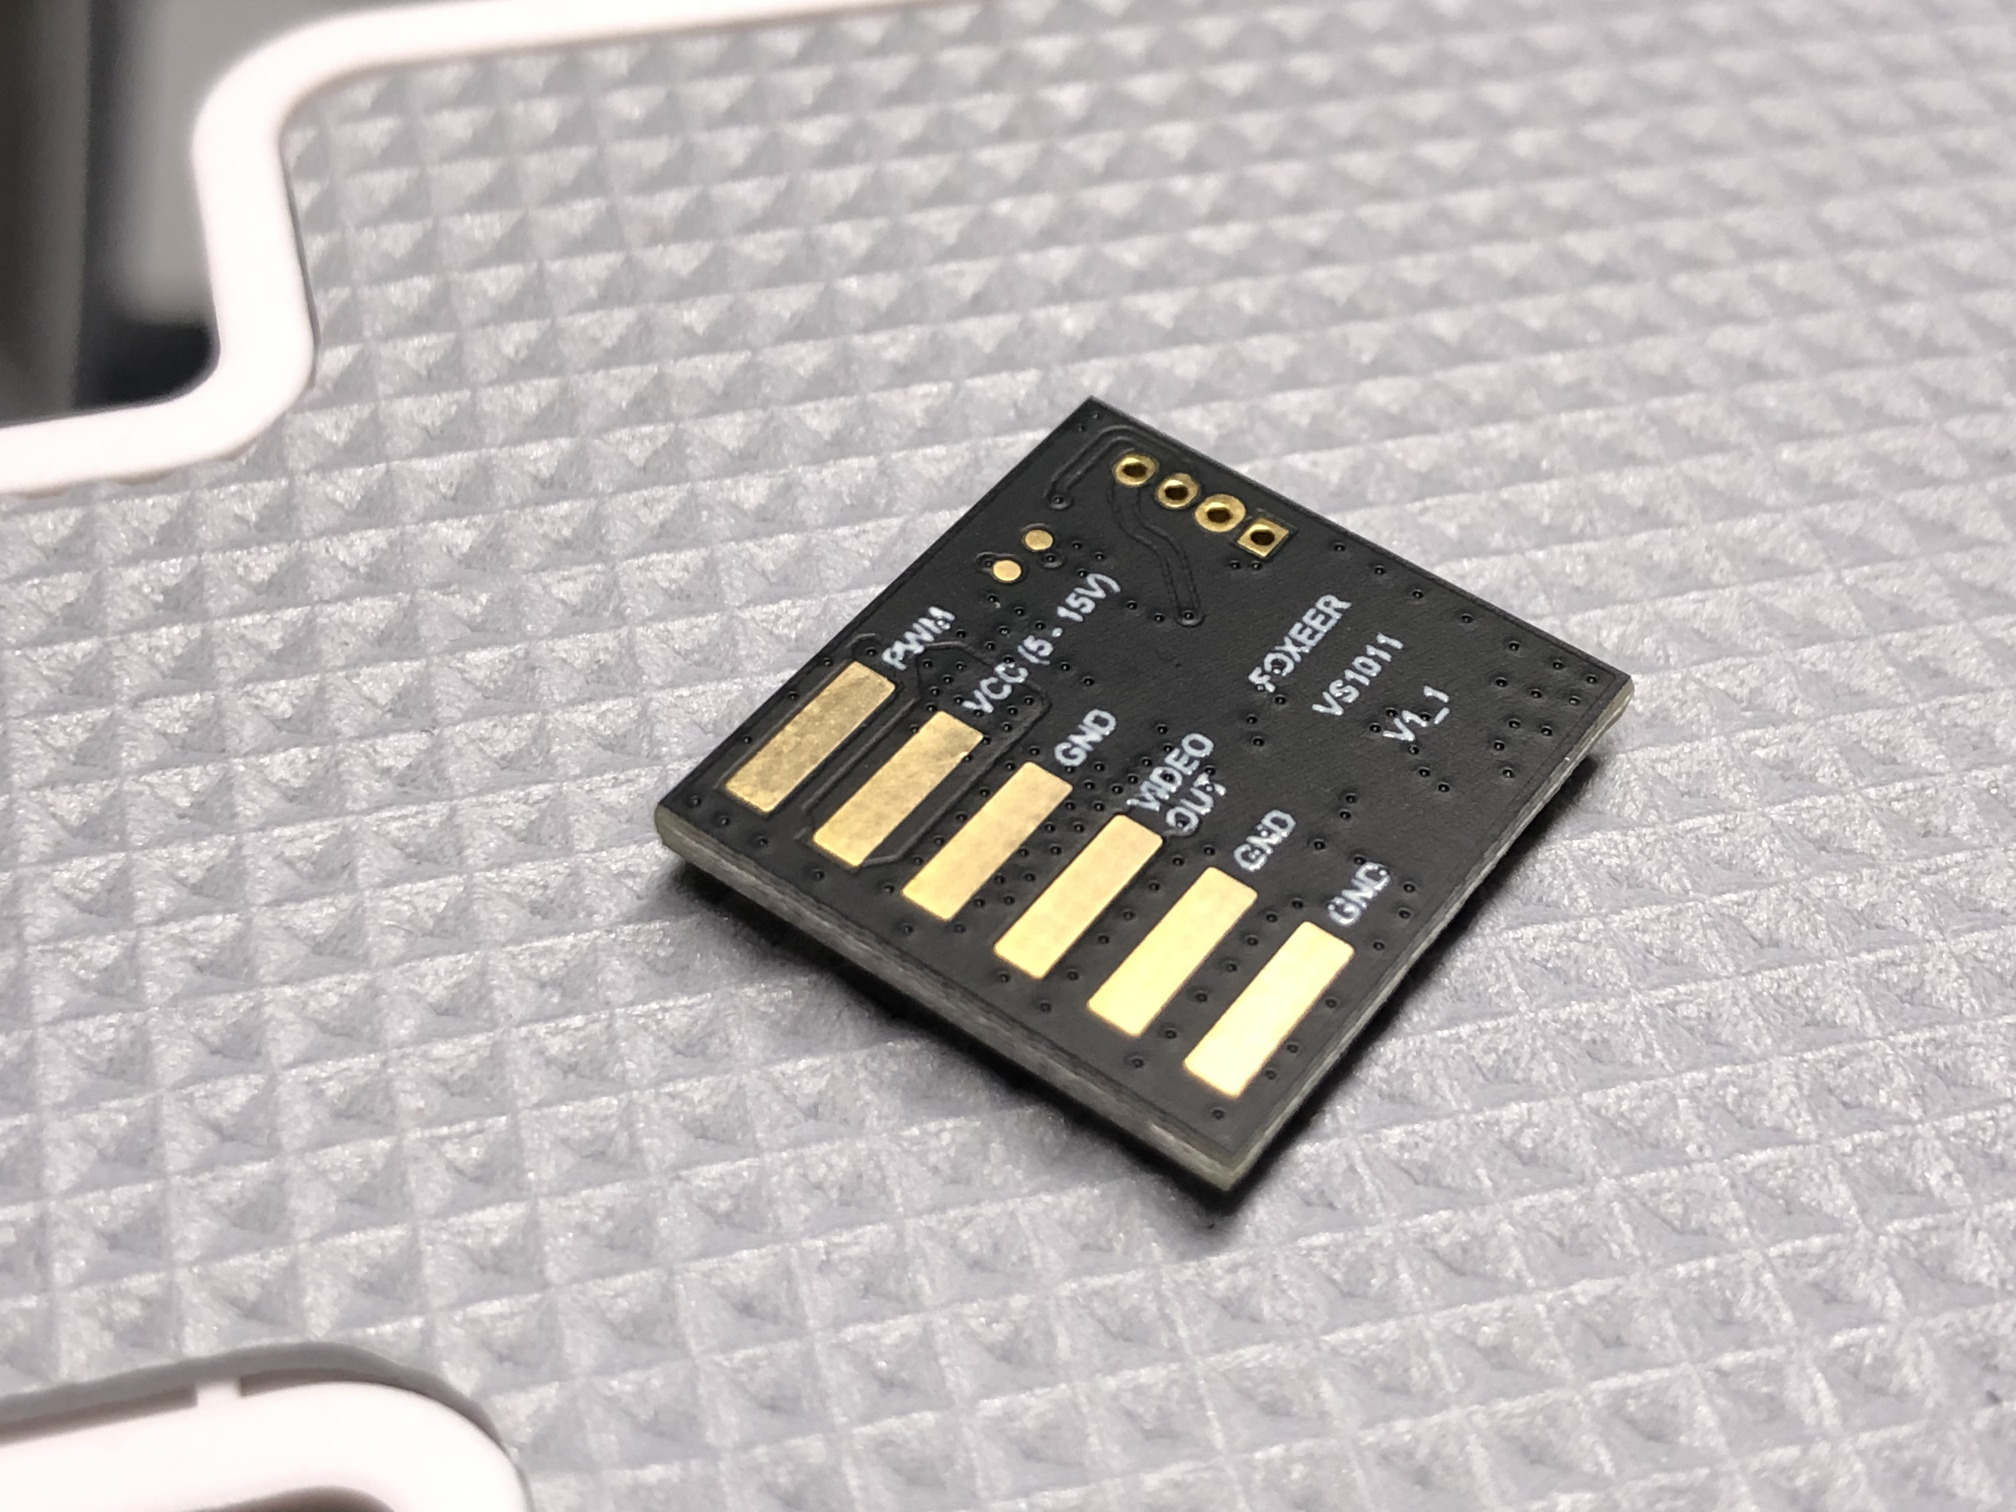
Runcam Thumb 2, IMX586 sensor, gyro, UART control, PWM control, type C connector
~~3 M1.4x5 or M1.4x7 screws (with coarse thread for plastic). there is a mount to use with FPV camera that would lift the runcam higher above the frame. I used Removable_V2_BlueJay_Canopy_with_Thumb_Pro.stl from that thing and the top part of the original Runcam Thumb 2 mount. ~~
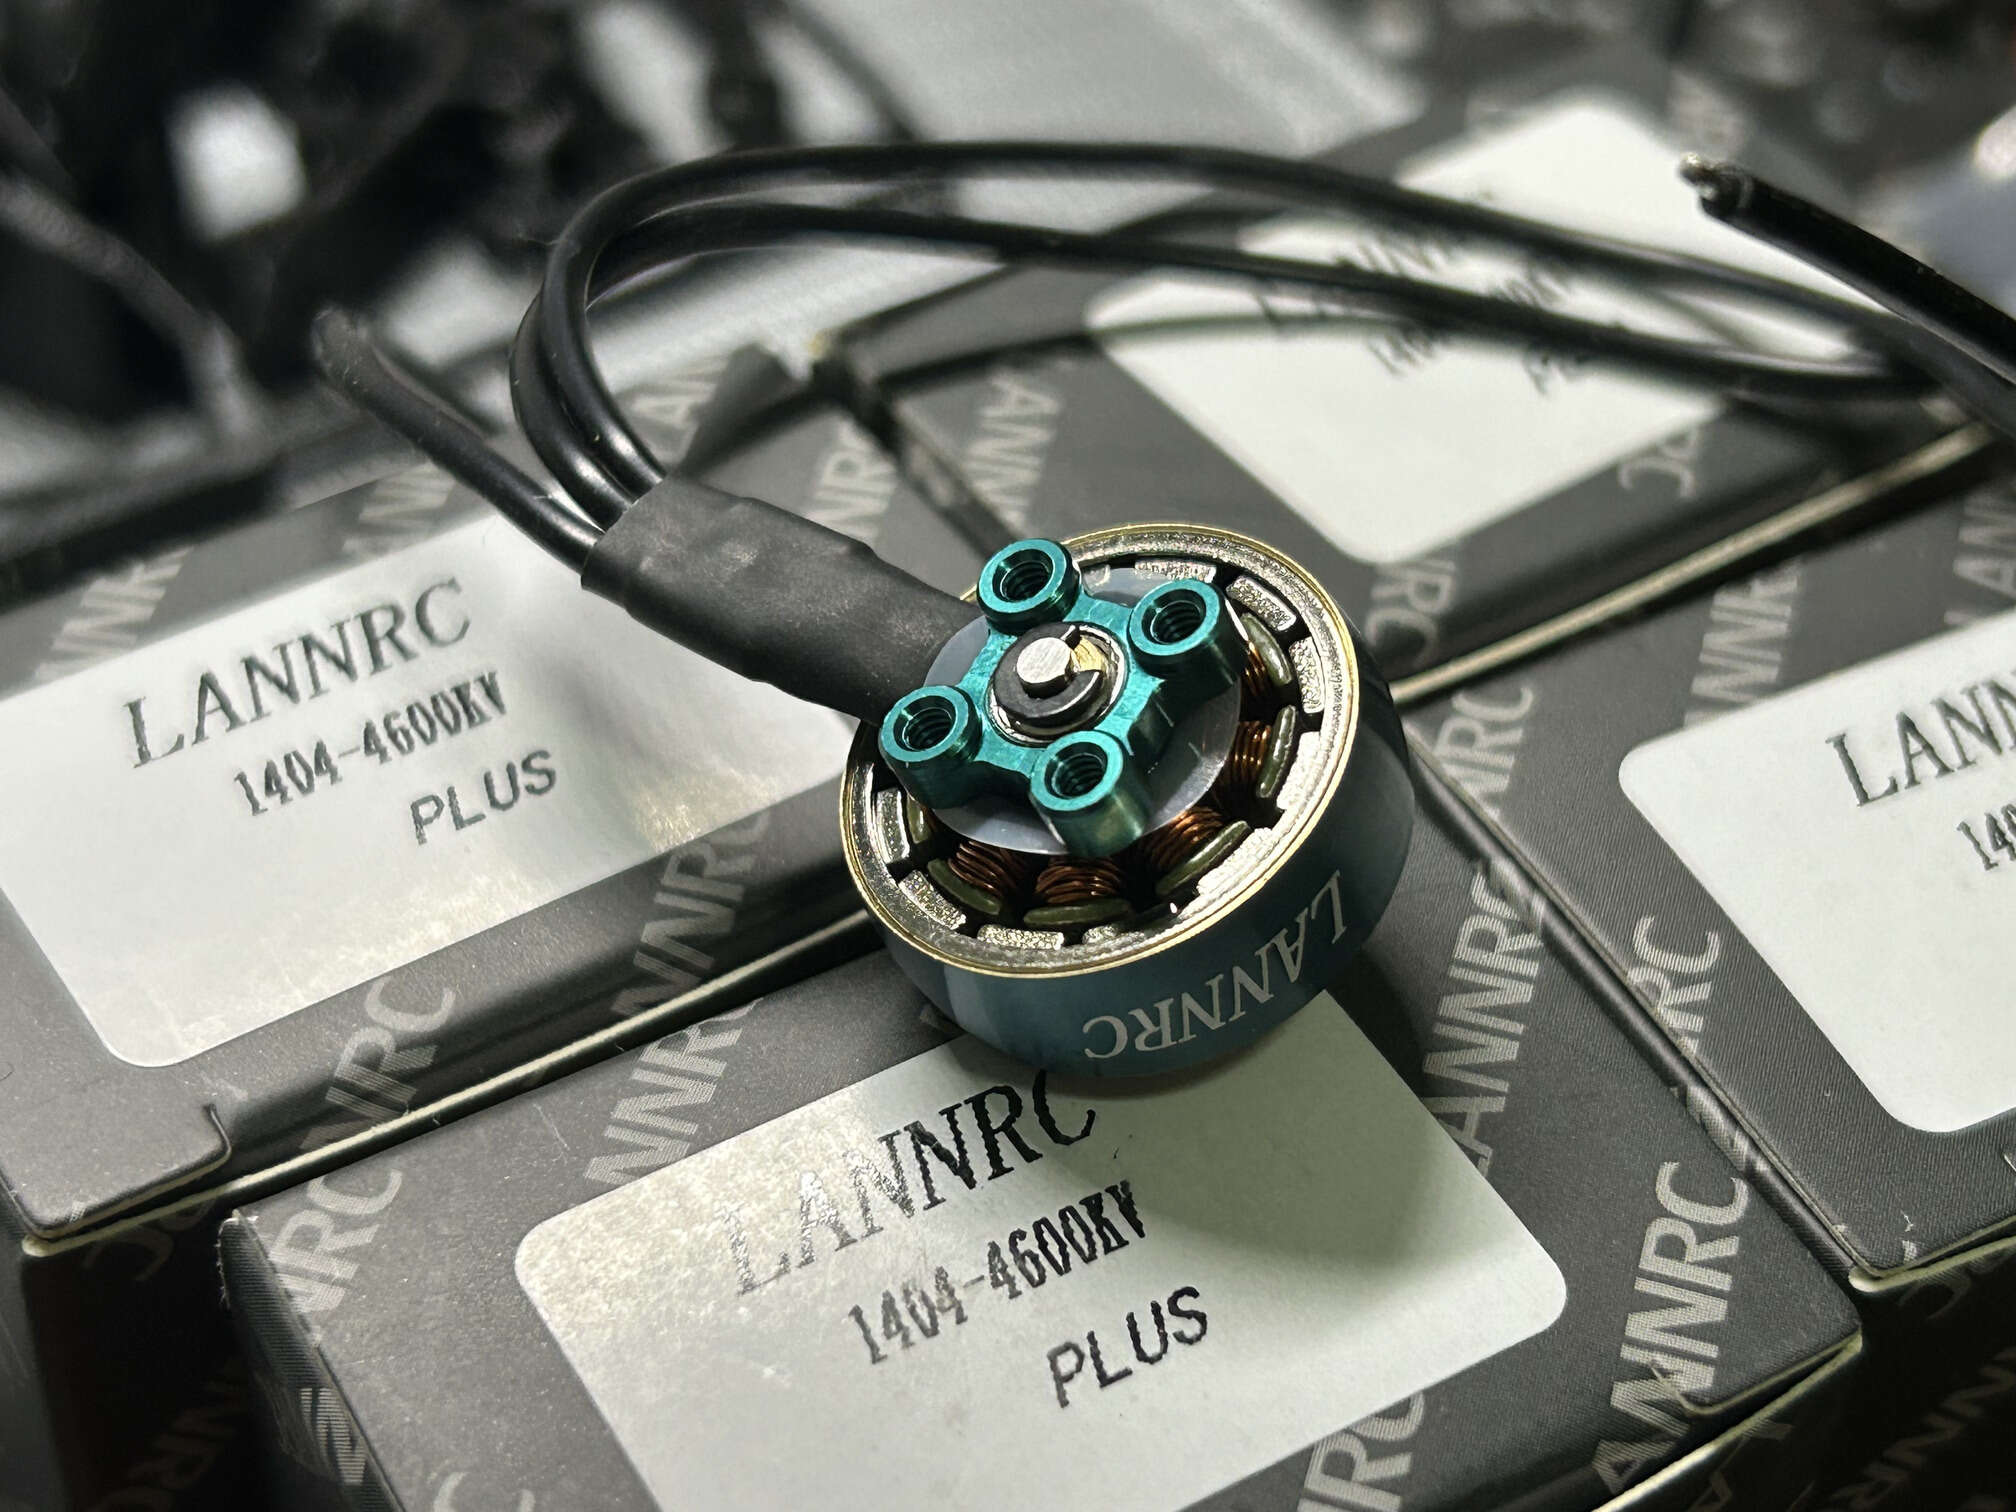
generic 1103 15000KV 2S (3 hole M1.4 base with 6mm distance, same as the betafpv 1102 motors) or better, more expensive motors like DarwinFPV bling 1103 8000KV, Happymodel EX1103 11000KV, sparkhobby xspeed 1103 8500KV
衢州市云端智能科技 (Happymodel) EX1103 11000KV 2S motors. the blueprint says the motor mounting holes are for M1.4 screws, but the actual size is M1.6x4
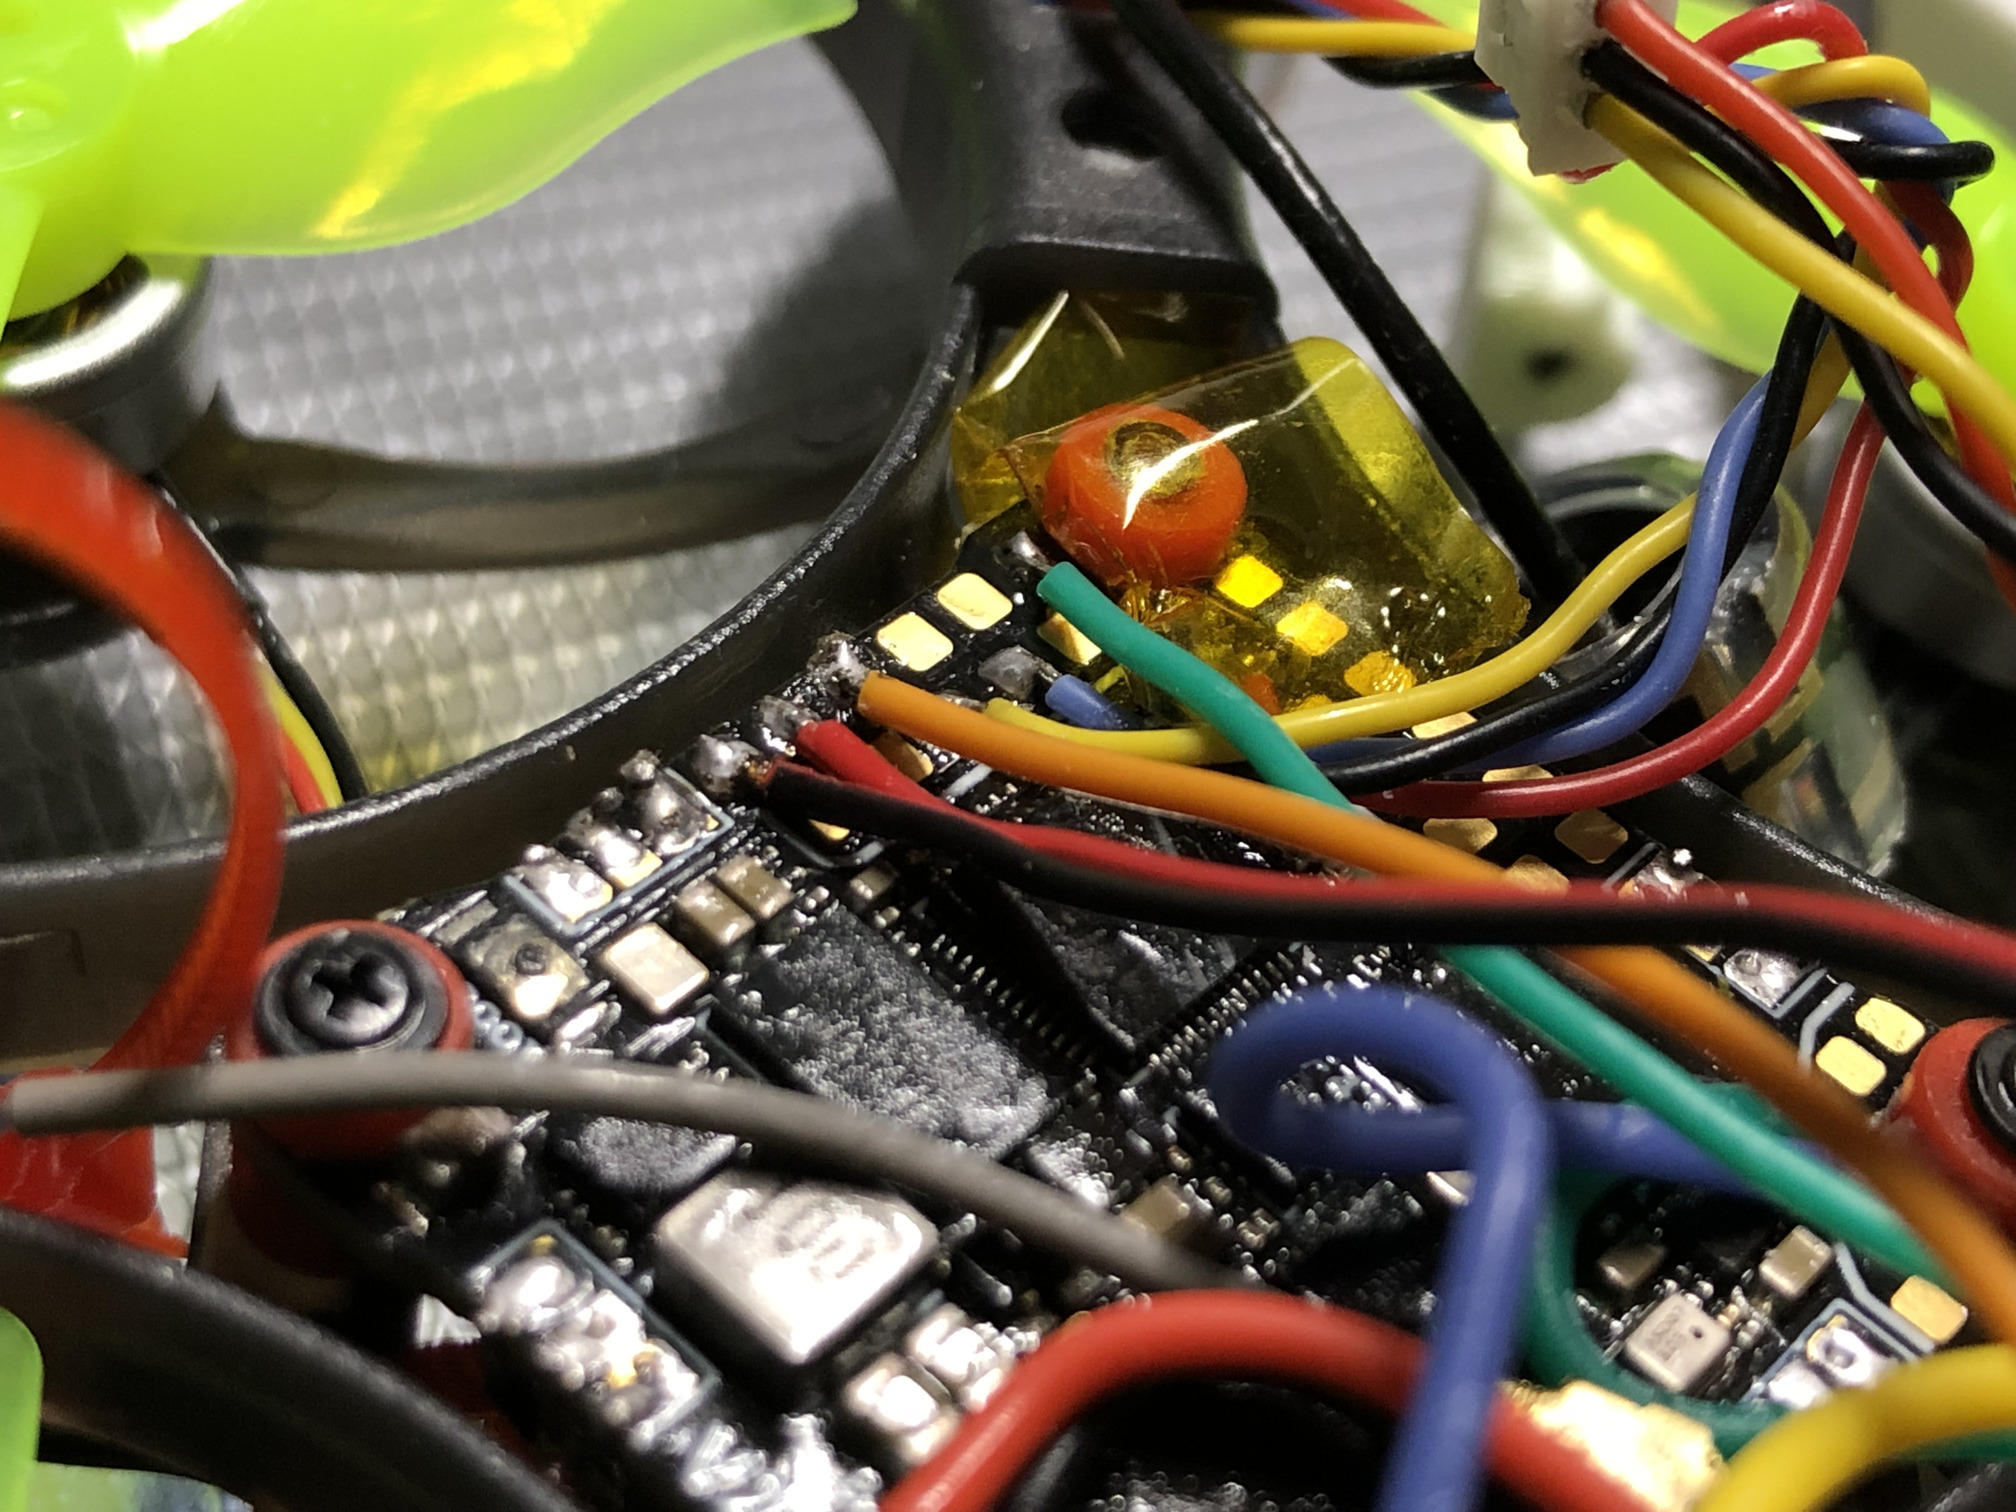
use rosin-free flux paste and 63% tin soldering thread (melts at around 183 degrees), clean the board with isopropyl alcohol after soldering. apply P-1025 conformal coating to the FC and VTX boards. add Kafuter K-705 silicon sealant (mechanically weak and easily removed) or B-7000 (strong glue) to the places where wires are soldered to the FC pads, U.FL connectors on FC and VTX. apply blue Loctite-243 onto last threads of the motor screws.
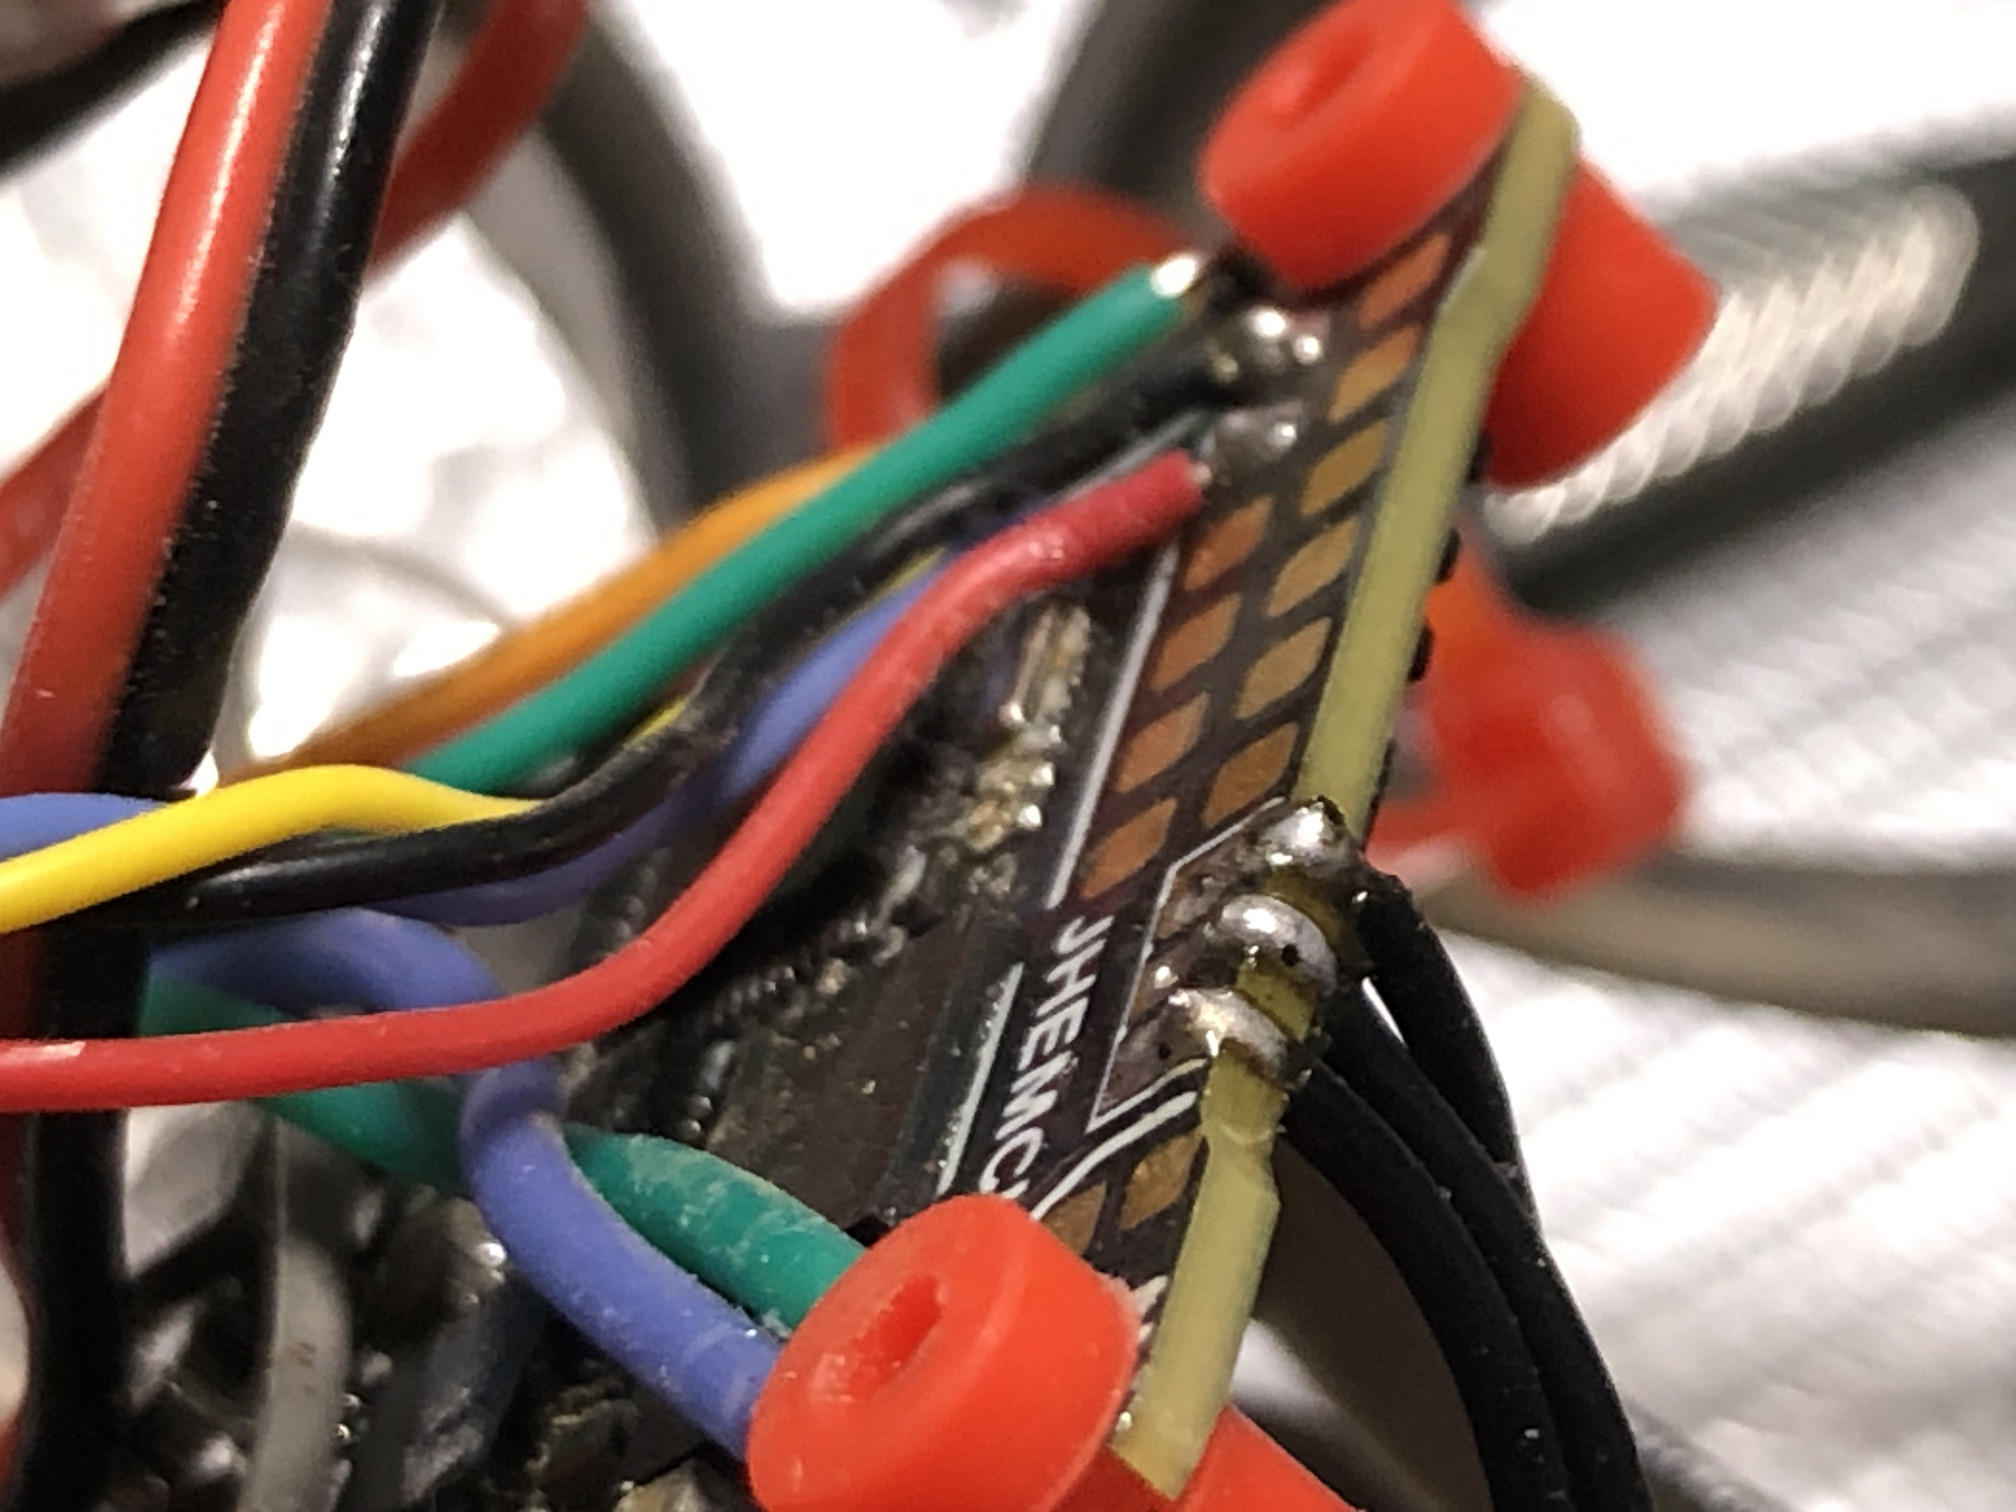
solder the frame PCB wiring +5v(red),tx3(yellow),rx3(black) to the FC. GPS is connected to the frame PCB pads. gnd is connected through the battery lead. BZ- pad is connected to the Runcam’s PWM.
Caddx Ant camera settings (using OSD menu board): AE mode to BLC=3, brightness=35, contrast auto, saturation manual=20
set up softserial. set PID loop frequency to 1/2 or 1/4 (and enable gyro low pass 2) if the cpu load is too high with softserial enabled. add ` -DUSE_SOFTSERIAL -DUSE_CAMERA_CONTROL` flags to the firmware.
set camera power in modes to softserial1, set softserial1 protocol to runcam in ports
set the switch to trigger mode in edgetx, set mode user1 in betaflight to AUX6. pad signal is inverted by adding 128 to 1 in box1, so triggering user1 sets the BZ- pad momentarily to LOW (0V)
this maps LED_STRIP pad (it is also possible to use the SDA pad) resource to the first servo (servo0). servo0 is activated with AUX5 (8 here, count from 1 with 1-4 being the stick axes, 5 being AUX1 and so on). mode value 2000 on the CH10 (toggle on the radio) sets LED_STRIP pad to HIGH (3.3V). this will tell the video channel switcher to switch to VIDEO2 (runcam). the other state is LOW, which means the fpv camera (VIDEO1) will be connected to the FC by default.
radio setup
ADC Filter OFF
send radio’s RTC data to the flight controller to have correct time in blackbox files and on the OSD: go to special functions, add ON Lua bfbkgd On and turn the checkmark on
ch5 inverted, SB - arm
ch6 inverted, SA inverted (change the weight(mixes) to -100%) - left 3-pos: air (low) / acro (mid) / angle(high)
ch7 - aux3 - turtle mode
ch8 (aux4 is 3 in vtx CLI command), S2 - VTX power control
ch9 - SW5 toggle, no group (aux5 servo0) - switch between the cameras + chirp
ch10, SW6 toggle, no group (aux6) - Runcam button
CH11 (aux7) - bat profile switching
CH12 - S1 - (aux8) - OSD profile switching
add special function SW5up ply trk ready, SW6down ply trk recsrt
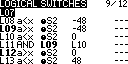
add logical switch L04 a>x tpwr 0mw, add special function L04 playval tpwr - enable
add logical switch L05 a<x rxbt 3.4V AND SB1up delay 1, add special function L05 playval rxbt 5 enable
connect the battery, reflash bluejay, target G-H-30, PWM 48kHz, version v0.21.0
1
2
3
4
5
6
7
8
9
startup boost min 1050, max 1100
rampup x3
motor timing  22.5 degrees
beep strength 40
beacon strength 80
ESC power rating 2S+
force EDT arm OFF
temperature protection Disabled (because it relies on EDT and the EDT is not working correctly here!)
beacon delay 1 min
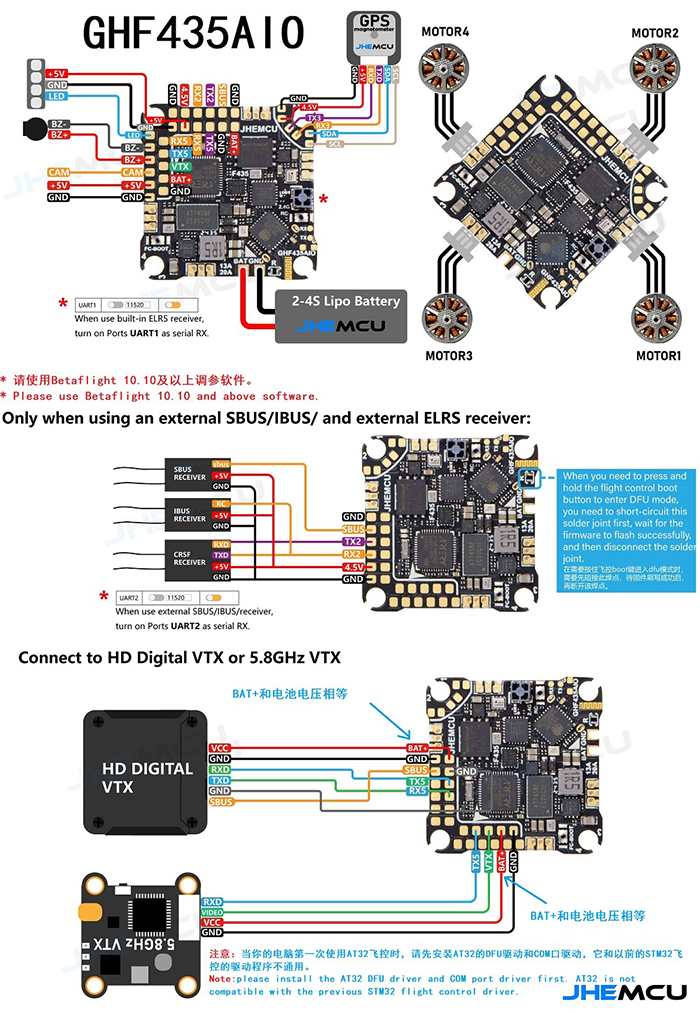
build and flash betaflight v2025.12, analog OSD, add features: camera control.
can be built locally. local build command: make JHEF435 EXTRA_FLAGS=" -D'RELEASE_NAME=2025.12.2' -DCLOUD_BUILD -DUSE_ACRO_TRAINER -DUSE_CAMERA_CONTROL -DUSE_DSHOT -DUSE_GPS -DUSE_GPS_PLUS_CODES -DUSE_LED_STRIP -DUSE_OSD -DUSE_OSD_SD -DUSE_PINIO -DUSE_SERIALRX -DUSE_SERIALRX_CRSF -DUSE_TELEMETRY -DUSE_TELEMETRY_CRSF -DUSE_VTX -DUSE_SERVOS -DUSE_ALTITUDE_HOLD -DUSE_POSITION_HOLD -DUSE_CHIRP" -j
calibrate the accelerometer. fly in angle mode and use the stick commands to adjust trim: disarm, throttle up with yaw in the center and use the right stick to add roll or pitch trim iteratively with test flights until the quad hovers level.
load elrs 150Hz rate profile
UARTS:
1
2
3
4
5
6
# serial
serial VCP 1 115200 57600 0 115200
serial UART1 0 115200 57600 0 115200
serial UART2 64 115200 57600 0 115200
serial UART3 2 115200 57600 0 115200
serial UART5 8192 115200 57600 0 115200
vtxtable bands 5
vtxtable channels 8
vtxtable band 1 BOSCAM_A A CUSTOM 5865 5845 5825 5805 5785 5765 5745 5725
vtxtable band 2 BOSCAM_B B CUSTOM 5733 5752 5771 5790 5809 5828 5847 5866
vtxtable band 3 FATSHARK F CUSTOM 5740 5760 5780 5800 5820 5840 5860 5880
vtxtable band 4 RACEBAND R CUSTOM 5658 5695 5732 5769 5806 5843 5880 5917
vtxtable band 5 IMD6 I CUSTOM 5362 5399 5436 5473 5510 5547 5584 5621
vtxtable powerlevels 4
vtxtable powervalues 25 100 200 400
vtxtable powerlabels 25 100 200 350
vtx settings
1
2
3
4
5
set vtx_band = 4
set vtx_channel = 8
set vtx_power = 1
set vtx_low_power_disarm = UNTIL_FIRST_ARM
set vcd_video_system = PAL
in-flight VTX power switching on a pot, used S2 (BF:aux4, radio:ch8). 0 means no change. <index> <aux_channel> <vtx_band> <vtx_channel> <vtx_power> <start_range> <end_range>.
battery_profile 0
# battery_profile 0
set battery_profile_name = LiHV
set bat_capacity = 720
set vbat_max_cell_voltage = 435
set vbat_full_cell_voltage = 420
set vbat_min_cell_voltage = 320
set vbat_warning_cell_voltage = 340
set force_battery_cell_count = 4
battery_profile 2
# battery_profile 2
set battery_profile_name = Li-ion
set vbat_min_cell_voltage = 250
set vbat_warning_cell_voltage = 270
set bat_capacity = 3000
set force_battery_cell_count = 4
filters for mobula8 frame and gemfan 2023 props.gyro low pass 2 can be disabled because the PID loop frequency (8KHz) is equal (pid_process_denom = 1) to the gyro update rate (8KHz), there is no antialiasing needed. also set these parameters to be profile-independent (set simplified_gyro_filter = ON and set simplified_dterm_filter = OFF):
1
2
3
4
5
6
7
8
9
10
11
12
13
14
set rpm_filter_weights = 100,20,20
set rpm_filter_min_hz = 120
set rpm_filter_fade_range_hz = 0

set simplified_gyro_filter = ON
set gyro_lpf1_static_hz = 0
set gyro_lpf2_static_hz = 0
set gyro_lpf1_dyn_min_hz = 0

set simplified_dterm_filter = OFF
set dterm_lpf1_dyn_min_hz = 82
set dterm_lpf1_dyn_max_hz = 165
set dterm_lpf1_static_hz = 82
set dterm_lpf2_static_hz = 165
changes to the rpm filters for Carbonfly80 frame and gemfan 45mm-3 props
1
2
set rpm_filter_min_hz = 160
set rpm_filter_fade_range_hz = 40
# master
set gyro_lpf1_static_hz = 0
set gyro_lpf2_static_hz = 0
set dyn_notch_count = 2
set dyn_notch_q = 350
set gyro_lpf1_dyn_min_hz = 0
set acc_trim_pitch = 2
set acc_calibration = 42,-10,-21,1
set rpm_filter_weights = 100,20,80
set rpm_filter_min_hz = 160
set rpm_filter_fade_range_hz = 40
set rpm_filter_q = 500
PIDs for the carbonfly 25 frame, tuned with PIDtoolbox using this method.
profile 3
# profile 3
set profile_name = tune
set dterm_lpf1_dyn_min_hz = 82
set dterm_lpf1_dyn_max_hz = 165
set dterm_lpf1_static_hz = 82
set dterm_lpf2_static_hz = 165
set vbat_sag_compensation = 100
set crash_dthreshold = 80
set crash_gthreshold = 600
set crash_setpoint_threshold = 500
set crash_recovery_rate = 150
set iterm_relax_type = GYRO
set iterm_windup = 85
set pidsum_limit = 1000
set pidsum_limit_yaw = 1000
set p_pitch = 75
set i_pitch = 161
set d_pitch = 68
set f_pitch = 199
set p_roll = 71
set i_roll = 153
set d_roll = 67
set f_roll = 191
set p_yaw = 71
set i_yaw = 153
set f_yaw = 191
set d_max_roll = 67
set d_max_pitch = 68
set d_max_advance = 0
set launch_control_mode = NORMAL
set thrust_linear = 20
set feedforward_averaging = OFF
set feedforward_smooth_factor = 30
set feedforward_jitter_factor = 9
set dyn_idle_min_rpm = 100
set simplified_master_multiplier = 160
set simplified_i_gain = 100
set simplified_d_gain = 140
set simplified_d_max_gain = 0
set simplified_pitch_d_gain = 90
set simplified_dterm_filter = OFF
set simplified_dterm_filter_multiplier = 110
rates
1
2
3
4
5
6
7
8
9
10
11
rateprofile 0

set rateprofile_name = sasha
rates_type = ACTUAL
set roll_rc_rate = 16
set pitch_rc_rate = 16
set yaw_rc_rate = 16
set roll_srate = 90
set pitch_srate = 90
set yaw_srate = 90
motors (important) and battery:
1
2
3
4
5
6
7
8
9
10
11
12
13
14
set dshot_bidir = ON
set dshot_bitbang = AUTO
set motor_pwm_protocol = DSHOT600
set motor_poles = 12
set bat_capacity = 720
set vbat_max_cell_voltage = 435
set vbat_full_cell_voltage = 420
set vbat_min_cell_voltage = 320
set vbat_warning_cell_voltage = 340
set beeper_dshot_beacon_tone = 3
set small_angle = 180
set dshot_edt = ON
set force_battery_cell_count = 4
set osd_units = METRIC
set osd_warn_bitmask = 270335
set osd_rssi_alarm = 20
set osd_link_quality_alarm = 80
set osd_rssi_dbm_alarm = -90
set osd_rsnr_alarm = 4
set osd_cap_alarm = 720
set osd_alt_alarm = 120
set osd_distance_alarm = 0
set osd_esc_temp_alarm = 0
set osd_esc_rpm_alarm = -1
set osd_esc_current_alarm = -1
set osd_core_temp_alarm = 70
set osd_ah_max_pit = 20
set osd_ah_max_rol = 40
set osd_ah_invert = OFF
set osd_logo_on_arming = OFF
set osd_logo_on_arming_duration = 5
set osd_arming_logo = 0
set osd_tim1 = 2560
set osd_tim2 = 2561
set osd_vbat_pos = 428
set osd_rssi_pos = 6592
set osd_link_quality_pos = 6629
set osd_link_tx_power_pos = 6597
set osd_rssi_dbm_pos = 6624
set osd_rsnr_pos = 416
set osd_tim_1_pos = 385
set osd_tim_2_pos = 14839
set osd_remaining_time_estimate_pos = 4536
set osd_flymode_pos = 6643
set osd_anti_gravity_pos = 341
set osd_g_force_pos = 375
set osd_throttle_pos = 6611
set osd_vtx_channel_pos = 4096
set osd_crosshairs_pos = 237
set osd_ah_sbar_pos = 238
set osd_ah_pos = 110
set osd_current_pos = 6635
set osd_mah_drawn_pos = 6616
set osd_wh_drawn_pos = 341
set osd_motor_diag_pos = 341
set osd_craft_name_pos = 394
set osd_pilot_name_pos = 341
set osd_gps_speed_pos = 227
set osd_gps_lon_pos = 17
set osd_gps_lat_pos = 0
set osd_gps_sats_pos = 6560
set osd_home_dir_pos = 6190
set osd_home_dist_pos = 6156
set osd_flight_dist_pos = 407
set osd_compass_bar_pos = 42
set osd_altitude_pos = 20729
set osd_pid_roll_pos = 341
set osd_pid_pitch_pos = 341
set osd_pid_yaw_pos = 341
set osd_debug_pos = 321
set osd_debug2_pos = 352
set osd_power_pos = 435
set osd_pidrate_profile_pos = 13
set osd_warnings_pos = 14729
set osd_avg_cell_voltage_pos = 14796
set osd_pit_ang_pos = 341
set osd_rol_ang_pos = 309
set osd_battery_usage_pos = 393
set osd_disarmed_pos = 14603
set osd_nheading_pos = 397
set osd_up_down_reference_pos = 252
set osd_ready_mode_pos = 14508
set osd_nvario_pos = 278
set osd_esc_tmp_pos = 54
set osd_esc_rpm_pos = 96
set osd_esc_rpm_freq_pos = 341
set osd_rtc_date_time_pos = 0
set osd_adjustment_range_pos = 341
set osd_flip_arrow_pos = 14574
set osd_core_temp_pos = 4118
set osd_log_status_pos = 341
set osd_stick_overlay_left_pos = 258
set osd_stick_overlay_right_pos = 276
set osd_stick_overlay_radio_mode = 2
set osd_rate_profile_name_pos = 20
set osd_pid_profile_name_pos = 13
set osd_profile_name_pos = 341
set osd_rcchannels_pos = 341
set osd_camera_frame_pos = 142
set osd_efficiency_pos = 341
set osd_total_flights_pos = 341
set osd_aux_pos = 341
set osd_sys_goggle_voltage_pos = 341
set osd_sys_vtx_voltage_pos = 341
set osd_sys_bitrate_pos = 341
set osd_sys_delay_pos = 341
set osd_sys_distance_pos = 341
set osd_sys_lq_pos = 341
set osd_sys_goggle_dvr_pos = 341
set osd_sys_vtx_dvr_pos = 341
set osd_sys_warnings_pos = 341
set osd_sys_vtx_temp_pos = 407
set osd_sys_fan_speed_pos = 341
set osd_stat_bitmask = 8521444
set osd_profile = 2
set osd_profile_1_name = -
set osd_profile_2_name = -
set osd_profile_3_name = -
set osd_gps_sats_show_pdop = OFF
set osd_displayport_device = AUTO
set osd_rcchannels = -1,-1,-1,-1
set osd_camera_frame_width = 24
set osd_camera_frame_height = 11
set osd_stat_avg_cell_value = OFF
set osd_framerate_hz = 12
set osd_menu_background = TRANSPARENT
set osd_aux_channel = 1
set osd_aux_scale = 200
set osd_aux_symbol = 65
set osd_craftname_msgs = OFF
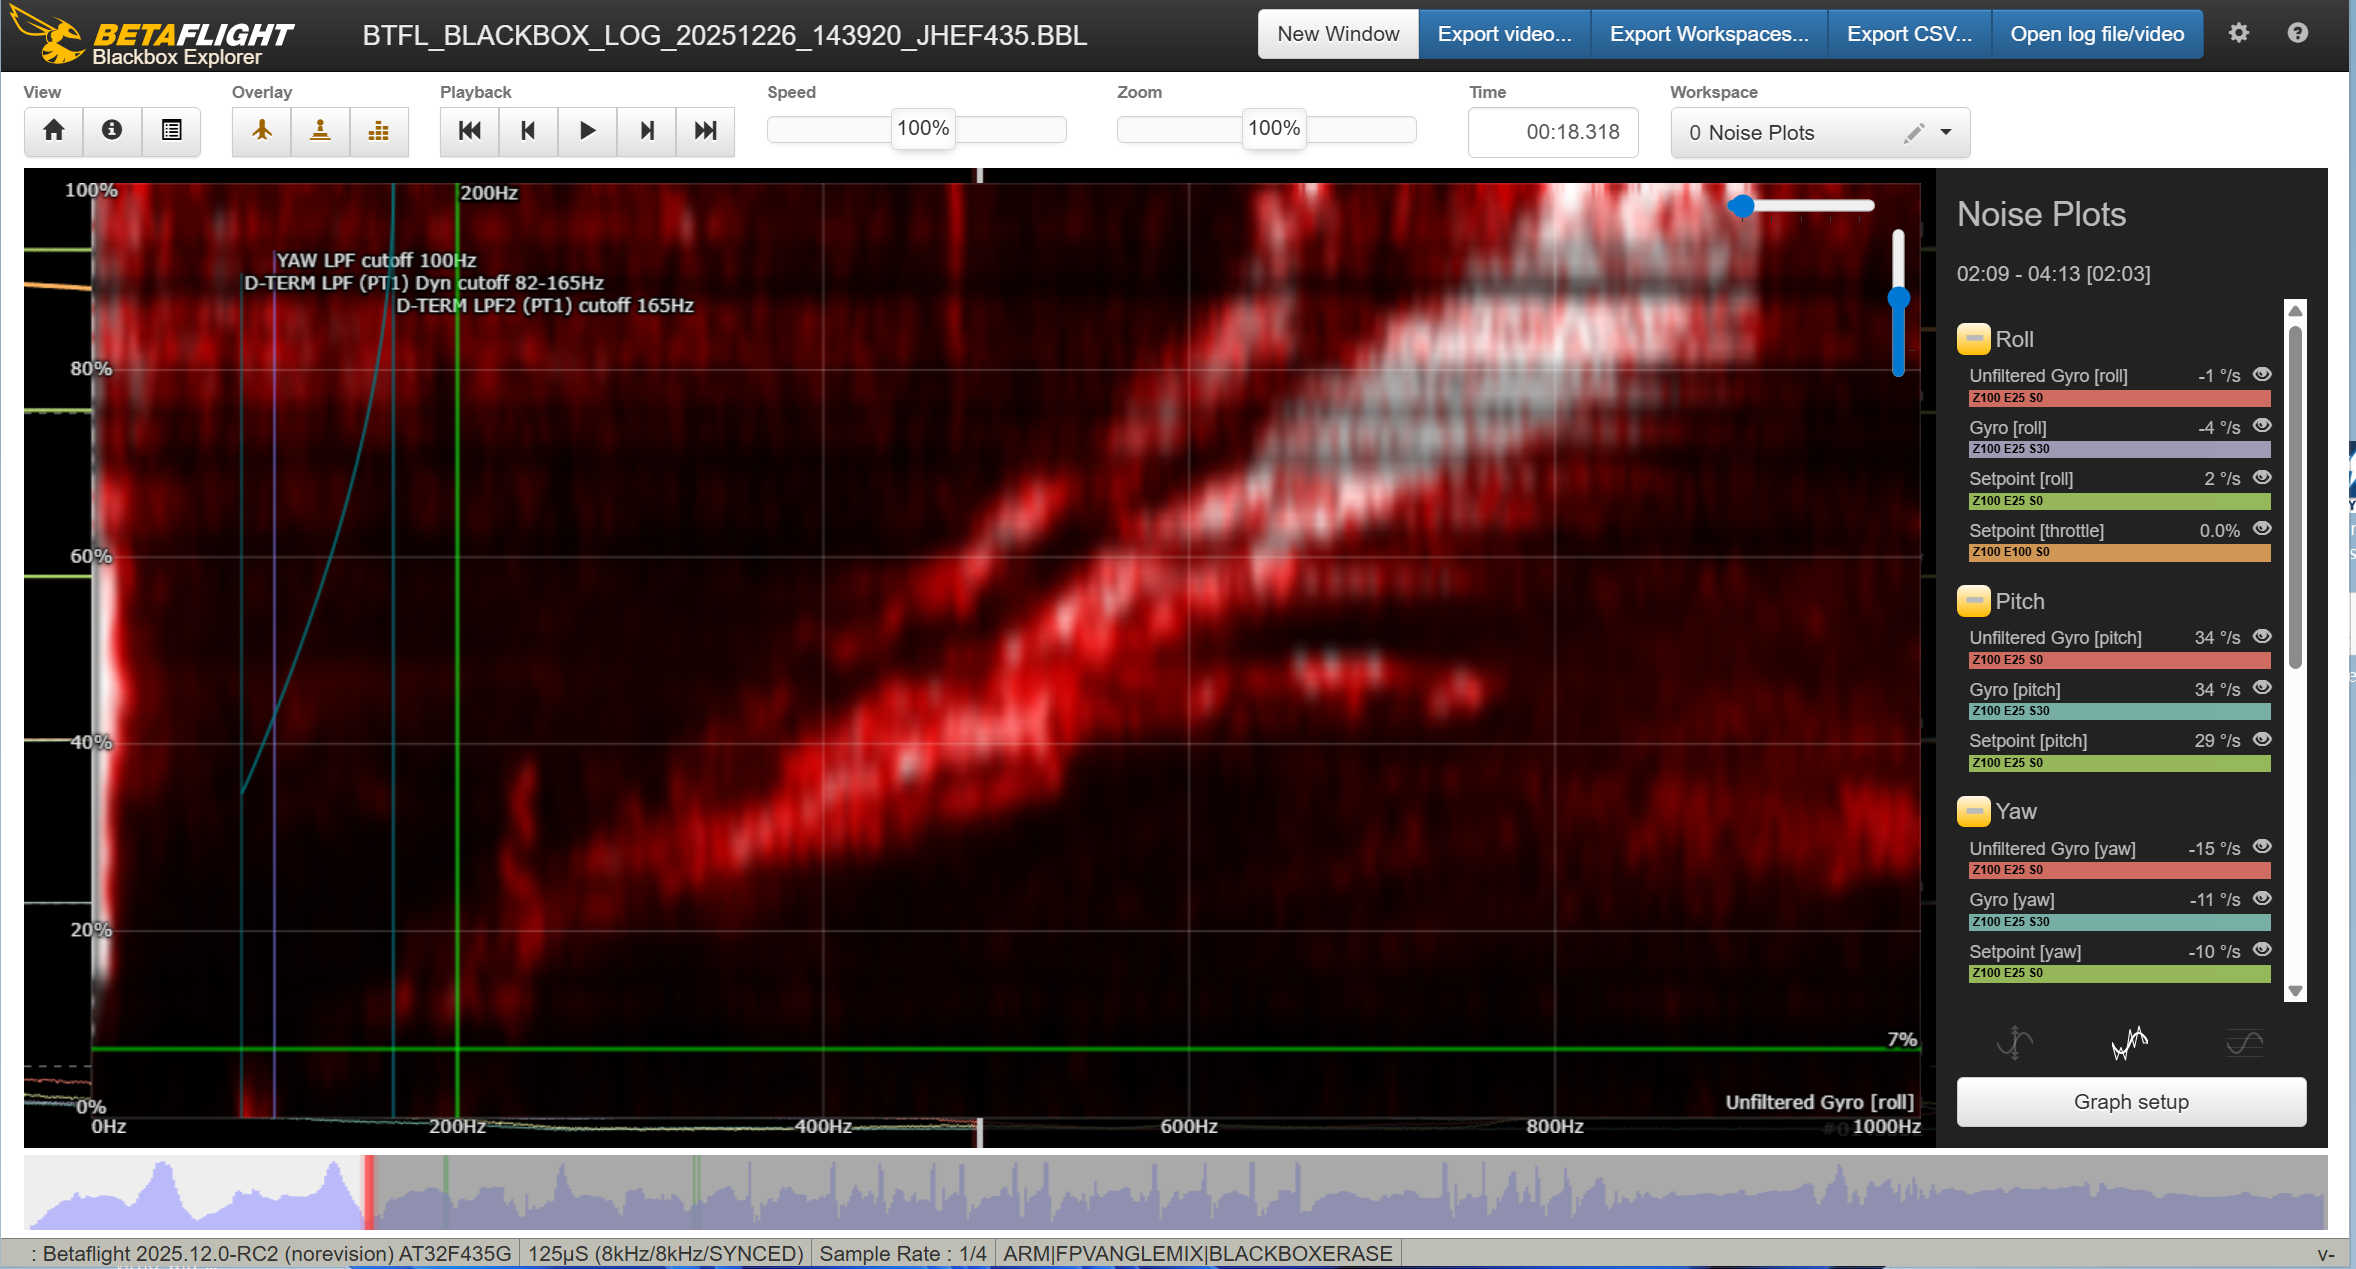
blackbox for filter tuning (2kHz). for PID tuning it will be set blackbox_sample_rate = 1/2 (4kHz). UAVTech’s workspace for blackbox viewer is here
set blackbox_sample_rate = 1/4
set blackbox_disable_gps = ON
set blackbox_disable_servos = ON
set blackbox_disable_attitude = ON
set blackbox_disable_acc = ON
set blackbox_disable_bat = ON
set blackbox_disable_alt = ON
set blackbox_disable_rssi = ON
set blackbox_disable_pids = OFF
set blackbox_disable_rc = OFF
set blackbox_disable_setpoint = OFF
set blackbox_disable_gyro = OFF
set blackbox_disable_gyrounfilt = OFF
set blackbox_disable_debug = OFF
set blackbox_disable_motors = OFF
set blackbox_disable_rpm = OFF
set blackbox_mode = NORMAL
set blackbox_high_resolution = OFF
set debug_mode = GYRO_RAW
I set debug_mode = BATTERY midway through the first part of the build to debug the voltage sag problem
(not using) GPS rescue, position hold and alt hold
just for fun, configure pos+alt hold, needs pos_hold_without_mag = ON, and then a calibration flight (a straight line for 10 meters) each time
1
2
3
4
5
6
rxfail 0 a
rxfail 1 a
rxfail 2 a
rxfail 3 s 1500
rxfail 4 h
rxfail 5 s 2000
1
2
3
4
5
6
set failsafe_delay = 15
set failsafe_switch_mode = STAGE1
set failsafe_throttle_low_delay = 100
set failsafe_procedure = GPS-RESCUE
set failsafe_recovery_delay = 5
set failsafe_stick_threshold = 30
set gps_provider = UBLOX
set gps_auto_config = ON
set gps_set_home_point_once = ON
set gps_rescue_min_start_dist = 15
set gps_rescue_alt_mode = CURRENT_ALT
set gps_rescue_initial_climb = 5
set gps_rescue_disarm_threshold = 30
set gps_rescs = 5
set gps_rescue_allow_arming_without_fix = ON
set gps_ublox_use_galileo = ON
set pos_hold_without_mag = ON
set ap_hover_throttle = 1435
set telemetry_disabled_altitude = ON
set telemetry_disabled_lat_long = ON
set telemetry_disabled_ground_speed = ON
set telemetry_disabled_heading = ON
QR code: set the camera to power on automatically when it receives power, but manual start of recording. set it to use gyro, no geometry correction, 4:3 4K 30FPS, PAL, daylight white balance, shutter 1/60, ISO manual, saturation 3, contrast 1, sharpness 1. use ISO and ND filters to adjust the exposure. stop recording before cutting the power, otherwise the end of the video file and the gyro data will be lost.
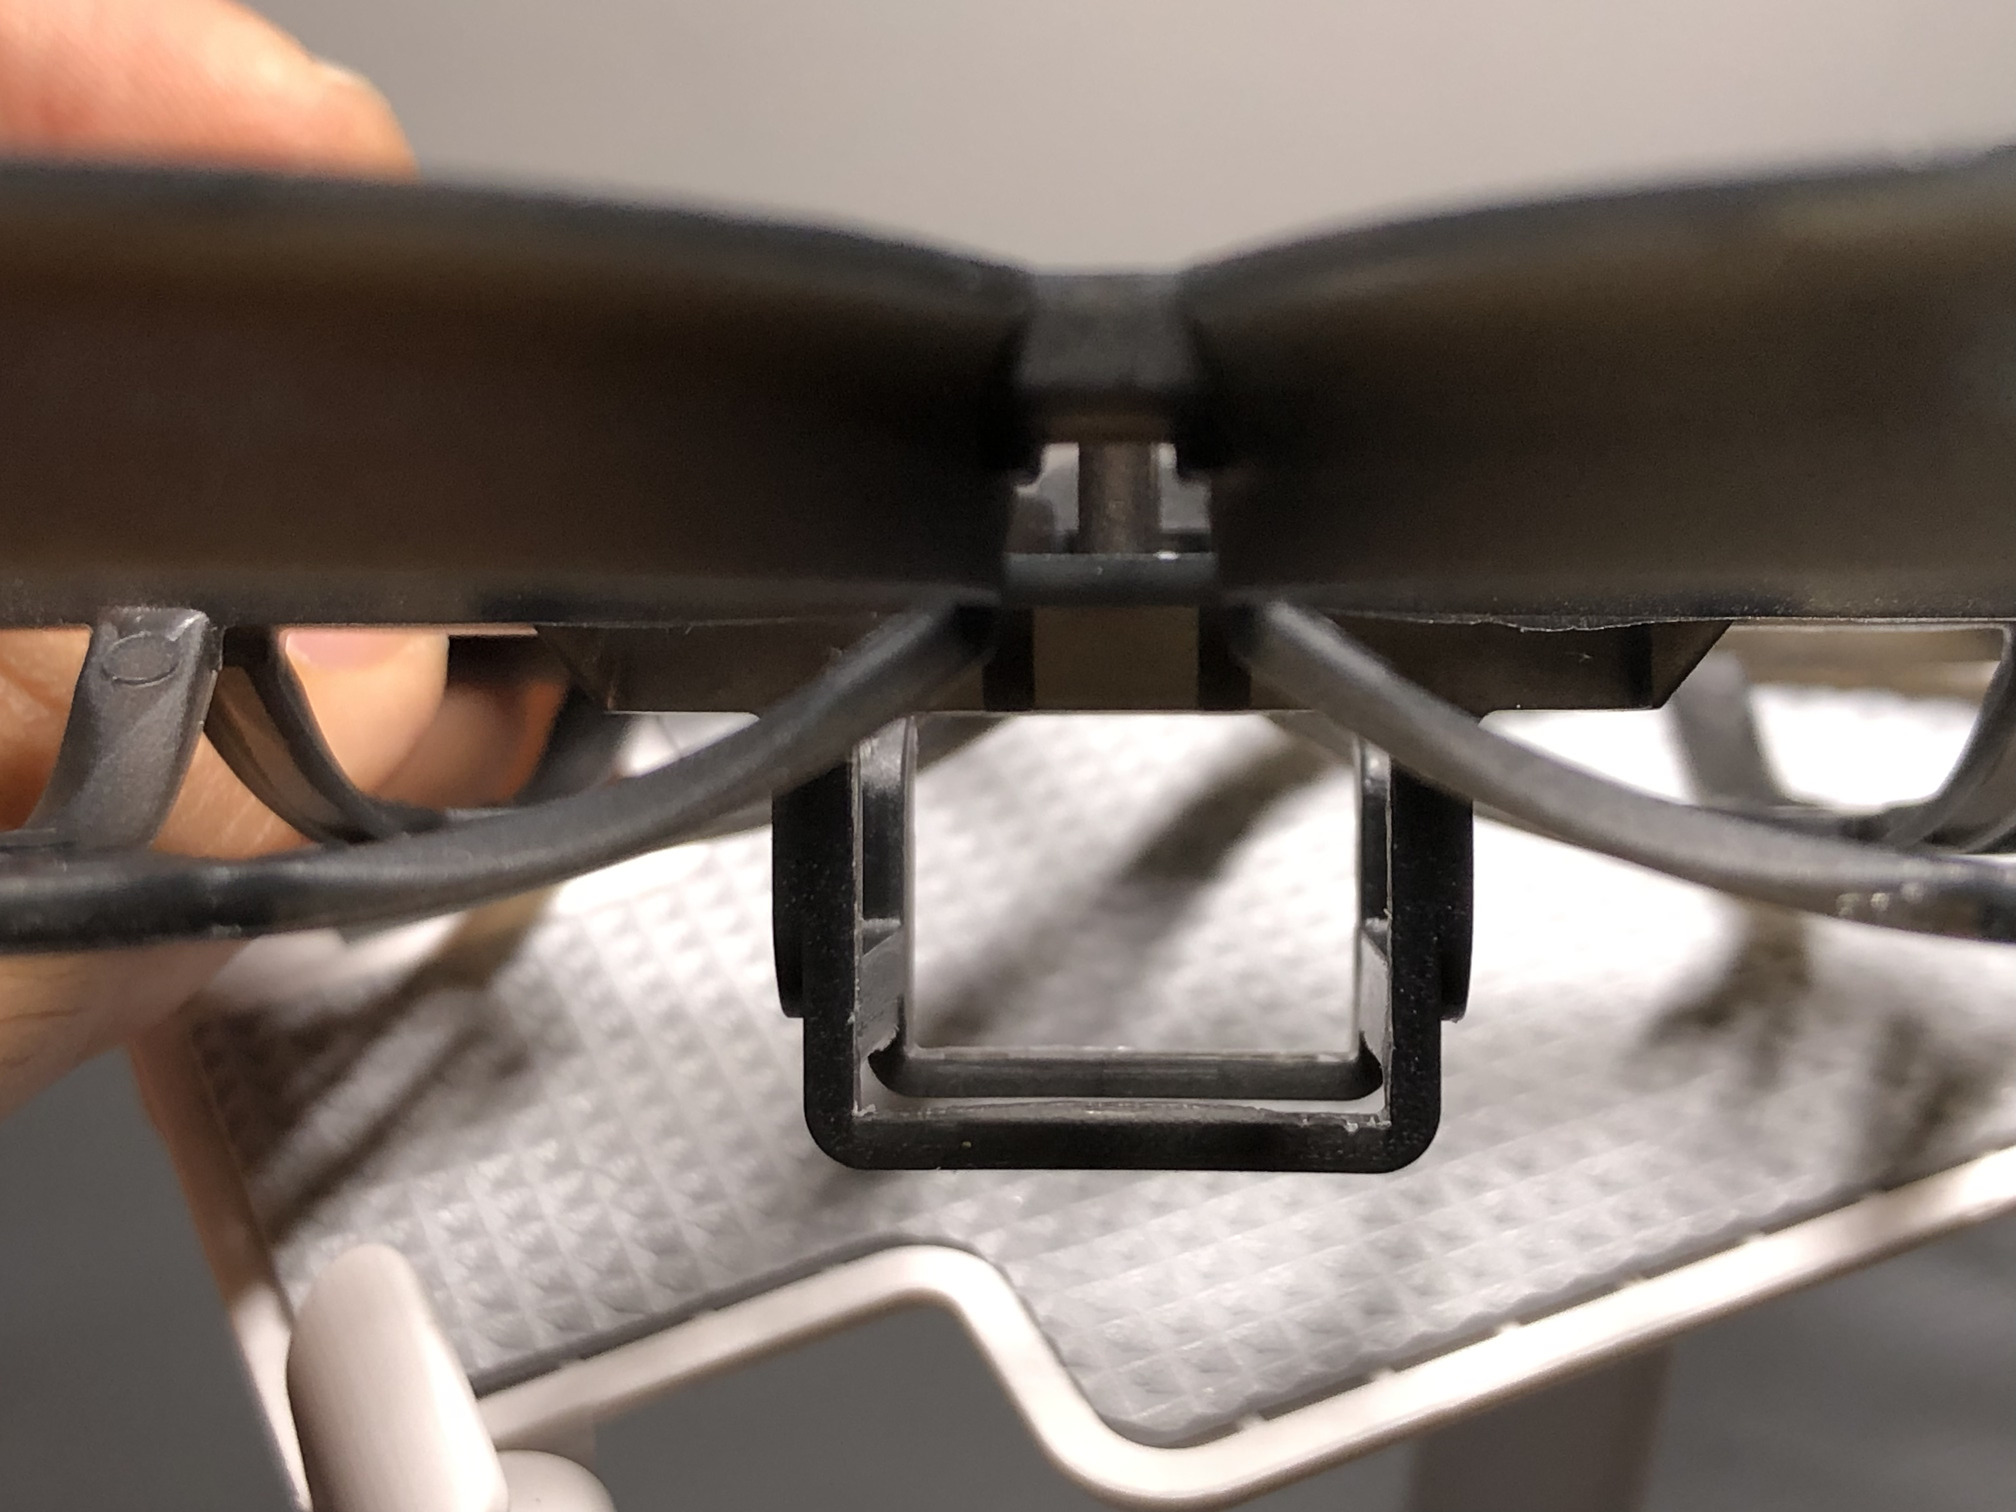
changes to motors order and board alignment after transplanting into AstroRC Carbonfly 80mm frame (same for the carbonfly 25)
the board is installed upside down in this frame. wrong alignment will trigger runaway protection on takeoff.
1
2
set align_board_roll = 180
set align_board_yaw = 45
reorder the motors (do not touch the resources), set motors direction (using Betaflight wizard or directly in Bluejay). the motors are in pusher props out configuration


