My 5inch quad
notes on my analog and Walksnail 5inch builds. in challenging environments where GPS can be spoofed and elrs jammed, the failsafe and gps rescue must be separated to prevent the flyaway (to the spoofed location). failsafe stage 2 must be set to drop, and gps rescue activated using a switch on the radio manually.
components
- FC: GEPRCF722_BT_HD_V3
- GEMFAN Vannystyle 5136-3 Propellers, pitch 3.6
gemfan hurricane 51466 v2, pitch 4.6geprc speedx2 2207.5 1960kvmotors use inner4mm*1mm rubber seal, FPM70 green materialMGC 2207.5 1960kv V4, the bearings are not very robust, the motor bells are available for sale separatelyESC JHEMCU 55A, Bluejay Target J-H-15, 48kHz- ESC JHEMCU 65A default J-H-15 - Bluejay, 0.19, 48kHz
- Mayatech Redbean gen4 RHCP antenna, 5.2-6GHz (lowest VSWR is at 5.7GHz), 3dBi gain, MMCX L-shape with 93mm cable.
pictures
 |  | - |
 |  |  |
 |  | - |
wiring
analog
1
2
3
4
uart1 - vtx (irc tramp)
uart2 - ELRS (serial rx)
uart4 - Bluetooth (msp)
uart5, SCL(pad marked T3 on this FC), SDA(pad marked R3 on this FC) - GPS
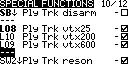
video switcher PWM to LED_STRIP. FPV camera fully is wired to the switcher VIDEO1, VIDEO2 is the runcam. runcam is powered from +5V, rx to FCs R1 (softserial 1). swither is powered from the camera’s 5V.
assembly (analog and Walksnail)
- add TVS diode to the battery input on th ESC in addition to the capacitor. use solid state capacitor 470uF 35V (negative terminal colored in red), hard mount it (isolated) to the frame but connect to the PDB/ESC using wires, not it’s leads (otherwise the leads will rip themselves out of the capacitor in a crash).
- install the Walksnail VTX, do not hard mount it to the frame, use rubber dampers and zip ties or a 3D-printed mount. otherwise the VTX casing will tear itself apart during a crash. keep the VTX case and antenna’s shield isolated from the frame.
- solder VTX to FC’s UART1 (or any other UART by default used by VTX) pins, but power it from +9v. measure the voltage on the 5V pad if there is no 9V pad on the FC, a FC had power on VTX pads marked 5V on the board but the pad was actually providing 9V.
- solder GPS module to the FC’s default GPS UART, also solder SCL and SDA pins to the FC’s I2C bus pins to connect the magnetometer. if the only free UART rx is used for ESC telemetry, set
Current meter sourcetoonboard ADCand setESC_SENSORto off in betaflight Power & Battery tab to free the UART. in Ports, set the UART’s sensor to GPS, rate to 57600. place the GPS module as far away from digital VTX antennas as possible, inverse square law applies to RF interference. - connect Walksnail VTX and DVR with the jumper cable (white dot aligns with the white wire, white wires are facing the side with u.fl connectors), flash them and the goggles with the same latest firmware https://caddxfpv.com/pages/download-center
- remove the jumper cable
- Create Avatar_cfg_wifi_off.txt (empty file) and place it on the SD card and power on the goggles to disable wifi.
- upload custom high resolution font to the goggles (Betaflight custom OSD font should not be called BTFL, otherwise Walksnail goggles will freeze and require restart when playing back OSD with DVR)
- fonts
- third party 720p 1080p and 2.7k 4k.
_24suffix is for 720p,_36is for 1080p,_40pis for 2.7k,_60pis for 4k resolution. - another font for 1080p and 720p
- other fonts
- original: https://cdn.shopify.com/s/files/1/0036/3921/4169/files/FC_OSD_Font_Update.rar?v=1717745825
- third party 720p 1080p and 2.7k 4k.
- copy
font_update.ini(duplicate sections to support switching between multiple FC systems) and the png files to the sd card and boot the goggles - manually set the font and the FC type in the goggles menu
- fonts
- bind the goggles to the VTX
- add a layer of conformal coating after soldering all the wires. add more coating on the connectors after plugging them in. I used
Kafuter K-705, but it’s viscosity is too high so it makes a thick layer when spread on a PCB. Use it for sealing where a thick layer is required: holes on the VTX case, ESC heatsink.P-1025forms a thinner layer, use it on the FC PCB to be able to resolder pads more easily later. apply the coating to all the electronic boards (including all the edges of multilayer PCBs), all JST SH connectors and gaps on the VTX and camera casing. naturally, leave out the barometer chip on the FC (and the barometer on the GPS module like M10DQ), and be careful not to leak the compound onto the camera sensor. conformal coating does not affect heat dissipation of the ICs on the FC and ESCs, because it mainly happens through the PCB and the wires. - use
B-7000to secure the antenna post - add a rubber plug to the USB C port.
- (optional) add copper foil shielding covered with insulation tape to the cables (camera, GPS, VTX, RX).
- apply blue
Loctite-243onto last threads of all screws except those that- hold the camera
- hold the top plate
- all wires must have some slack. multiple wires must be twisted together
- for analog, do not use caddx ratel2 camera (high latency problem), use runcam nano2 1.8mm (f/1.2, 700TVL) or Runcam Racer Nano4 (1200 TVL, 160 degrees)
radio
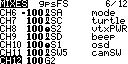
- ch5 aux1 SB inverted (change the weight in mixes to -100%) - right 3-pos: arm (high) -
- ch6 aux2 SA inverted (change the weight in mixes to -100%) - left 3-pos: air (low) / acro (mid) / angle(high)
- ch7 aux3 SC - left momentary sw - turtle mode
- ch8 aux4 S2 - VTX power adjustment
- ch9 aux5 SD - right momentary sw - beeper + chirp
- ch10 aux6 S1 - OSD profile switching
- ch11 aux7 sw5 2pos - Runcam/FPV cam switch
- ch12 G2 - (aux8) SW1 failsafe 1100-1250, SW2 gps rescue 1300-1400, SW3 alt hold + pos hold 1500-1600
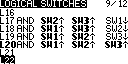
- in setup -> customizable switches: SW1, SW2, SW3 are in group 1, type 2POS.
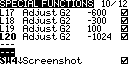
- in special functions: L17 down adjust global variable G2 to -600, L18 down adjust global variable G2 to -300, L19 down adjust global variable G2 to 100, L20 down adjust global variable G2 to -1024
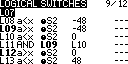
- in logical switches: L17 SW2up AND SW3up AND SWITCH SW1down, L18 SW1up AND SW3up AND SWITCH SW2down, L19 SW1up AND SW2up AND SWITCH SW3down, L20 SW1up AND SW2up AND SWITCH SW3up
- in mixes: CH12 is set to G2
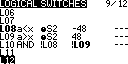
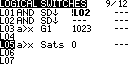
- add logical switch
L04 a>x tpwr 0mw, add special functionL04 playval tpwr - enable - add logical switch
L05 a<x rxbt 3.6V AND SB1up delay 1, add special functionL05 playval rxbt 5 enable
ELRS
- https://expresslrs.github.io/web-flasher/
ESCs (Bluejay)
- props out
- J-H-15 - Bluejay, 0.21.0
- use https://esc-configurator.com or build the same app locally to flash and setup latest Bluejay firmware to the ESCs, https://github.com/bird-sanctuary/bluejay/releases
- 48kHz PWM (might lower the noise floor)
- startup boost min 1025, max 1050
- temperature protection Disabled
- force EDT arm OFF
- rampup x9
- motor timing 15 degrees (22.5 if there are any desyncs)
- beacon delay infinite (to not to draw attention to a downed quad)
- readjust motors direction,
set yaw_motors_reversed = ONif some of the motors are being reversed (props out) - beep strength and beacon strength must not be set too low, it will cause TELEM_DSHOT error at startup
- ESCs reboot right after plugging in the battery might be related to dshot600 (there is no such problem on dshot300)
ESCs (AM32)
- https://am32.ca/
betaflight
- compile apps and firmware locally
make GEPRCF722_BT_HD_V3 EXTRA_FLAGS="-D'RELEASE_NAME=2025.12.2' -DCLOUD_BUILD -DUSE_ACRO_TRAINER -DUSE_ALTITUDE_HOLD -DUSE_DSHOT -DUSE_GPS -DUSE_GPS_PLUS_CODES -DUSE_LED_STRIP -DUSE_MAG -DUSE_OSD -DUSE_OSD_SD -DUSE_PINIO -DUSE_POSITION_HOLD -DUSE_SERIALRX -DUSE_SERIALRX_CRSF -DUSE_TELEMETRY -DUSE_TELEMETRY_CRSF -DUSE_VTX -DUSE_SERVOS -DUSE_CHIRP"
- check that FC is working, save the output of
dumpanddiff all showdefaultsto separate files - check the current version and the board name with
version - for cloud builds:
statusto find BUILD_KEYcurl https://build.betaflight.com/api/builds/[BUILD KEY]/json | tee factory.json | jqto find/save the features enabled in the current firmware. alsocurl https://build.betaflight.com/api/builds/[BUILD KEY]/log. the firmware itself is at/hex
- build the firmware locally, in CLI run
blto enter the bootloader mode and then flash the flight controller, adding featuresAltitude Hold,Position Hold,Magnetometers, and custom defines for the particular magnetometer microchip used, likeMAG MAG_QMC5883 - restore parts of the diff as needed (for instance, PID and filter settings of profile0)
- disable location-related information in the ELRS telemetry:
1
2
3
4
5
set telemetry_disabled_altitude = ON
set telemetry_disabled_lat_long = ON
set telemetry_disabled_ground_speed = ON
set telemetry_disabled_heading = ON
save
configure betaflight (issue
savebefore leaving the CLI):set crash_recovery = DISARM- self-explanatory, very helpful.- Power & Battery tab. calibrate the voltage and amperage using an external multimeter.
- calibrate the accelerometer. fly in angle mode and use the stick commands to adjust trim: disarm, throttle up with yaw in the center and use the right stick to add roll or pitch trim iteratively with test flights until the quad hovers level.
- if the GPS module also has a barometer that conflicts with the barometer on the flight controller (would manifest like this: the FC won’t boot again after being powered on by USB only which doesn’t power the GPS module and the FC’s onboard barometer, and then saving changes to the FC’s configuration), disable automatic barometer detection by
set baro_hardware = BMP280 - check the datasheet for the magnetometer chip for its XYZ axis alignment, dry fit the GPS module on the drone frame with magnetometer axes pointing in the same directions as the the default Betaflight directions, then set the actual installed orientation difference with in the CLI like
1
2
3
4
5
6
7
8
9
10
11
12
13
14
15
16
set mag_hardware = QMC5883
set align_mag = CUSTOM
# when located at the tail angled mount with the socket facing forward
set mag_align_roll = 0
set mag_align_pitch = 2150
set mag_align_yaw = 0

# when located in the front with the socket facing backwards
set mag_align_roll = 1800
set mag_align_pitch = 0
set mag_align_yaw = 0

# when located in the front with the socket facing forward
set mag_align_roll = 0
set mag_align_pitch = 1800
set mag_align_yaw = 0
the rotation is centered around the dot on the microchip, so the pitch 215 means that the magnetometer chip was rotated (from the default alignment for the Betaflight, when X axis is pointing forward, Y axis is pointing to the left and Z axis is pointing up) 215 degrees counter-clockwise (pitch up rotation) around the dot on the chip on the Y axis when looking from the right side of the drone. pitch down rotation would be a negative value increasing from -360. might temporary enable debugging for
MAG_CALIBin the blackbox tab to check the alignment on the sensors tab (debugcheckbox). the axis pointing to the magnetic North will have the highest value. - find the correct magnetic declination value for the region, then set it in CLI like
set mag_declination = xxxandsave - calibrate the magnetometer
- make note of the current values using
get mag - enter the calibration mode using stick commands: pitch low with roll centered, throttle high and yaw fully right
- two short beeps would confirm entering the calibration mode
- rotate the drone in any direction at a rate exceeding 350 deg/s to begin the calibration
- the beeper will beep fast 7 times, blue LED on the FC will go solid
- rotate the drone (FC) around all 3 axes for 30 seconds
- two long beeps - failure
- three medium beeps - success. check with
get mag
- make note of the current values using
- connect the controller and set up the modes:
- arm set to high (set the mix weight to -100 in EdgeTX to invert the channel if needed)
- also add
ORwith turtle mode channel to this mode, to bypass the need to rearm in turtle mode
- also add
- angle, acro, default (AIR mode)
- beeper
- turtle mode
- failsafe
- gps rescue
- arm set to high (set the mix weight to -100 in EdgeTX to invert the channel if needed)
- set up the
stage 1failsafe. it is needed to get the drone into a level flight with a bit of recovery climb. for instance (numbering here starts from 0, 0-3 are the stick input channels): throttle (channel 4) set 1300, arm (channel 5) hold, angle mode (channel 6) set 20001 2 3 4
# rxfail rxfail 3 s 1300 rxfail 5 s 2000 save
set up the
stage 2failsafe,failsafe_procedure = GPS-RESCUE. auto-land is more problematic, because it’s uncontrollable, does not account for the wind, and the motors will still be spinning for some time after landing untilfailsafe_landing_timeruns out. it will disarm itself afterfailsafe_landing_timeregardless it has landed or not, it will be midair iffailsafe_throttleis not low enough. landing on a hard even surface is not a problem, and at 1100 throttle (1000 is idle and around 1275 is hover) it even should be enough forcrash_recoveryto disarm the drone. but it will be a problem if landing on uneven softer surface like grass, plus props being entangled in it will melt the prop’s shafts and unwind the nuts even on idle speed. the same will happen if the drone bounce and flip while autolanding on a relatively hard surface, but the impact is not hard enough forcrash_recoveryto disarm it.- misc settings (disabling beacon here too)
1
2
3
4
feature -AIRMODE
beeper -ON_USB
beacon -RX_LOST
beacon -RX_SET
set up gps return to home (edit the altitude):
1
2
3
4
5
6
7
8
9
10
11
12
13
14
15
16
17
set failsafe_delay = 15
set failsafe_throttle_low_delay = 300
set failsafe_procedure = GPS-RESCUE
set gps_ublox_use_galileo = ON
set gps_set_home_point_once = ON
set gps_rescue_alt_mode = FIXED_ALT
set gps_rescue_return_alt = 15
set gps_rescue_ascend_rate = 1000
set gps_rescue_ground_speed = 1500
set gps_rescue_max_angle = 50
set gps_rescue_descent_dist = 10
set gps_rescue_min_sats = 6

set failsafe_landing_time = 60
set failsafe_throttle = 1100

save
- modes
1
2
3
4
5
6
7
8
9
10
aux 0 0 0 1900 2100 0 0
aux 1 0 2 1900 2100 0 0
aux 2 1 1 1900 2100 0 0
aux 3 3 7 1500 1600 0 0
aux 4 27 7 1100 1275 0 0
aux 5 11 7 1500 1600 0 0
aux 6 46 7 1300 1400 0 0
aux 7 13 4 1700 2100 0 0
aux 8 28 1 900 1100 0 0
aux 9 35 2 1925 2100 0 0
- load
RC_LINKpreset for the corresponding mode, for example, ELRS 150Hz (options:freestyle, serial, single cell). low rc smoothing will cause hot motors on extreme PIDs in Motors tab, turn on bidirectional DShot, set highest protocol that is supported by the ESCs:
1
2
3
4
5
6
7
8
9
10
11
12
set dshot_bidir = ON
set motor_pwm_protocol = DSHOT600
set dshot_edt = ON
set bat_capacity = 1050
set vbat_max_cell_voltage = 430
set vbat_full_cell_voltage = 410
set vbat_min_cell_voltage = 330
set vbat_warning_cell_voltage = 360
set baro_hardware = DPS310
set motor_poles = 14

save
props off, check that Extended DSHOT Telemetry is working:
1
2
3
dshotprog 255 13
motor 255 1060
dshot_telemetry_info
in PID profile, set dynamic idle depending on the propeller parameters, anti-gravity, voltage sag compensation (depends on
vbat_warning_cell_voltage), thrust linearization:1 2 3 4 5 6
set dyn_idle_min_rpm = 40 set vbat_sag_compensation = 100 set thrust_linear = 20 set anti_gravity_gain = 110 set small_angle = 180 save
- filters and PID tuning
set motor_output_limit = 90to avoid burning the ESCs- (not using) for filming with walksnail camera, configure the blackbox for minimum logging of gyro data to use with the Gyroflow later. gyroflow Walksnail lens profile is here. gyroflow walksnail howto. download combined logs using download function in betaflight configurator, not removable media mode (and then erase the flash):
1
2
3
4
5
6
7
8
9
10
11
12
13
set blackbox_mode = NORMAL
set blackbox_sample_rate = 1/16
set blackbox_disable_pids = ON
set blackbox_disable_rc = ON
set blackbox_disable_setpoint = ON
set blackbox_disable_bat = ON
set blackbox_disable_mag = ON
set blackbox_disable_alt = ON
set blackbox_disable_rssi = ON
set blackbox_disable_debug = ON
set blackbox_disable_motors = ON
set blackbox_disable_gps = ON
save
- set up the OSD
1
2
3
4
5
6
7
8
9
10
11
12
13
14
15
16
17
18
19
20
21
22
23
24
25
26
27
28
29
30
31
32
33
34
35
36
37
38
39
40
41
42
43
44
45
set osd_rssi_dbm_alarm = -102
set osd_alt_alarm = 120
set osd_vbat_pos = 4563
set osd_rssi_pos = 4544
set osd_link_quality_pos = 6629
set osd_link_tx_power_pos = 4549
set osd_rssi_dbm_pos = 6624
set osd_rsnr_pos = 448
set osd_tim_1_pos = 417
set osd_tim_2_pos = 14840
set osd_remaining_time_estimate_pos = 4537
set osd_flymode_pos = 6643
set osd_g_force_pos = 375
set osd_throttle_pos = 4531
set osd_vtx_channel_pos = 4128
set osd_crosshairs_pos = 237
set osd_ah_sbar_pos = 238
set osd_ah_pos = 110
set osd_current_pos = 6635
set osd_mah_drawn_pos = 6617
set osd_motor_diag_pos = 4524
set osd_craft_name_pos = 394
set osd_gps_speed_pos = 4323
set osd_gps_lon_pos = 17
set osd_gps_lat_pos = 0
set osd_gps_sats_pos = 4512
set osd_home_dir_pos = 4171
set osd_home_dist_pos = 4172
set osd_flight_dist_pos = 439
set osd_compass_bar_pos = 4138
set osd_altitude_pos = 20726
set osd_debug_pos = 481
set osd_avg_cell_voltage_pos = 14796
set osd_battery_usage_pos = 457
set osd_disarmed_pos = 6442
set osd_nheading_pos = 4147
set osd_ready_mode_pos = 6348
set osd_nvario_pos = 278
set osd_esc_tmp_pos = 407
set osd_flip_arrow_pos = 6382
set osd_core_temp_pos = 4153
set osd_rate_profile_name_pos = 20
set osd_pid_profile_name_pos = 374
set osd_sys_vtx_temp_pos = 407
set osd_stat_bitmask = 8521444
- blocked motors alarm
1
set osd_esc_rpm_alarm = 1000
RSSI is on AUX12 (no need to configure it)
set crashflip_rate = 25for turtle mode automationanalog VTX setup. geprc 1.6w
1
2
3
4
5
6
7
8
9
10
11
12
13
vtxtable bands 8
vtxtable channels 8
vtxtable band 1 BOSCAM_A A CUSTOM  5865 5845 5825 5805 5785 5765 5745 5725
vtxtable band 2 BOSCAM_B B CUSTOM  5733 5752 5771 5790 5809 5828 5847 5866
vtxtable band 3 BOSCAM_E E CUSTOM  5705 5685 5665 5645 5885 5905 5925 5945
vtxtable band 4 FATSHARK F CUSTOM  5740 5760 5780 5800 5820 5840 5860 5880
vtxtable band 5 RACEBAND R CUSTOM  5658 5695 5732 5769 5806 5843 5880 5917
vtxtable band 6 BAND_L   L CUSTOM  5362 5399 5436 5473 5510 5547 5584 5621
vtxtable band 7 BAND_U   U CUSTOM  5325 5348 5366 5384 5402 5420 5436 5456
vtxtable band 8 BAND_O   O CUSTOM  5474 5492 5510 5528 5546 5564 5582 5600
vtxtable powerlevels 4
vtxtable powervalues 25 200 600 1600
vtxtable powerlabels 25 200 600 1W6
1
2
3
4
5
6
set vtx_band = 5
set vtx_channel = 8
set vtx_power = 2
set vtx_low_power_disarm = UNTIL_FIRST_ARM
set vtx_freq = 5917
set vcd_video_system = PAL
- in-flight VTX power switching on a pot, used S2 (BF:aux4, radio:ch8). 0 means no change.
<index> <aux_channel> <vtx_band> <vtx_channel> <vtx_power> <start_range> <end_range>
1
2
3
4
vtx 0 3 0 0 1 900 1249
vtx 1 3 0 0 2 1250 1499
vtx 2 3 0 0 3 1500 1749
vtx 3 3 0 0 4 1750 2100
- the radio reporting current VTX power level with audio messages can be set up like this (this is a 4-level 350mw max VTX example, for this VTX it would be
25,200,600,1600):
 |  |  |
- in-flight OSD profile switching on a pot. I use S1, set it to CH10 (AUX6 in BF)
1
adjrange 0 0 5 900 2100 29 5 0 0
filter tuning
runcam
(not using) runcam camera control with PINIO
https://www.betaflight.com/docs/wiki/guides/current/Pinio-and-PinioBox
this FC has Bluetooth connectivity and PINIO1 is used to disable it on ARM.
default mappings https://github.com/betaflight/unified-targets/tree/master/configs/default
compile Betaflight with led_strip, enable led strip in configuration tab. set switch to trigger mode in edgetx. pad signal is inverted by adding 128 to 1 in box2, so triggering user1 sets the LED_STRIP pad momentarily to LOW (0V)
original
1
2
3
4
5
resource LED_STRIP 1 A01
resource PINIO 1 C13
resource PINIO 2 C14
pinio_config = 129,1,1,1
pinio_box = 0,40,255,255
actual change
1
2
3
4
5
resource LED_STRIP 1 none
resource pinio 2 A01
set pinio_config = 129,129,1,1
set pinio_box = 0,40,255,255
save
video source switcher control with servo output.
the switcher’s manual says it uses PWM 3.3V, 50Hz, duty 5-10%
1
2
3
4
5
6
7
8
resource
resource LED_STRIP 1 none
resource servo 1 A01
feature LED_STRIP
feature SERVO_TILT
feature -CHANNEL_FORWARDING
set servo_pwm_rate = 50
servo 0 1000 2000 1500 100 10
CH11 toggle, AUX7
(not using) softserial for controlling Runcam
add -DUSE_SOFTSERIAL -DUSE_CAMERA_CONTROL flags to the firmware. remap serial rx 1 resource to softserial 1 RX, BEEPER- to softserial 1 TX
1
2
3
4
5
6
7
8
resource
resource SERIAL_RX 1 A10
resource SERIAL_RX 1 none
resource SOFTSERIAL_RX 1 A10

resource BEEPER 1 C15
resource BEEPER 1 none
resource SOFTSERIAL_TX 1 C15
camera power in modes on AUX8
rates
load five33, 533 rate profile (use Actual) as a starting point
1
2
3
4
5
6
7
8
set rateprofile_name = sasha
rates_type = ACTUAL
set roll_rc_rate = 16
set pitch_rc_rate = 16
set yaw_rc_rate = 16
set roll_srate = 90
set pitch_srate = 90
set yaw_srate = 90
PIDs and filters
tuning for performance. set pidsum_limit before tuning, tune filters first, then tune PIDs with PIDtoolbox using this method. about filter weights. also about tuning
1
2
3
4
5
6
7
8
9
10
11
12
13
14
15
16
17
18
19
20
21
22
23
24
25
26
27
28
29
30
31
32
33
34
35
36
37
38
39
40
41
42
43
44
45
46
47
# master
set gyro_lpf1_type = PT2
set gyro_lpf1_static_hz = 0
set dyn_notch_q = 350
set gyro_lpf1_dyn_min_hz = 0
set gyro_lpf1_dyn_max_hz = 650

set rpm_filter_weights = 100,60,80
set rpm_filter_q = 750
set rpm_filter_min_hz = 120
set rpm_filter_fade_range_hz = 0


profile 3

# profile 3
set profile_name = tune4
set vbat_sag_compensation = 100
set anti_gravity_gain = 90
set pidsum_limit = 1000
set pidsum_limit_yaw = 1000
set p_pitch = 62
set i_pitch = 110
set d_pitch = 58
set f_pitch = 98
set p_roll = 53
set i_roll = 95
set d_roll = 46
set f_roll = 86
set p_yaw = 53
set i_yaw = 95
set f_yaw = 86
set d_max_roll = 46
set d_max_pitch = 58
set d_max_advance = 0
set motor_output_limit = 95
set thrust_linear = 20
set feedforward_averaging = OFF
set feedforward_jitter_factor = 9
set dyn_idle_min_rpm = 50
set simplified_master_multiplier = 120
set simplified_d_gain = 130
set simplified_d_max_gain = 0
set simplified_feedforward_gain = 60
set simplified_pitch_d_gain = 110
set simplified_pitch_pi_gain = 110
references
- https://support.runcam.com/hc/en-us/articles/360014537794-RunCam-Device-Protocol
- Chris Rosser’s 5inch prop test results